How to Customize MediViews
MediViews are presets that control how medical records are displayed in a case — which record types are visible, which fields are shown, how they are formatted, and how records are grouped and sorted.
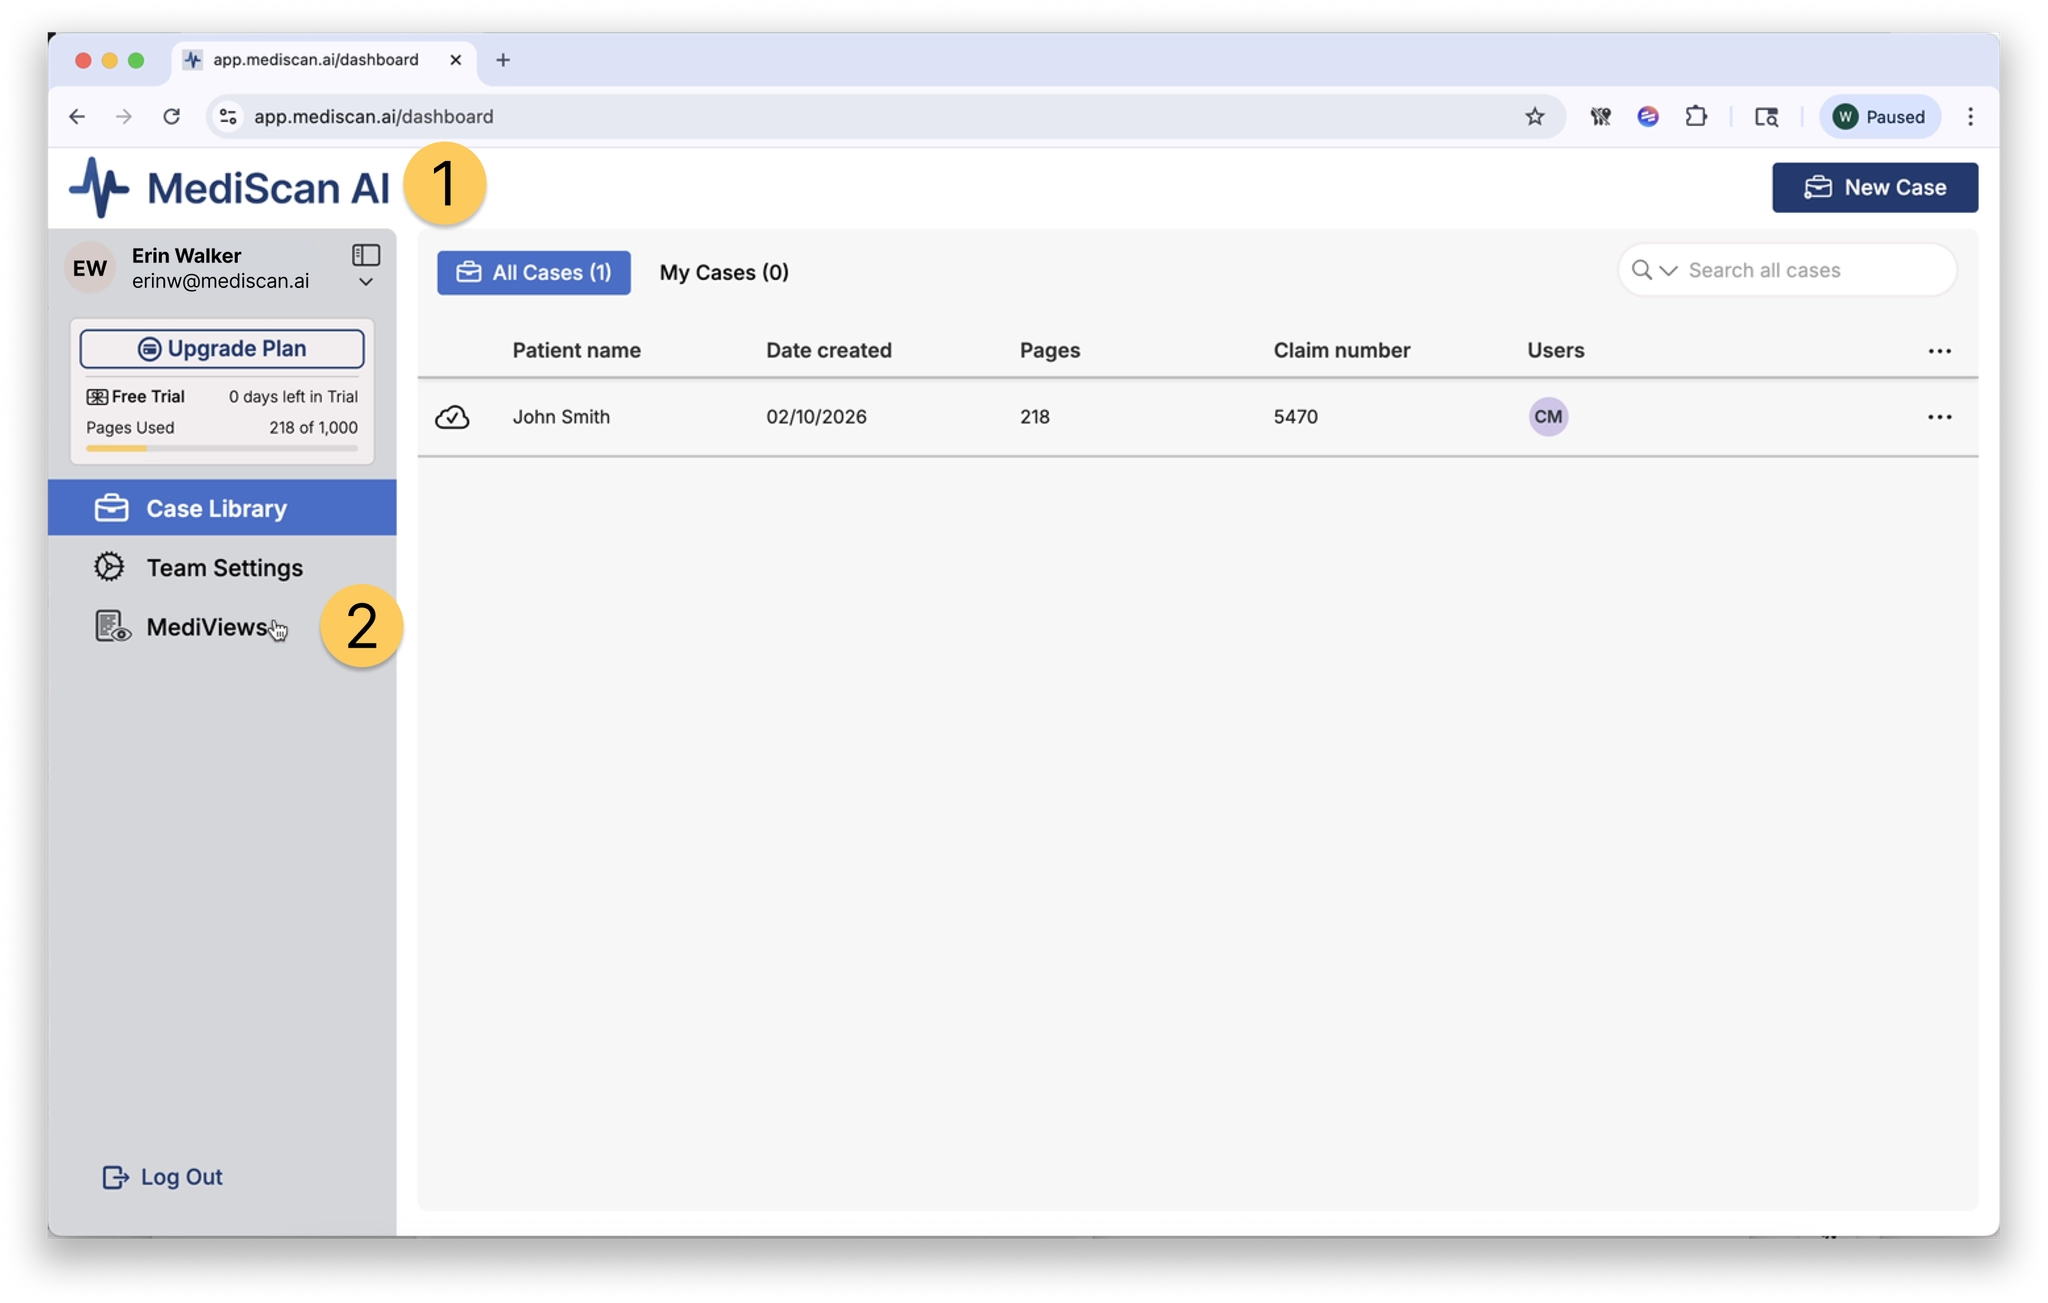
Navigate to MediViews
- Click the MediScan AI logo in the upper left corner to go to the home page.
- In the left sidebar, click MediViews.
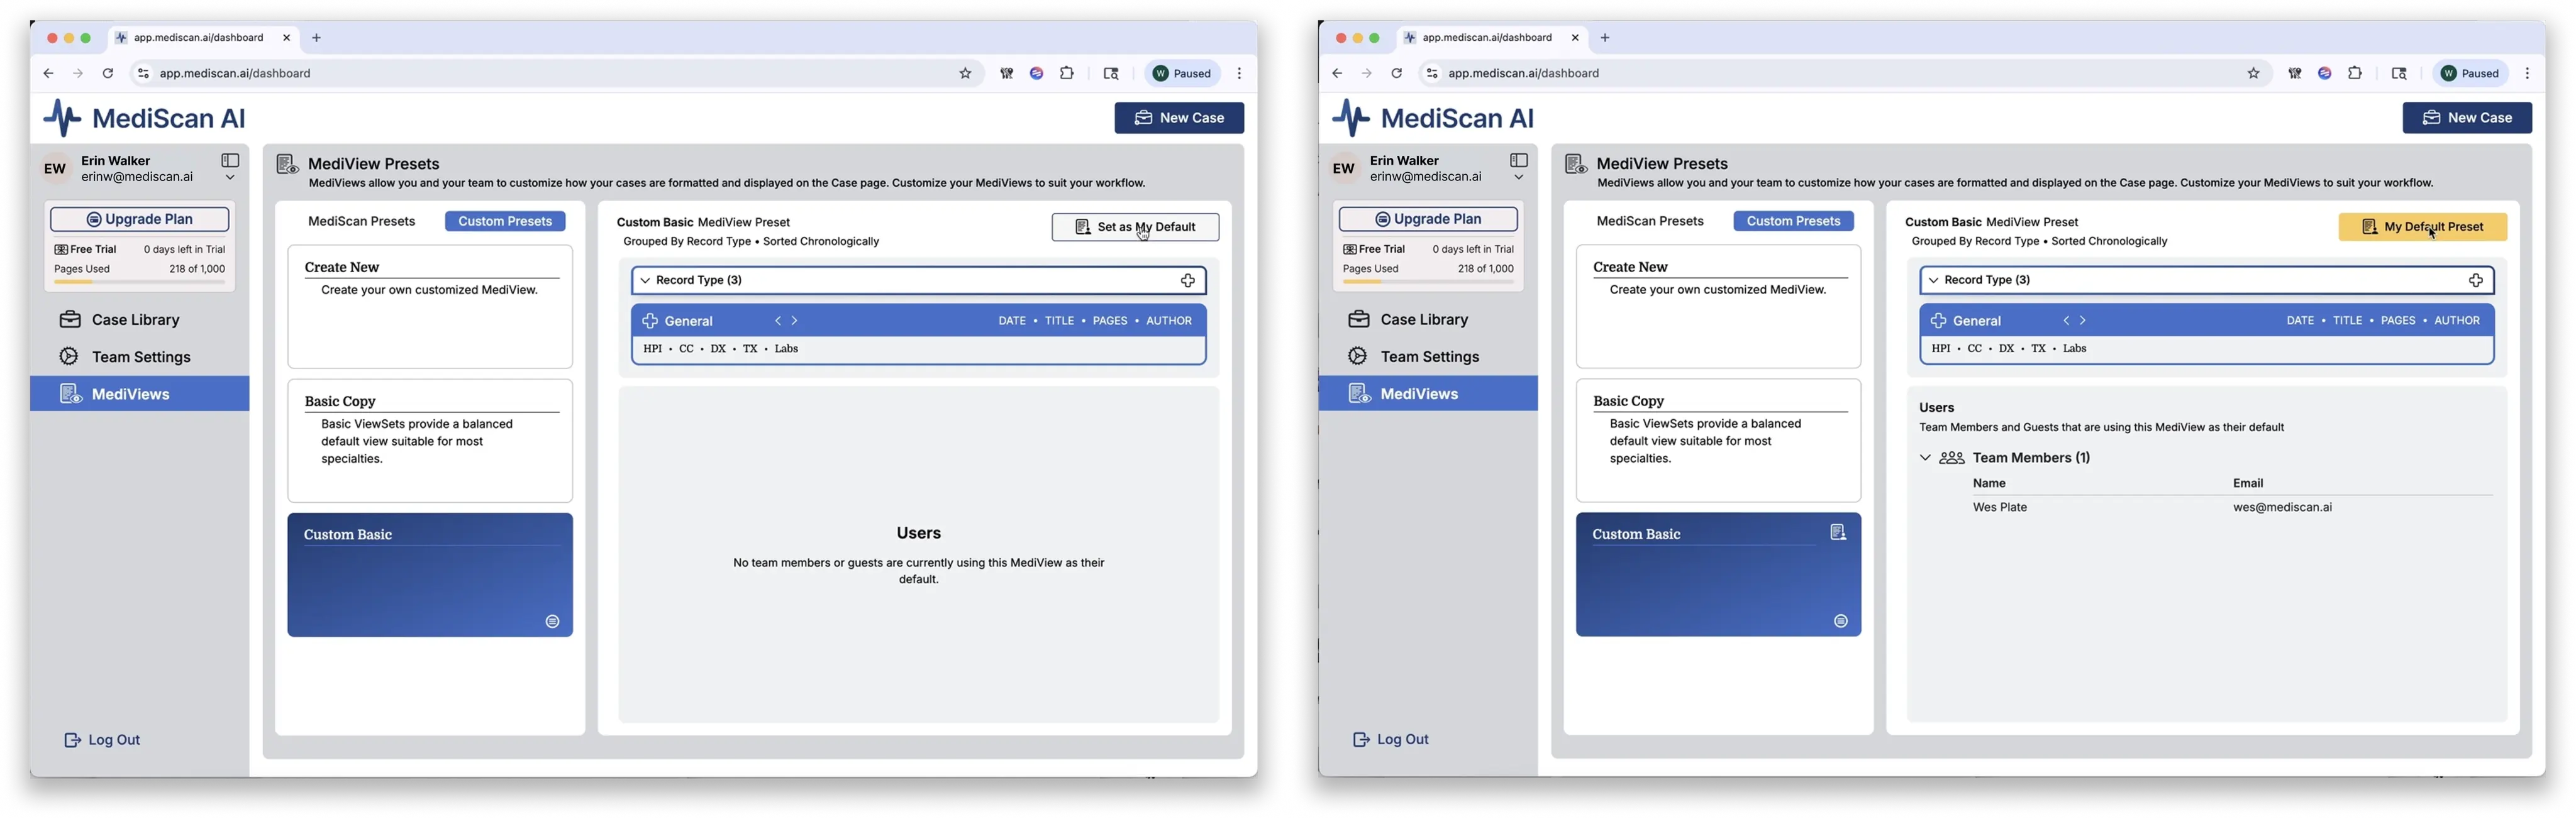
The MediViews Presets Page
The MediViews page lists both the built-in presets provided by MediScan AI and any custom presets your team has created.
With the MediScan Presets tab selected on the left, you will see four built-in MediView presets. You can use these directly or use them as a starting point to build your own custom versions.
Selecting a preset shows its details across two panels:
- Left panel — the settings configured in the selected preset
- Right panel — the preset name, whether grouping is enabled, and the sorting option; below that, a preview of the record headers shown in the MediScan AI records panel
Use the left and right chevron buttons to cycle through different medical record types and see which fields are enabled for each.
At the bottom of the right panel, you will see a list of team members who have this preset set as their default.
Default Presets
Your default preset is the MediView that loads automatically when you open a new case. You can always switch presets while viewing a case, but your default is what is used when you first open one.
The button in the upper right corner of the interface shows whether the currently selected preset is your default. If it is not, you can set it as your default from there.
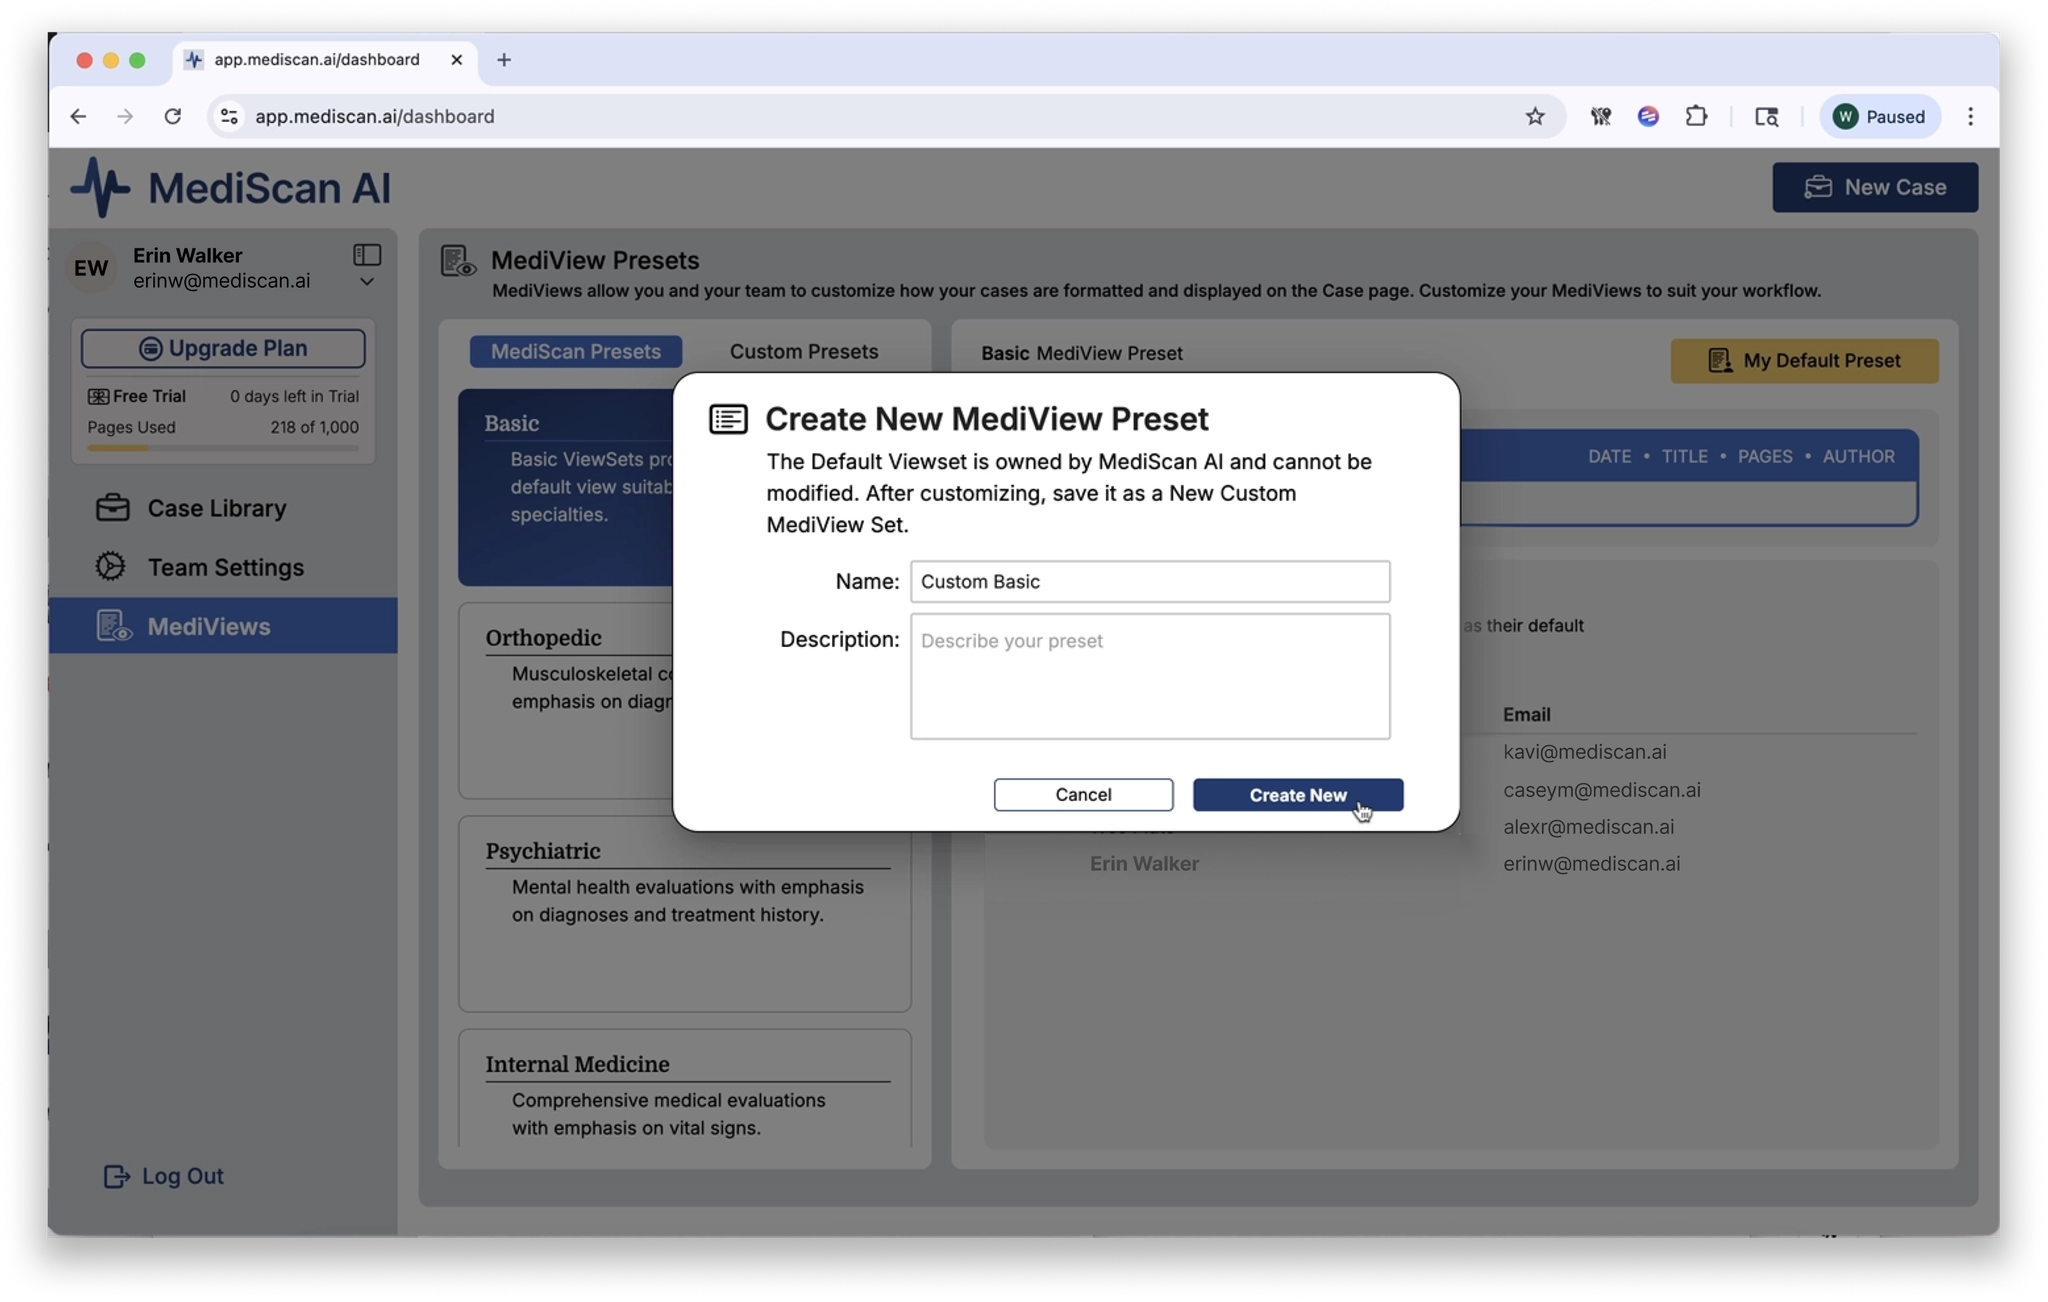
Create a Custom Preset
To create a custom preset, start by modifying one of the built-in presets.
- Select a built-in preset and click Modify.
- Give your new custom preset a name and a description.
- Click Create New.
Customize Your Preset
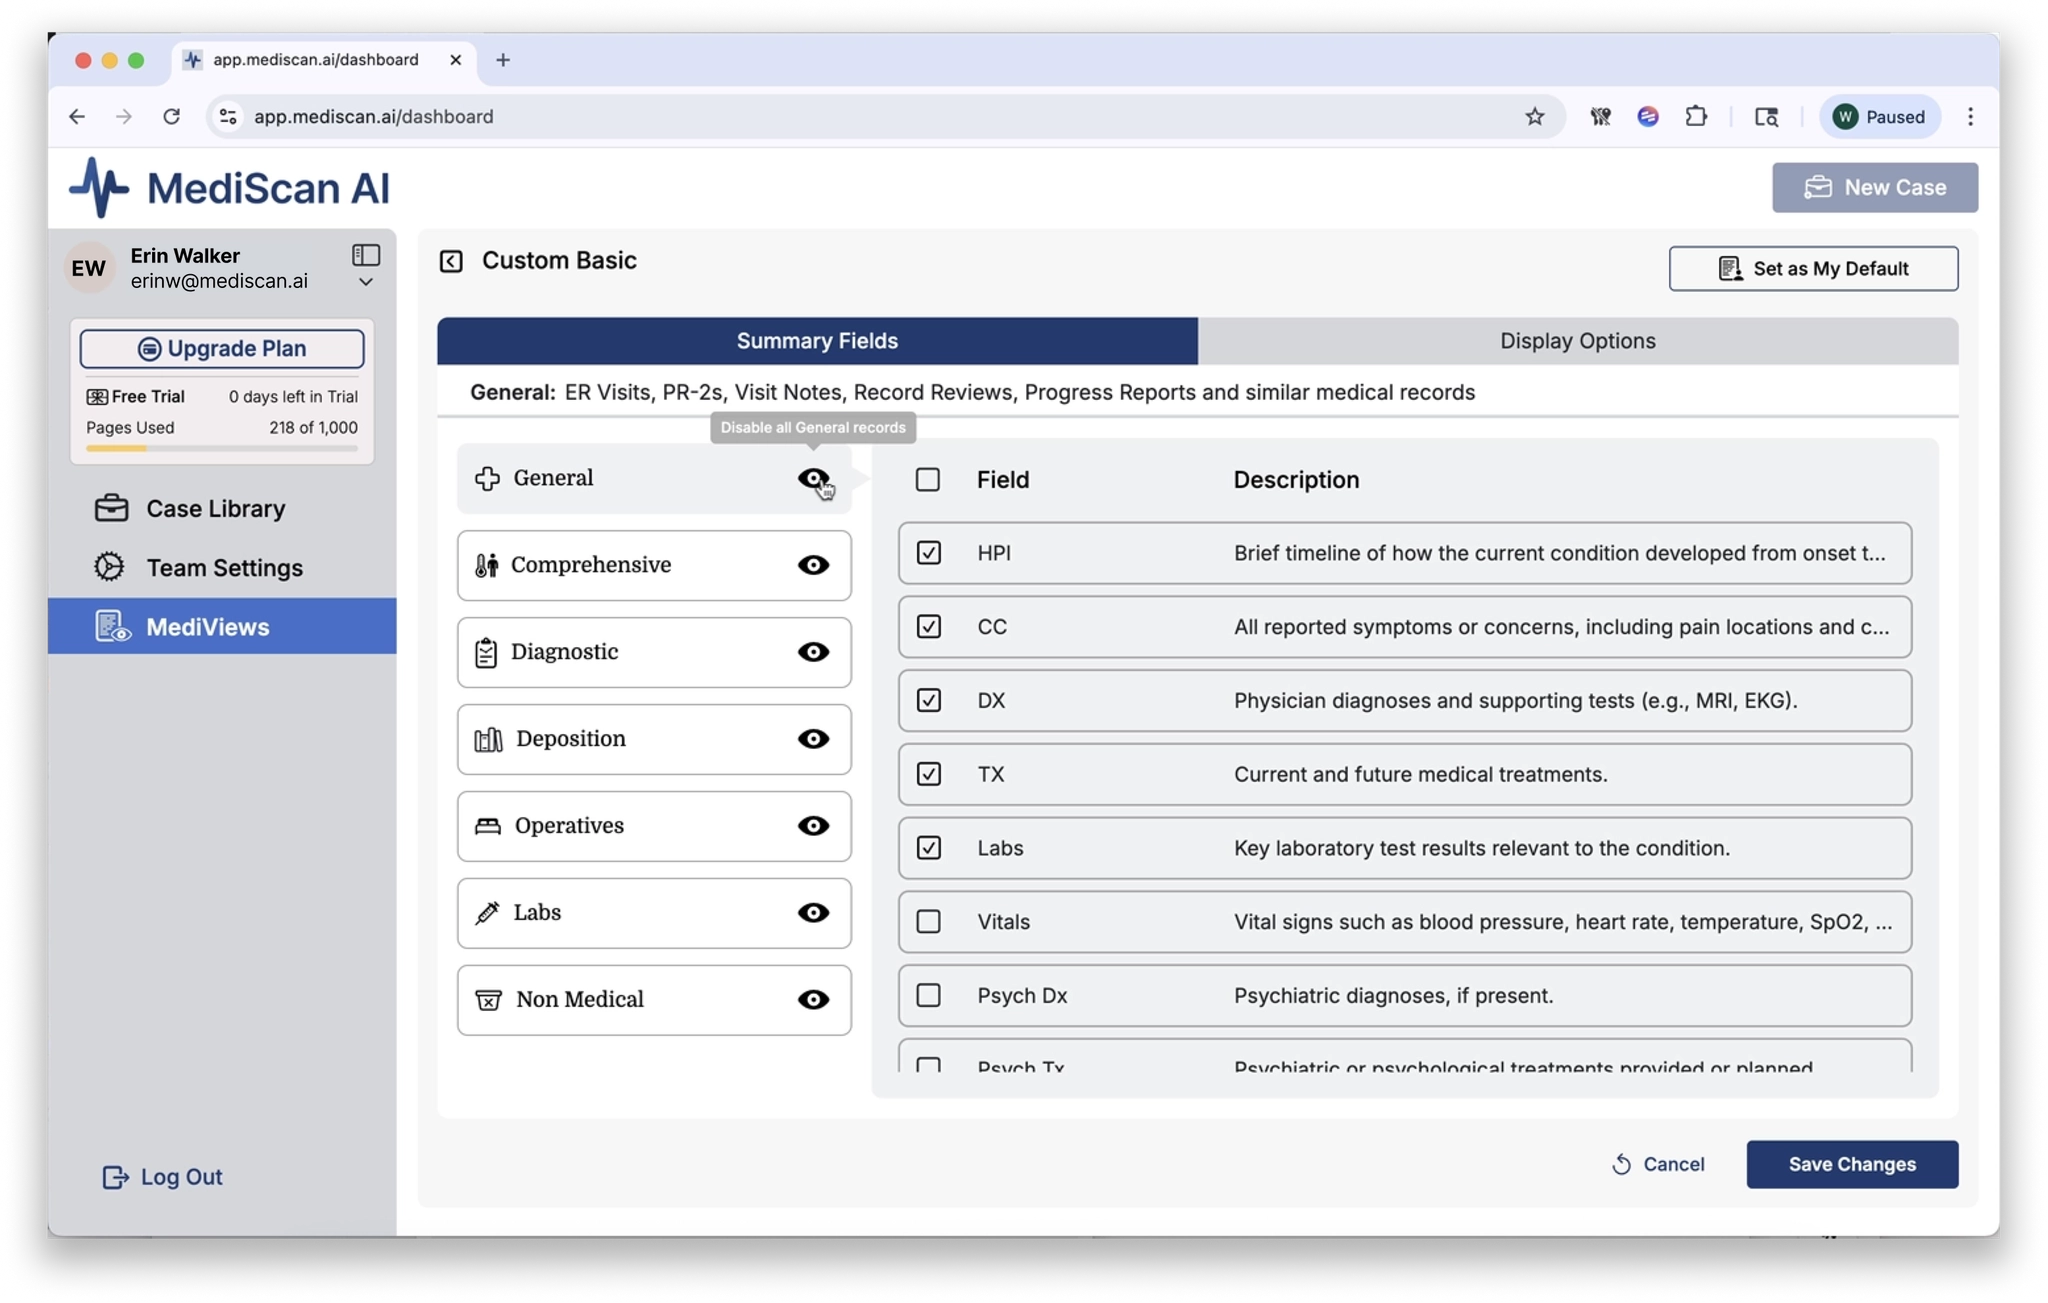
Summary Fields Tab
The Summary Fields tab controls which record types and fields are displayed.
- The left side lists record types. An eyeball icon next to each type indicates whether it is enabled. Click the eyeball to toggle a record type on or off.
- The right side lists the individual fields available for the selected record type. Use the checkboxes to include or exclude each field.
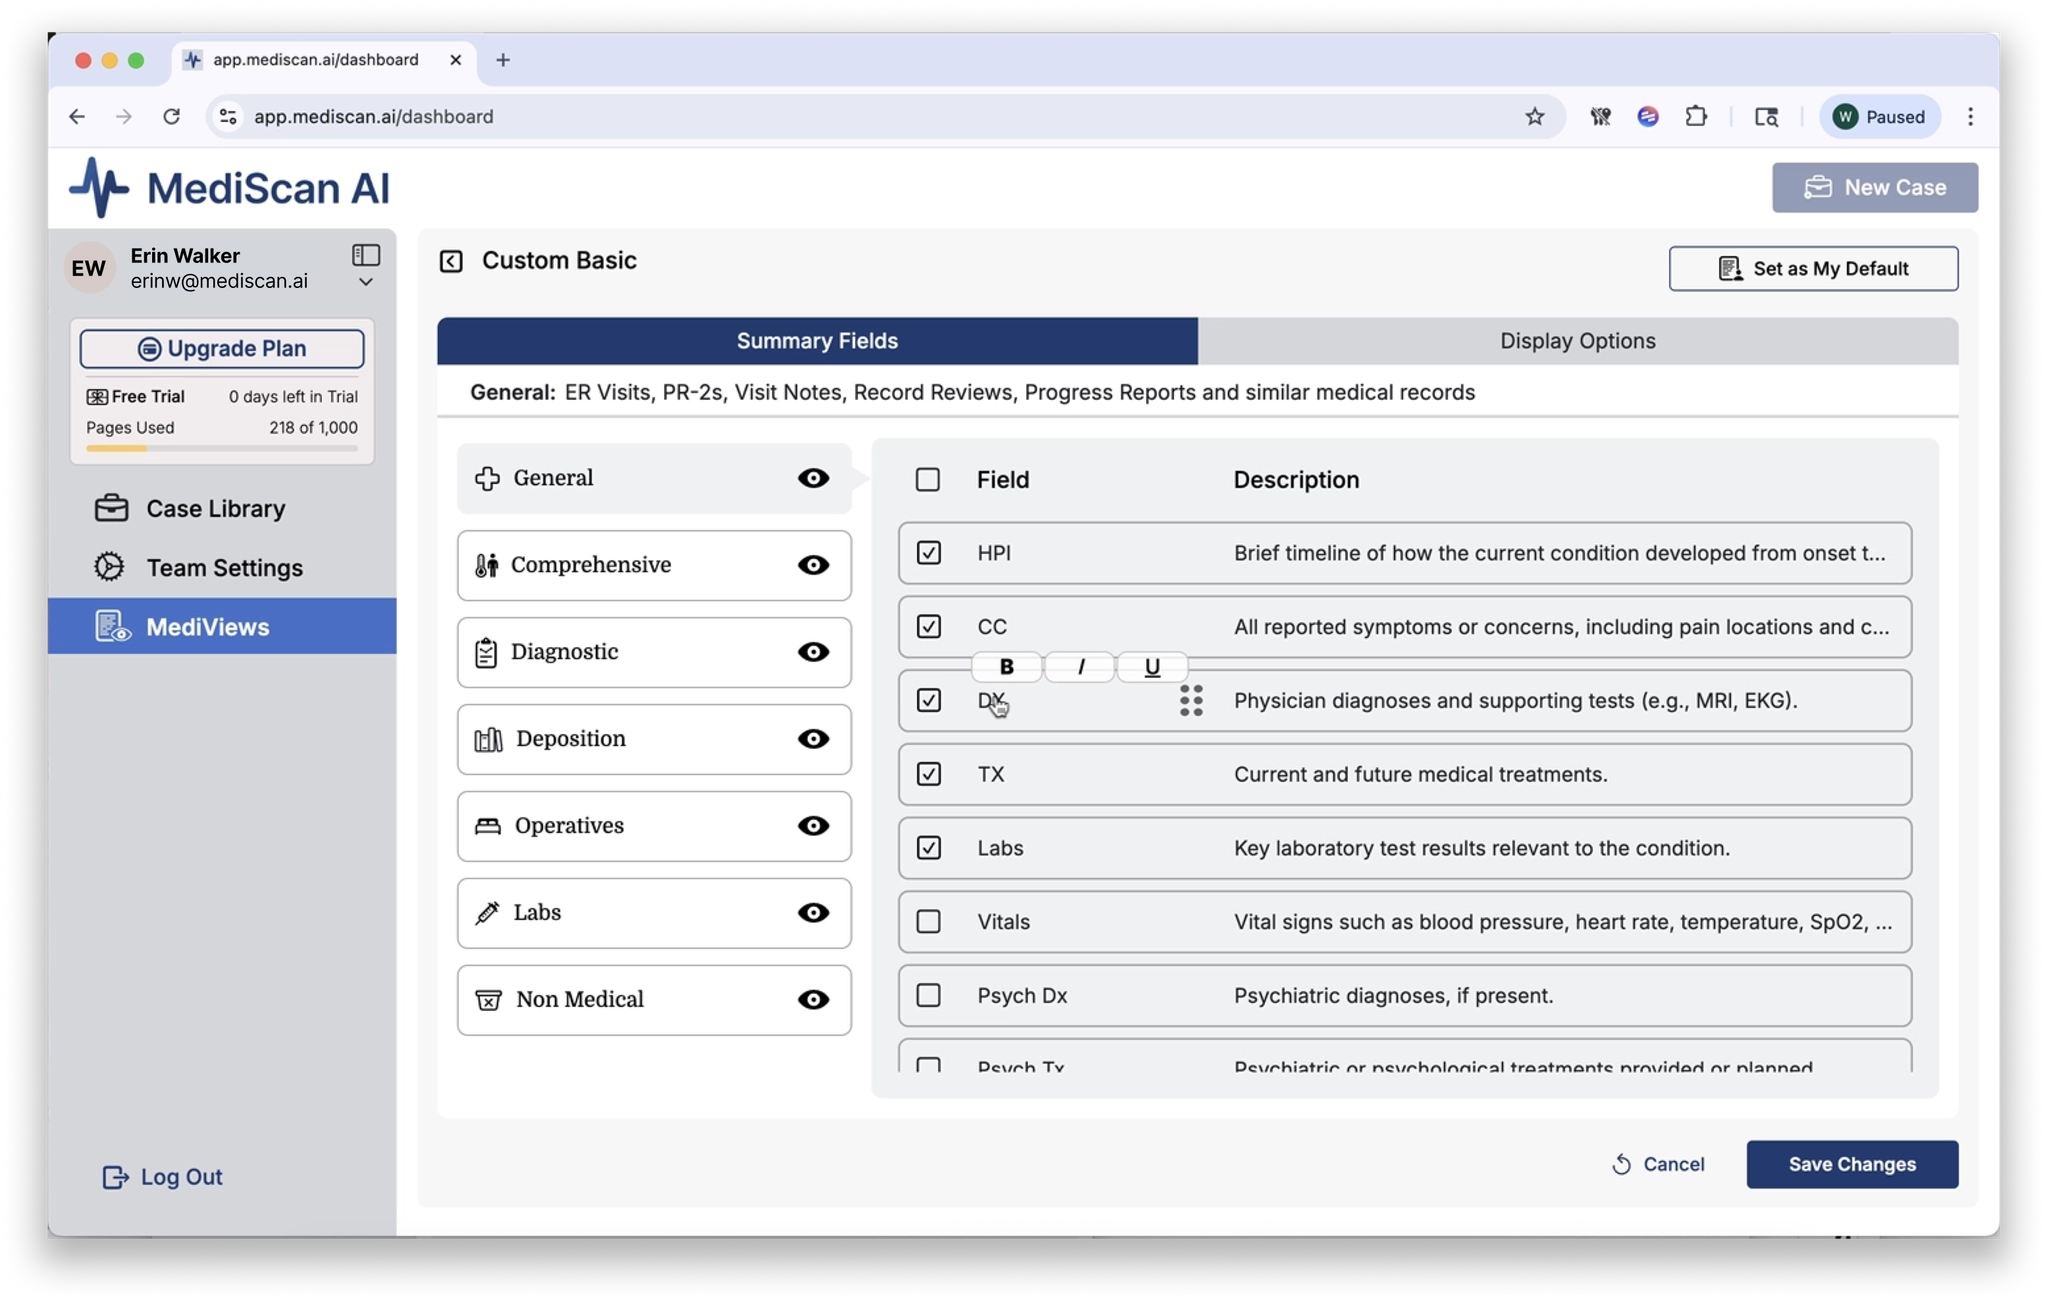
For each field, you can also:
- Hover over the field name to reveal formatting options — bold, italic, or underline — to draw visual attention to that field in the record panel.
- Drag using the six-dot grabber (between the field name and its description) to reorder fields as they appear in the record summary.
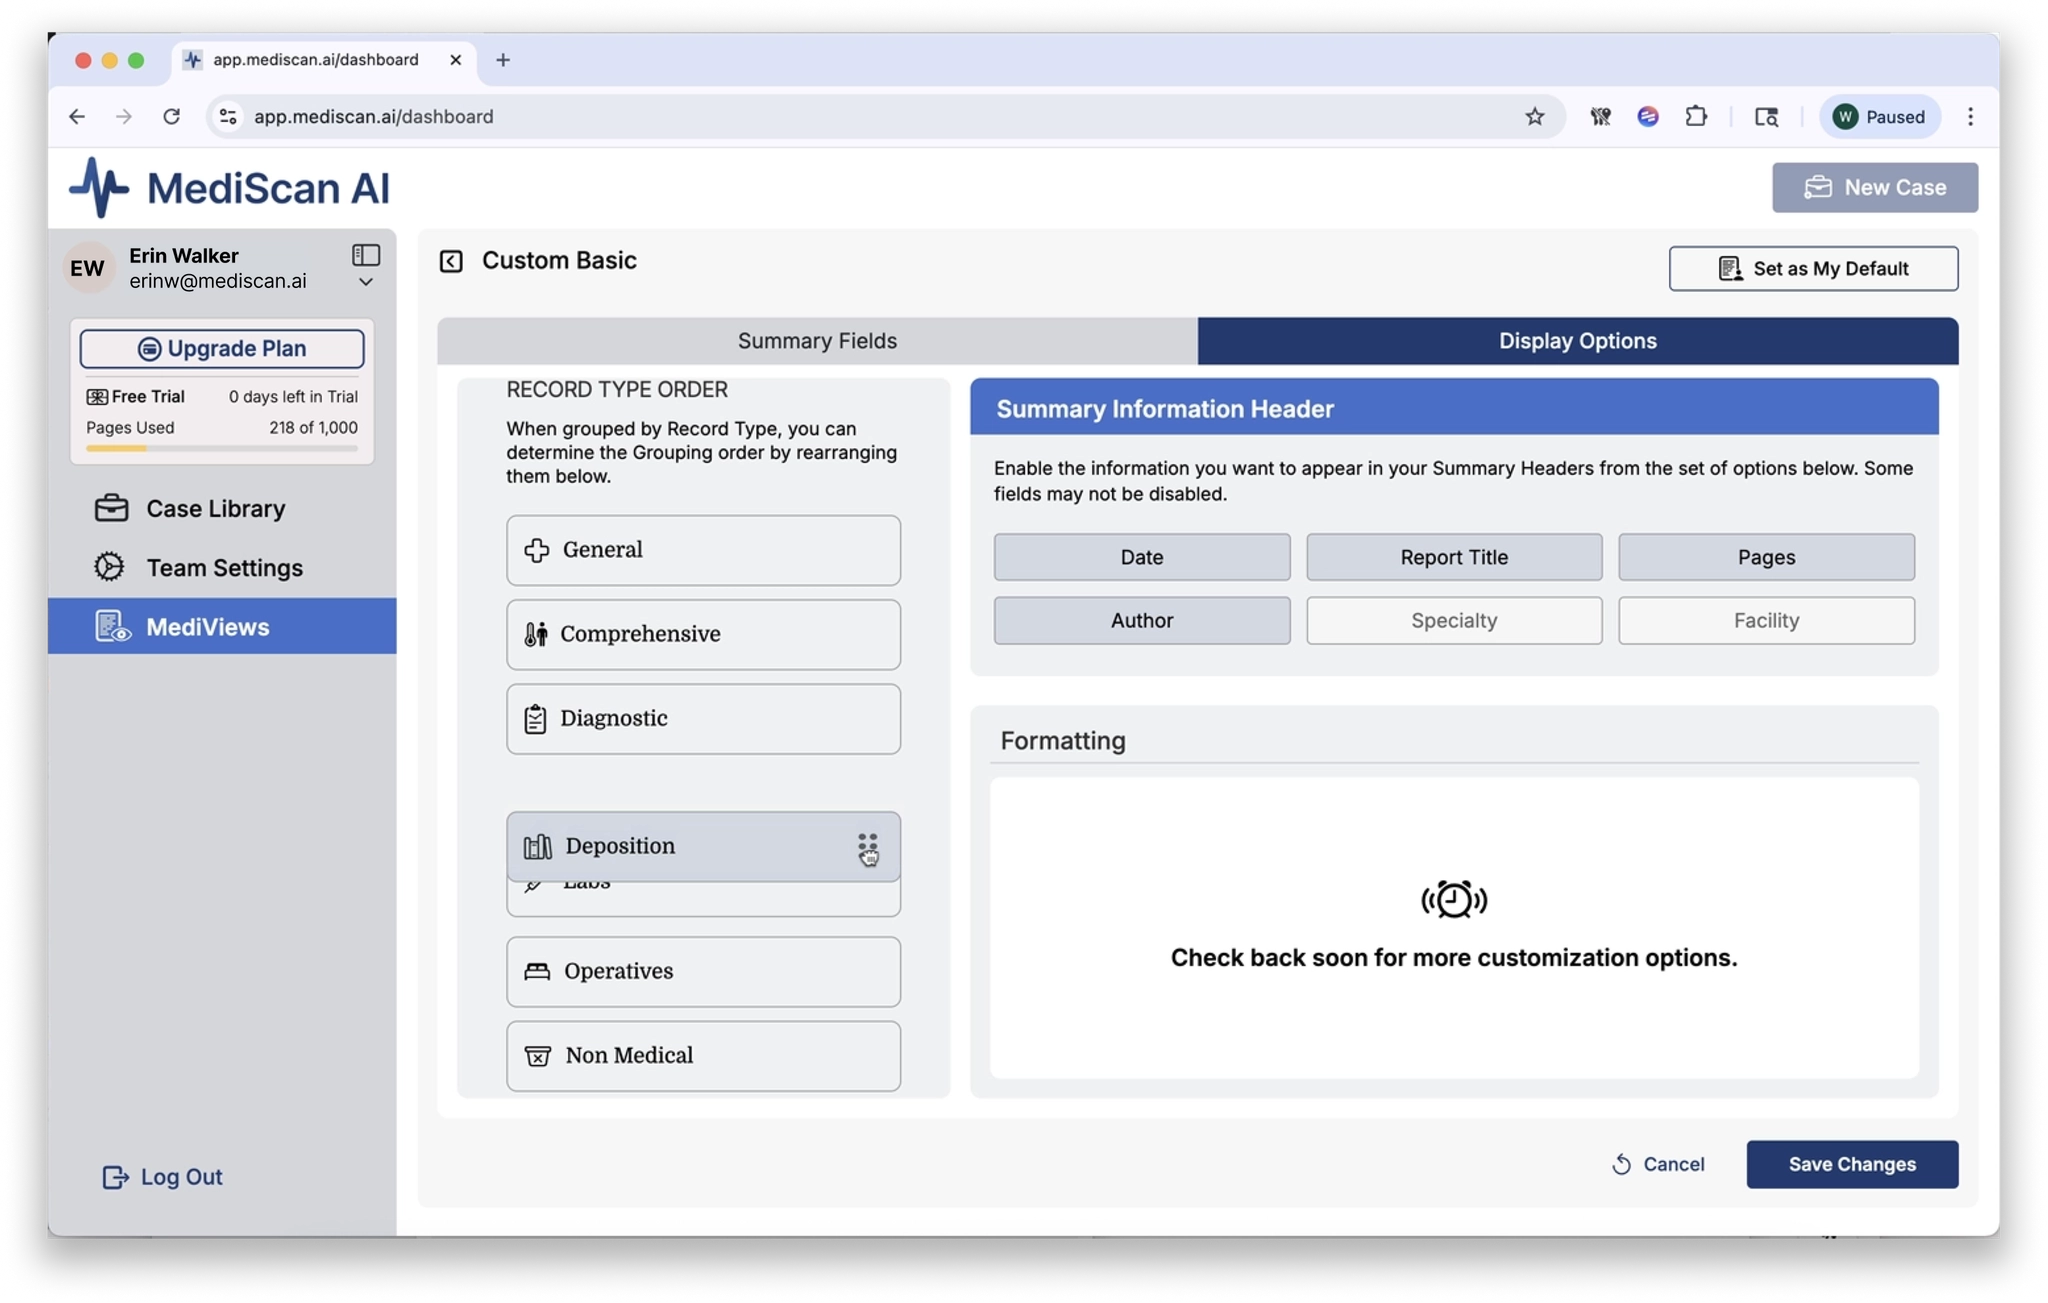
Display Options Tab
The Display Options tab controls how records are grouped and sorted.
Grouping — choose one:
- Record type
- Author
- Specialty
- Facility
Sorting — choose one:
- Chronological
- Page number
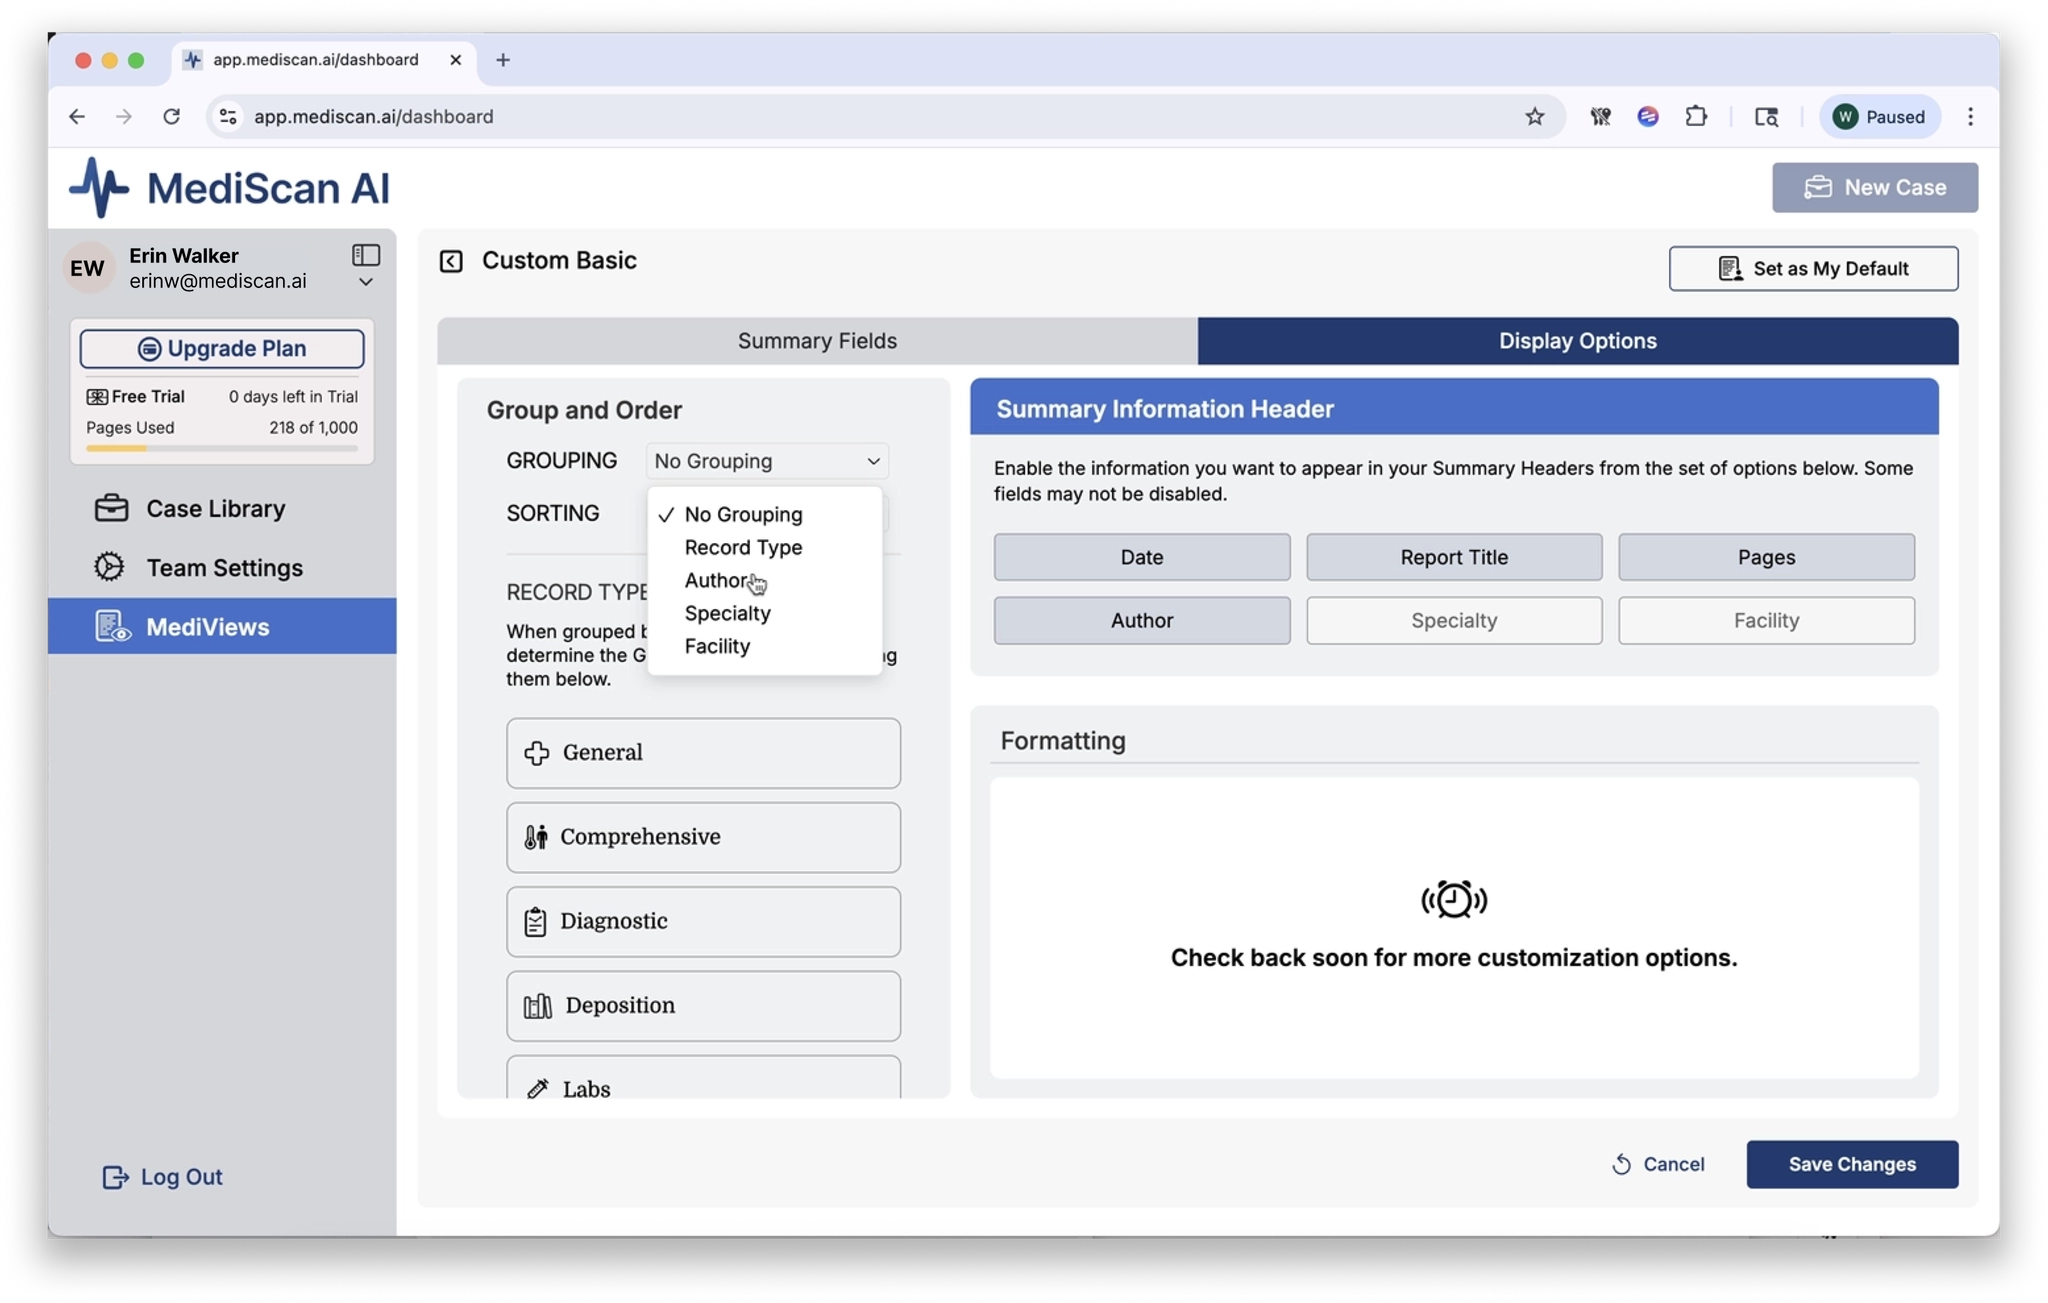
Below the group and sort options, the Record Type Order section lets you set the order in which record types appear when grouping by record type. Use the six-dot grabber on the right side of each record type to drag and reorder them.
On the right side of this tab, the Summary Information Header options let you choose which pieces of information are shown in the summary headers.
Save and Set as Default
- After making your changes, click Save Changes.
- Your new preset will appear in the Custom Presets tab.
- To make it your default, click Set as My Default in the upper right corner.
Apply a MediView to an Existing Case
Switching your default preset affects new cases going forward. To apply a MediView to a case that already exists:
- Go to the Case Library and open the case.
- In the record panel, click the View menu.
- Under MediViews, select Switch Preset.
- Choose the preset you want to apply.

Any grouping, sorting, or formatting changes in the new preset will take effect in the record panel immediately.
Download Files
Prepare Your Export
1. From the case page, click the Export button in the upper right corner.
1. In the Prepare for Download dialog, choose your file format:
- Microsoft Word (.docx)
2. Select any additional options for your export.
3. Click the Formatting tab to access additional formatting options.
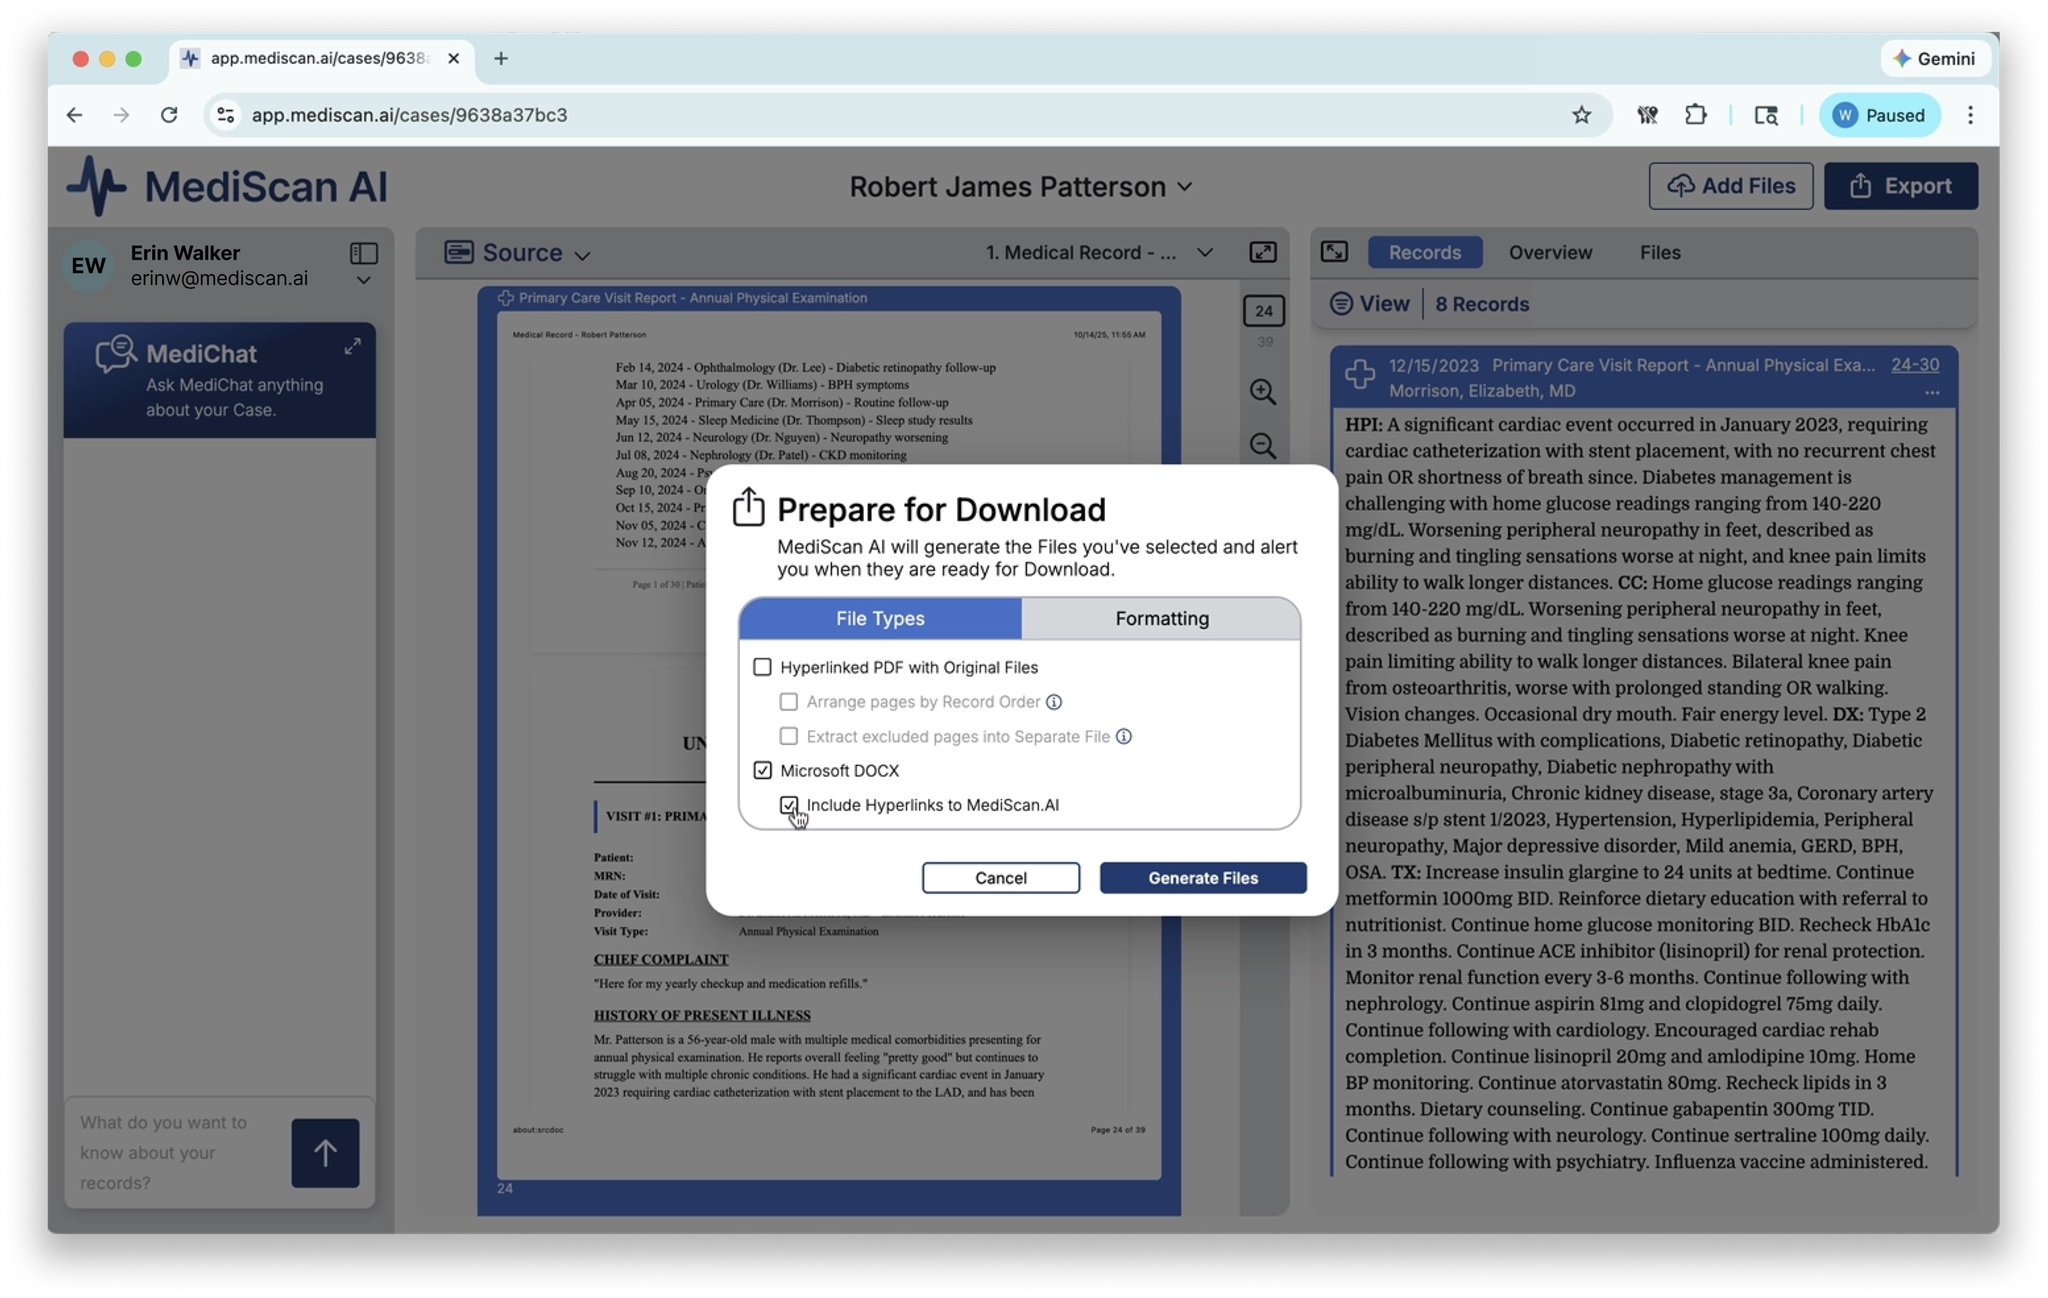
1. When you are ready, click Generate Files.
MediScan AI will prepare your exports. Once they are ready, they will appear in the Files tab.
Download Exported Files
From the Files tab, you have two options:
- To download a single export, click the cloud icon next to that individual export.
- To download all exports at once, click the cloud icon at the top of the Download column in the Export section.
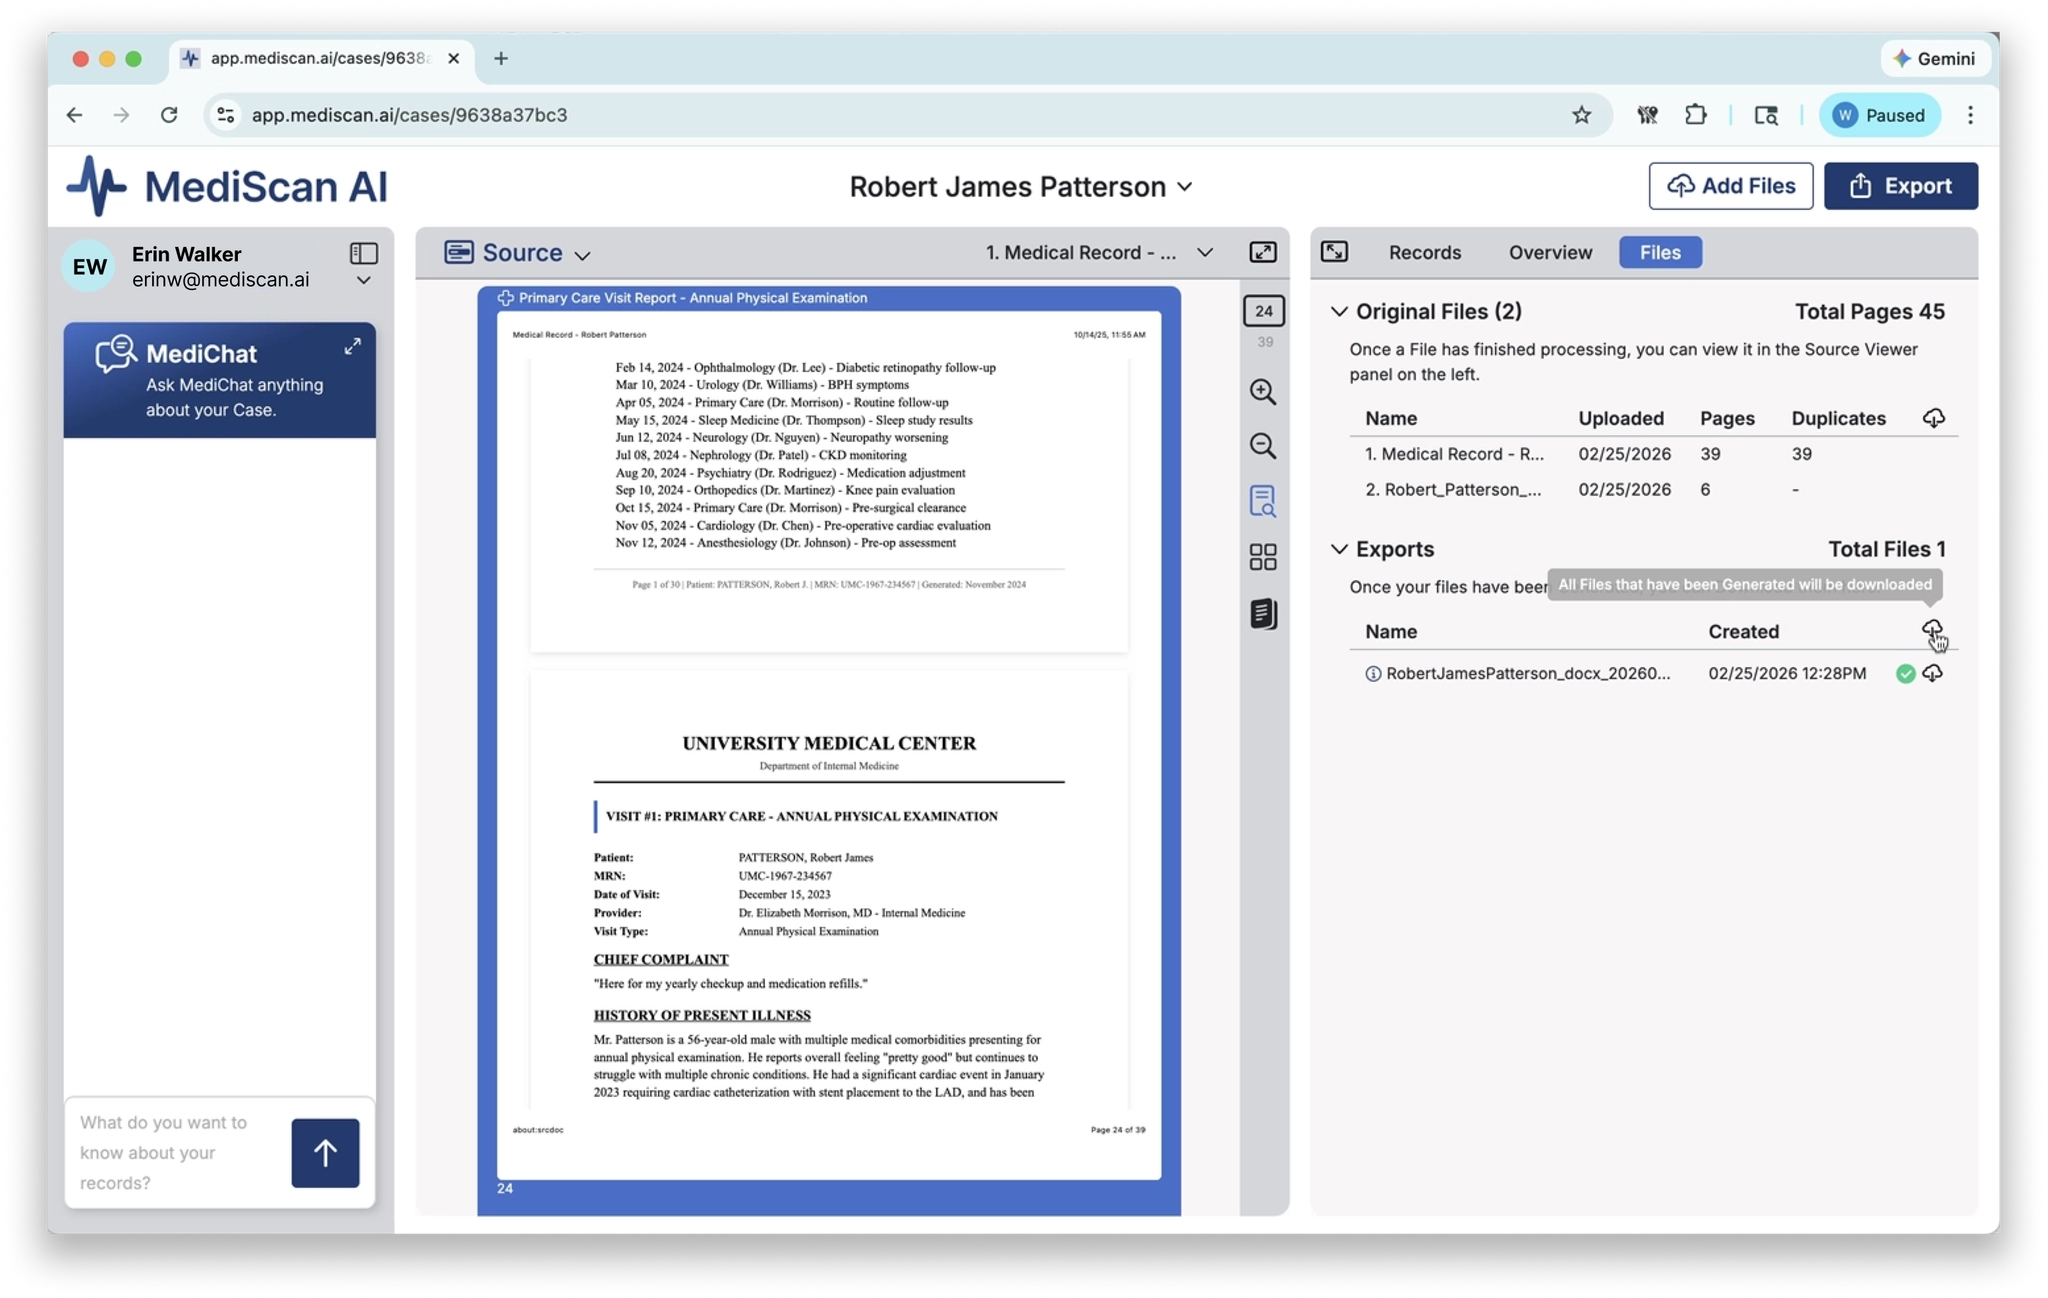
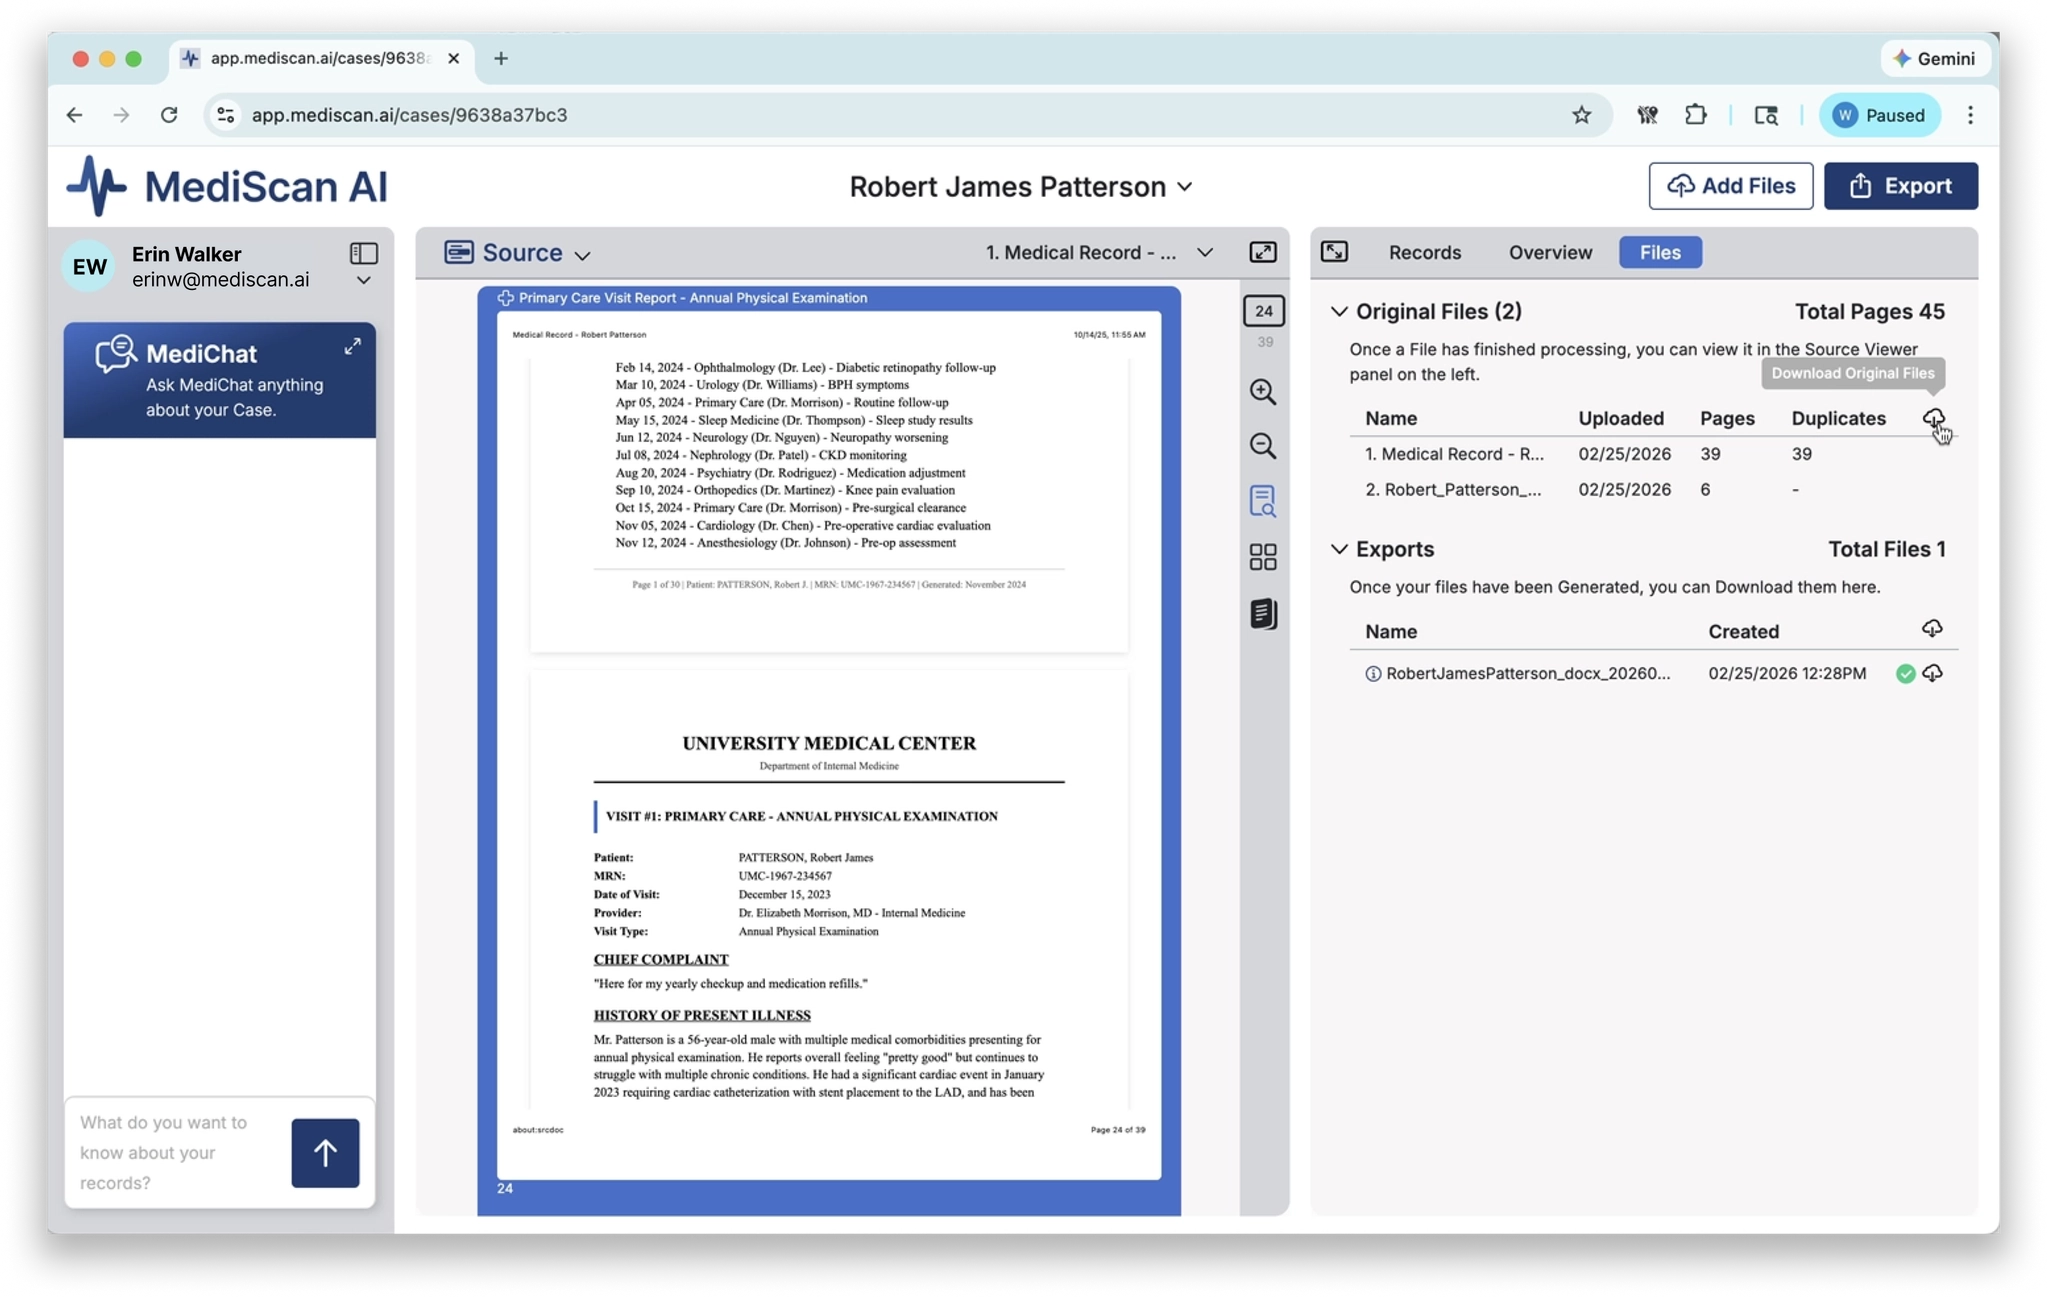
Download Original Files
You can also download the original files you uploaded to the case. In the Original Files section, click the cloud icon next to the file you want to download.
New Case
Upload Files
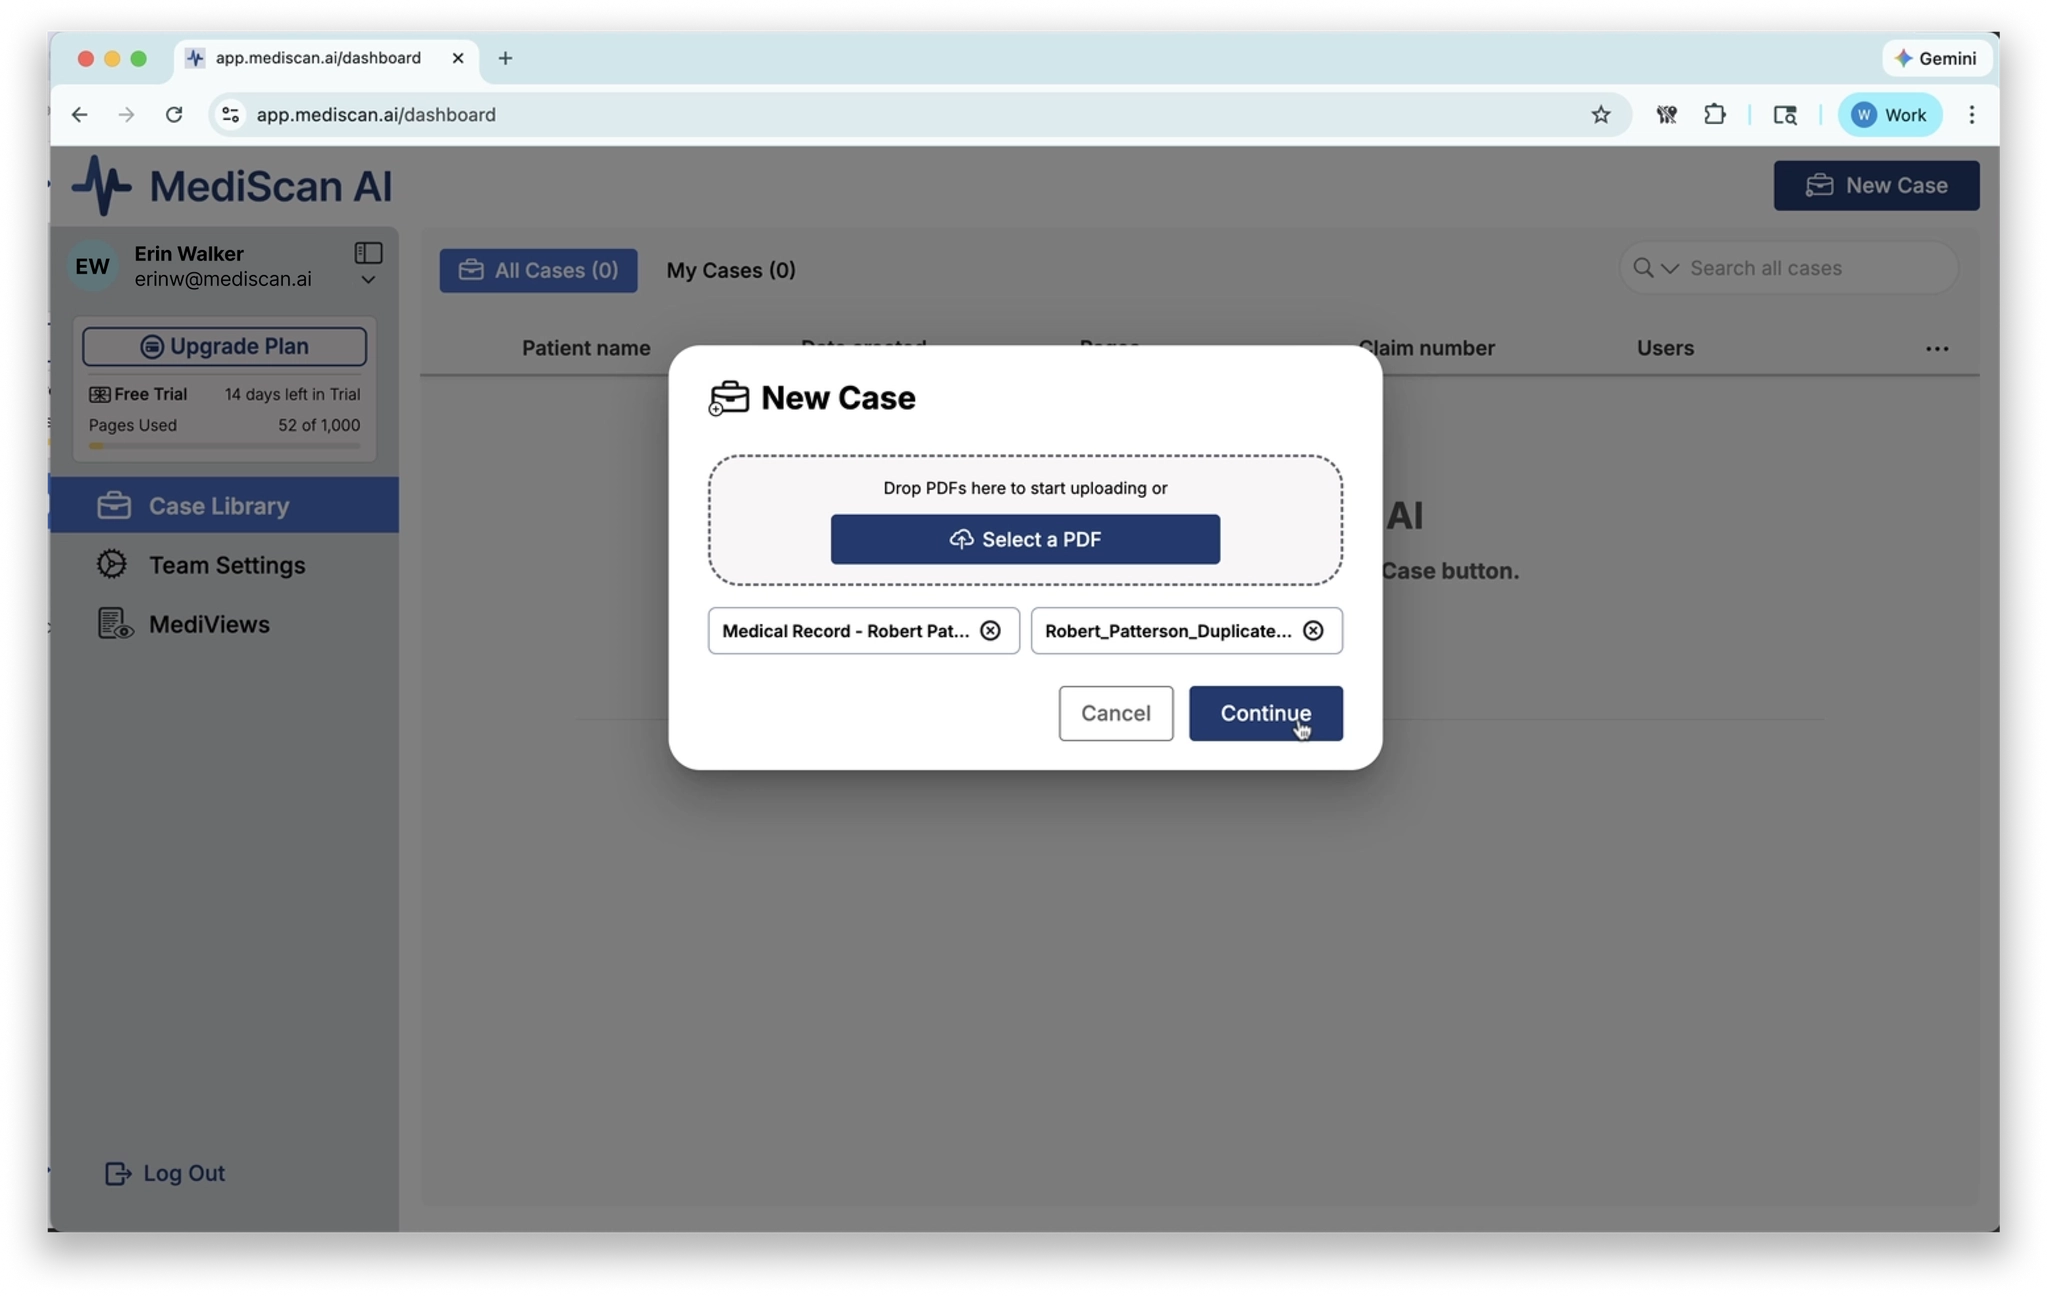
1. Click the New Case button in the upper right corner.

1. In the New Case dialog, add your PDF files using either method:
- Drag and drop files from your desktop directly into the drop zone, or
- Click Select a PDF to browse and select files from your computer.
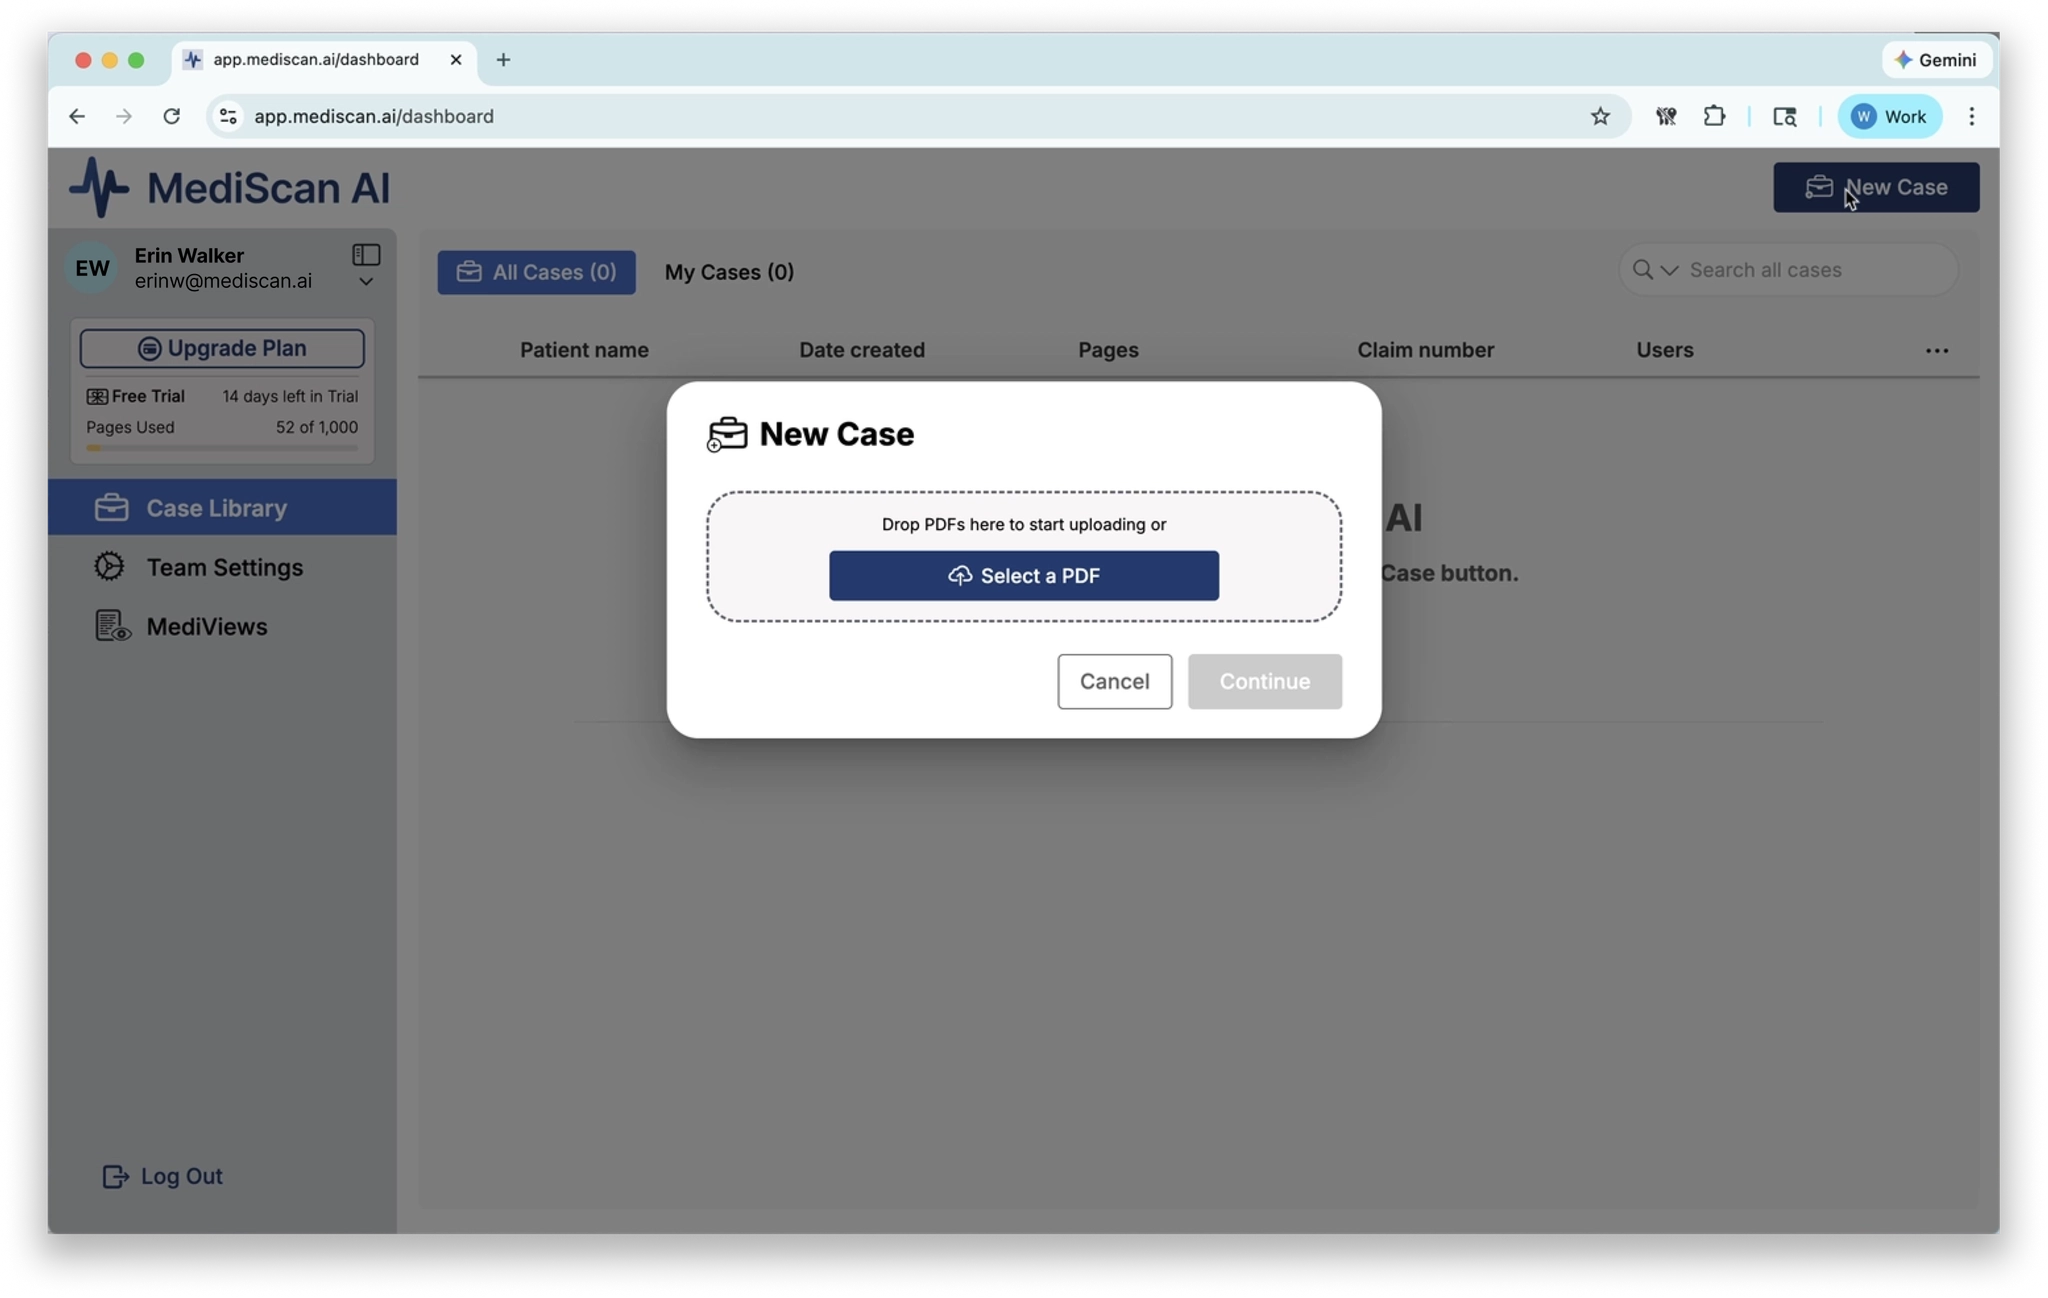
One case per patient. All files you add will be combined into a single case, so make sure they belong to the same patient. If you are uploading records for multiple patients, create a separate case for each one.
- Previews of your selected files will appear in the dialog so you can confirm you have the right files.
- When you are ready, click Continue.
Processing
After you click Continue, your files will begin uploading. Once uploaded, MediScan AI will:
- Transcribe the PDF files
- Identify individual records within the files
- Generate summaries for every medical visit found in the records
Processing time depends on the number of files and total page count.
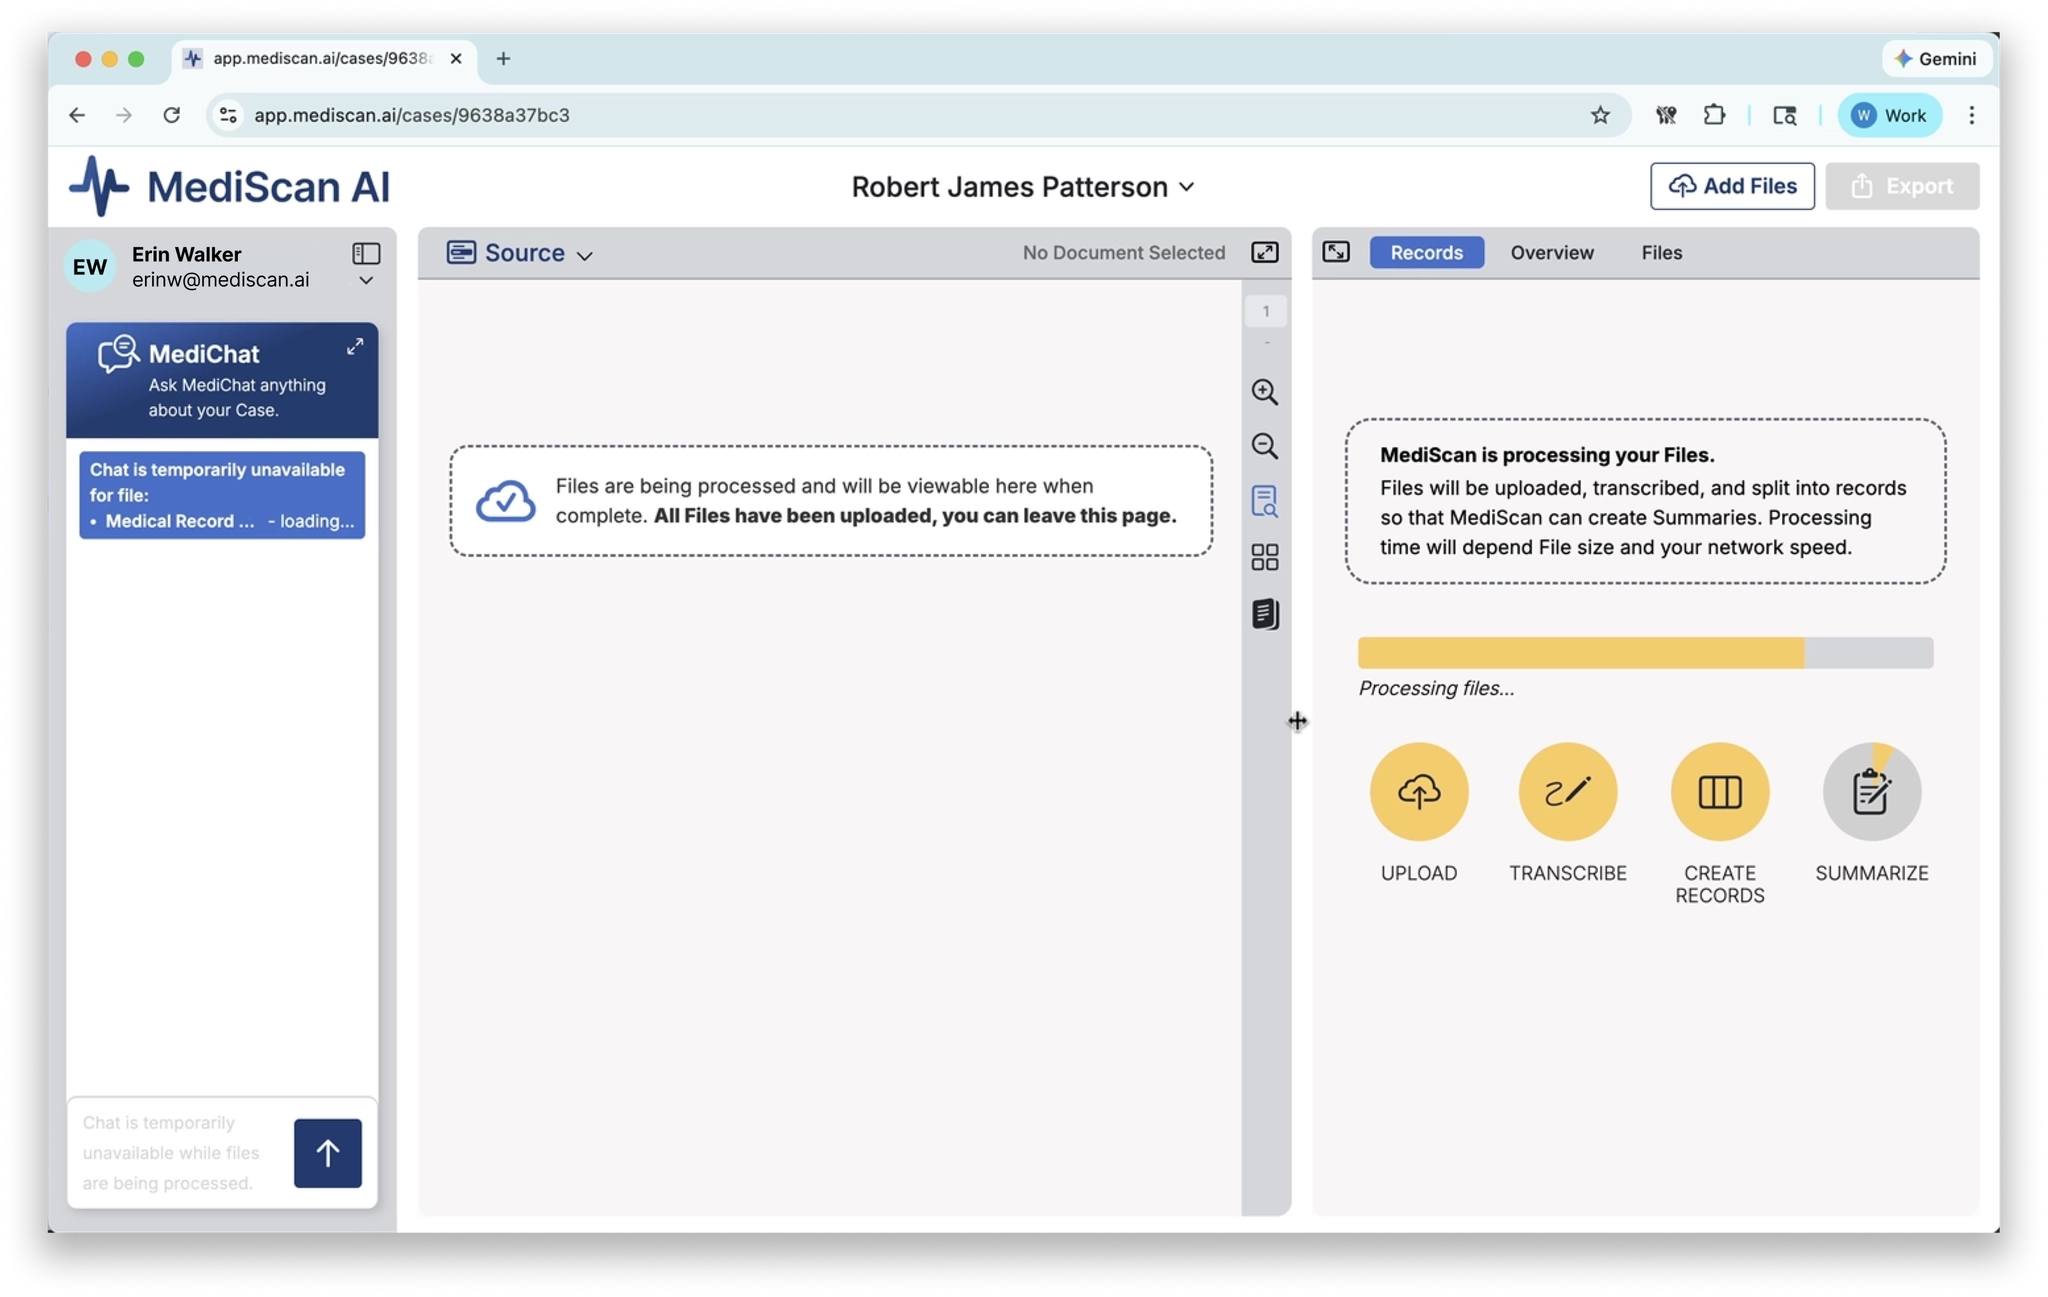
You don’t need to wait. When processing is complete, you will receive an email notification. You can close MediScan AI and come back later — the results will be ready when you return.
View Results
When processing is finished, open the case in MediScan AI to see the completed case summary and individual record summaries.

This guide walks through creating a new MediScan AI account, setting up your team, and inviting both team members and guests.
Sign Up
- On the login page, click Don’t Have an Account? Sign Up. or go directly to https://app.mediscan.ai/signup
- Fill out the signup form with your:
- First and last name
- Company email address
- Password
- Company type
- Role
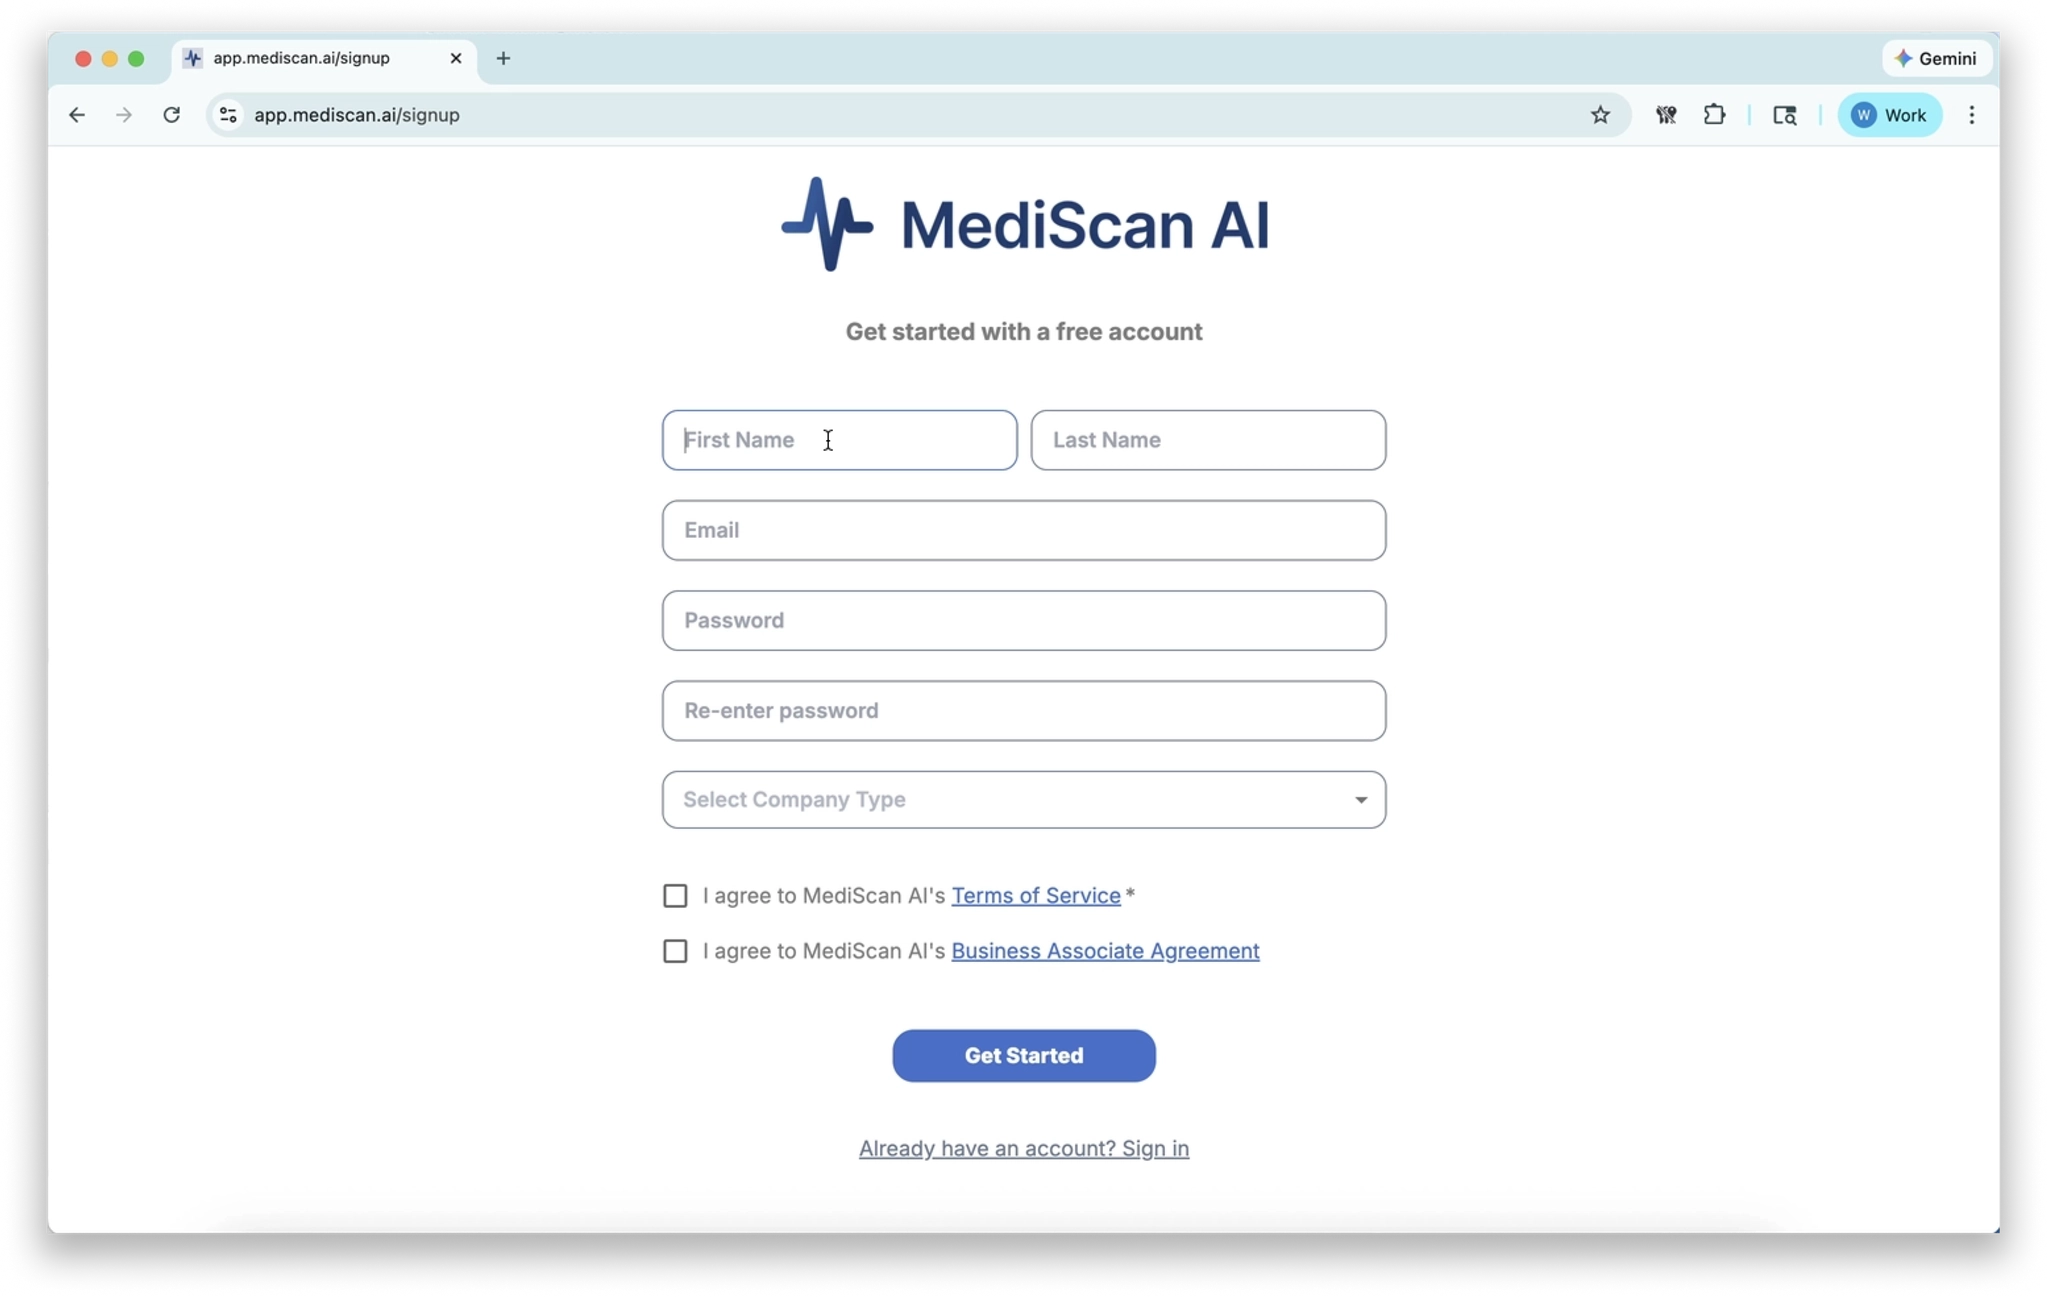
- After reading the Terms of Service and Business Associate Agreement, check the checkboxes if you agree.
- Click Get Started.
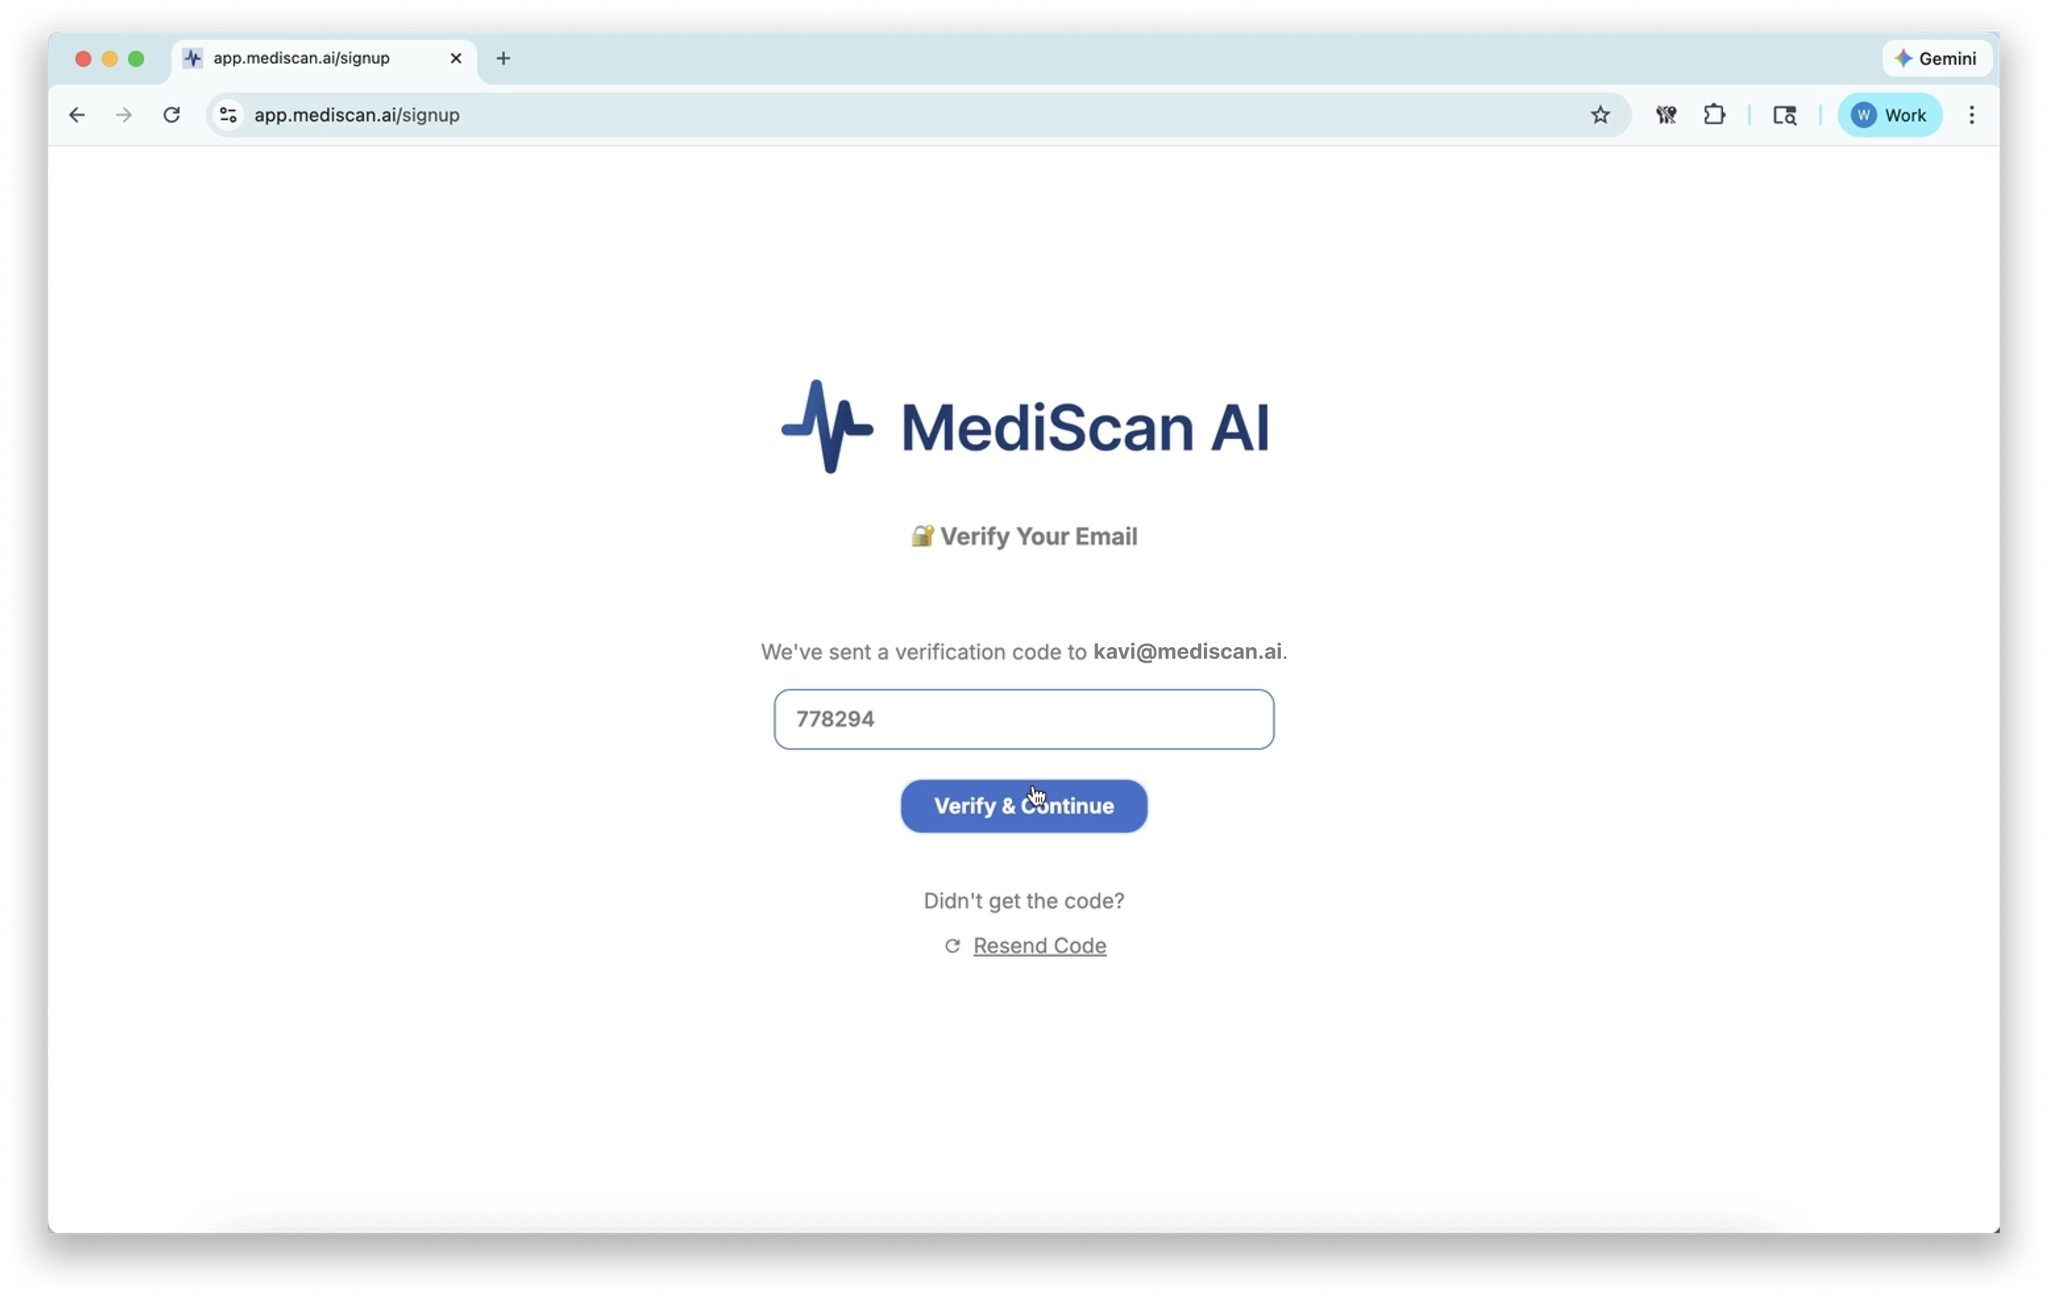
- A verification code will be sent to your email address. Retrieve the code from your inbox, enter it on the signup page, and click Verify and Continue.
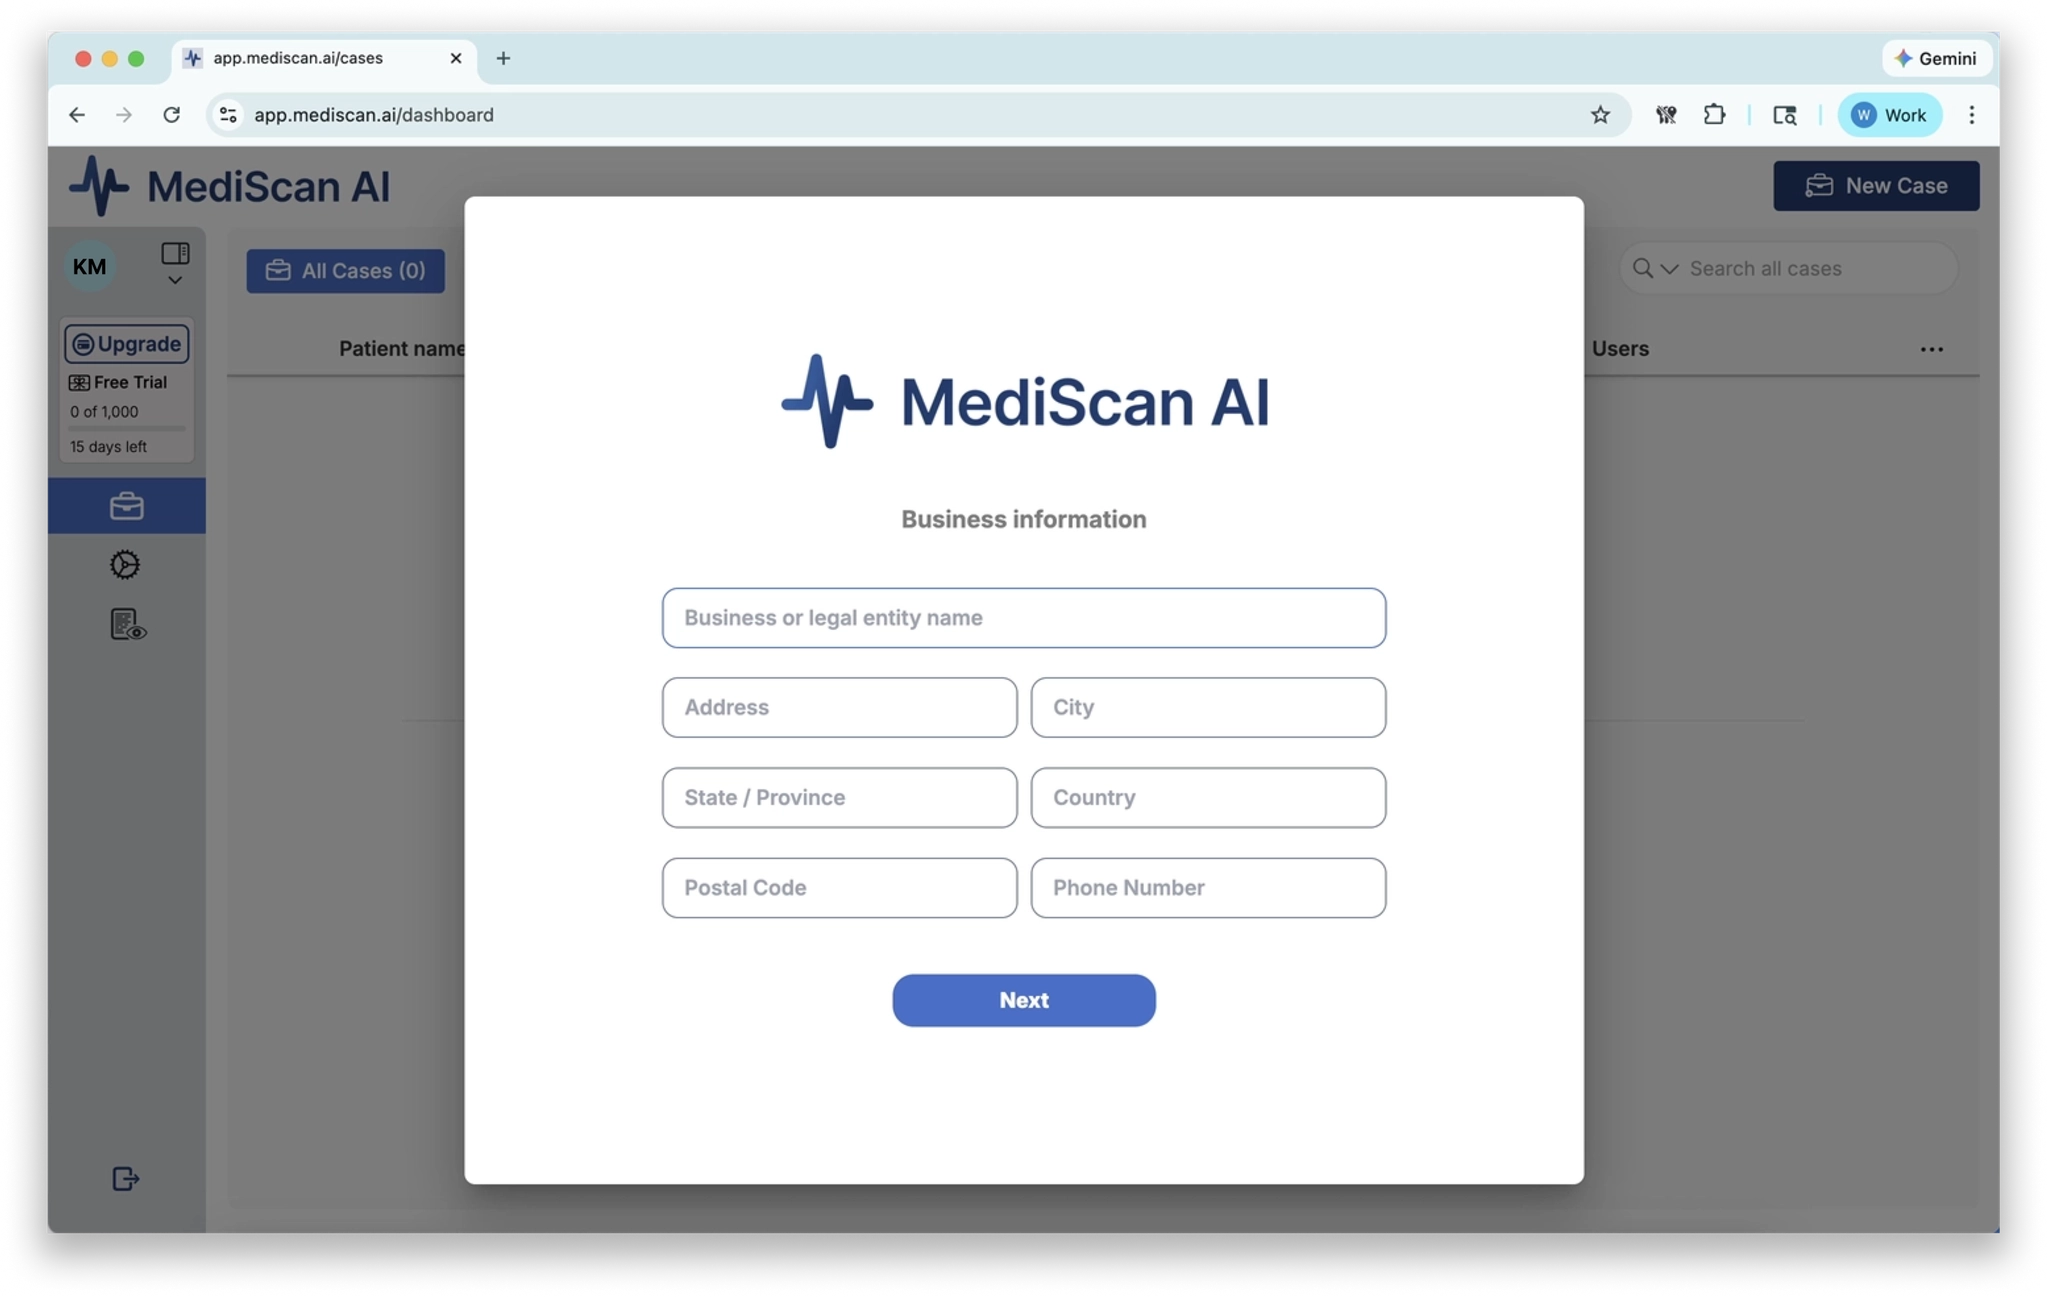
Set Up Your Team
After verifying your email, you will be prompted to complete your business information.
- Fill out all fields in the business information form.
- Click Next when finished.
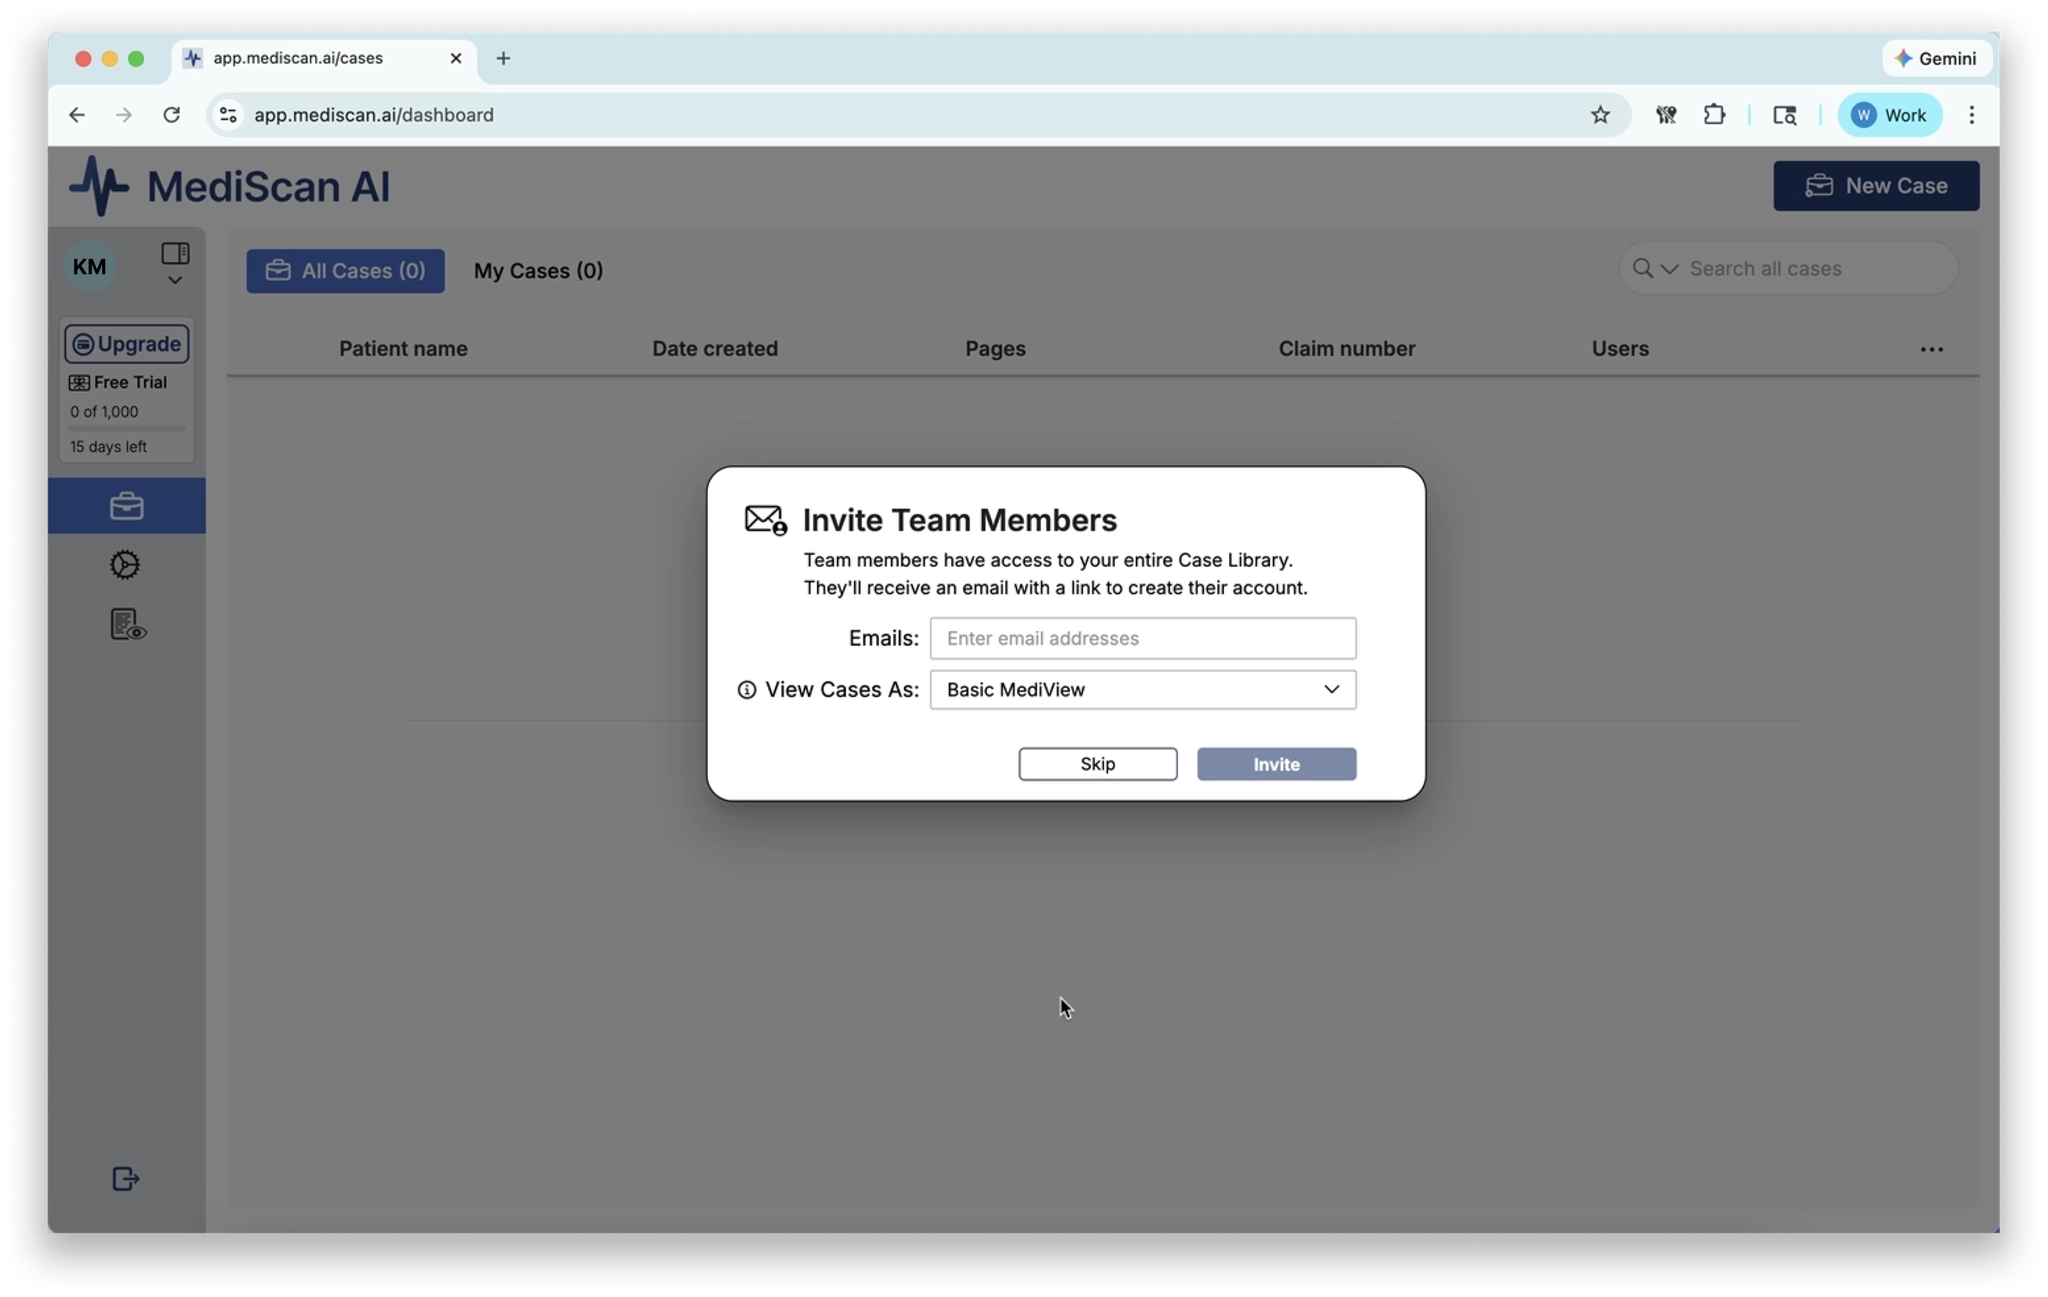
Invite Team Members
During Setup
The next step invites colleagues from your company to join your team.
Team members have access to all cases in your team. Guests only have access to cases you specifically assign to them. Think of team members as employees who need visibility into all cases, and guests as contractors brought in for specific case work.
- Enter your colleagues’ email addresses in the Emails field.
- Choose the MediScan preset that will serve as the default for these users. (For more on MediView presets, see Setting up MediViews.)
- Click Invite to send the invitations.
- If you prefer to skip this step and invite team members later, click Skip.
Your team is now created. The next steps are to invite any remaining team members and to start creating cases.
Invite Team Members from Team Settings
After your initial setup, you can invite additional team members at any time from the Team Settings page.
- In the left sidebar, click Team Settings.
- Click Invite Team Member.
- Enter the team member’s email address and click Invite.
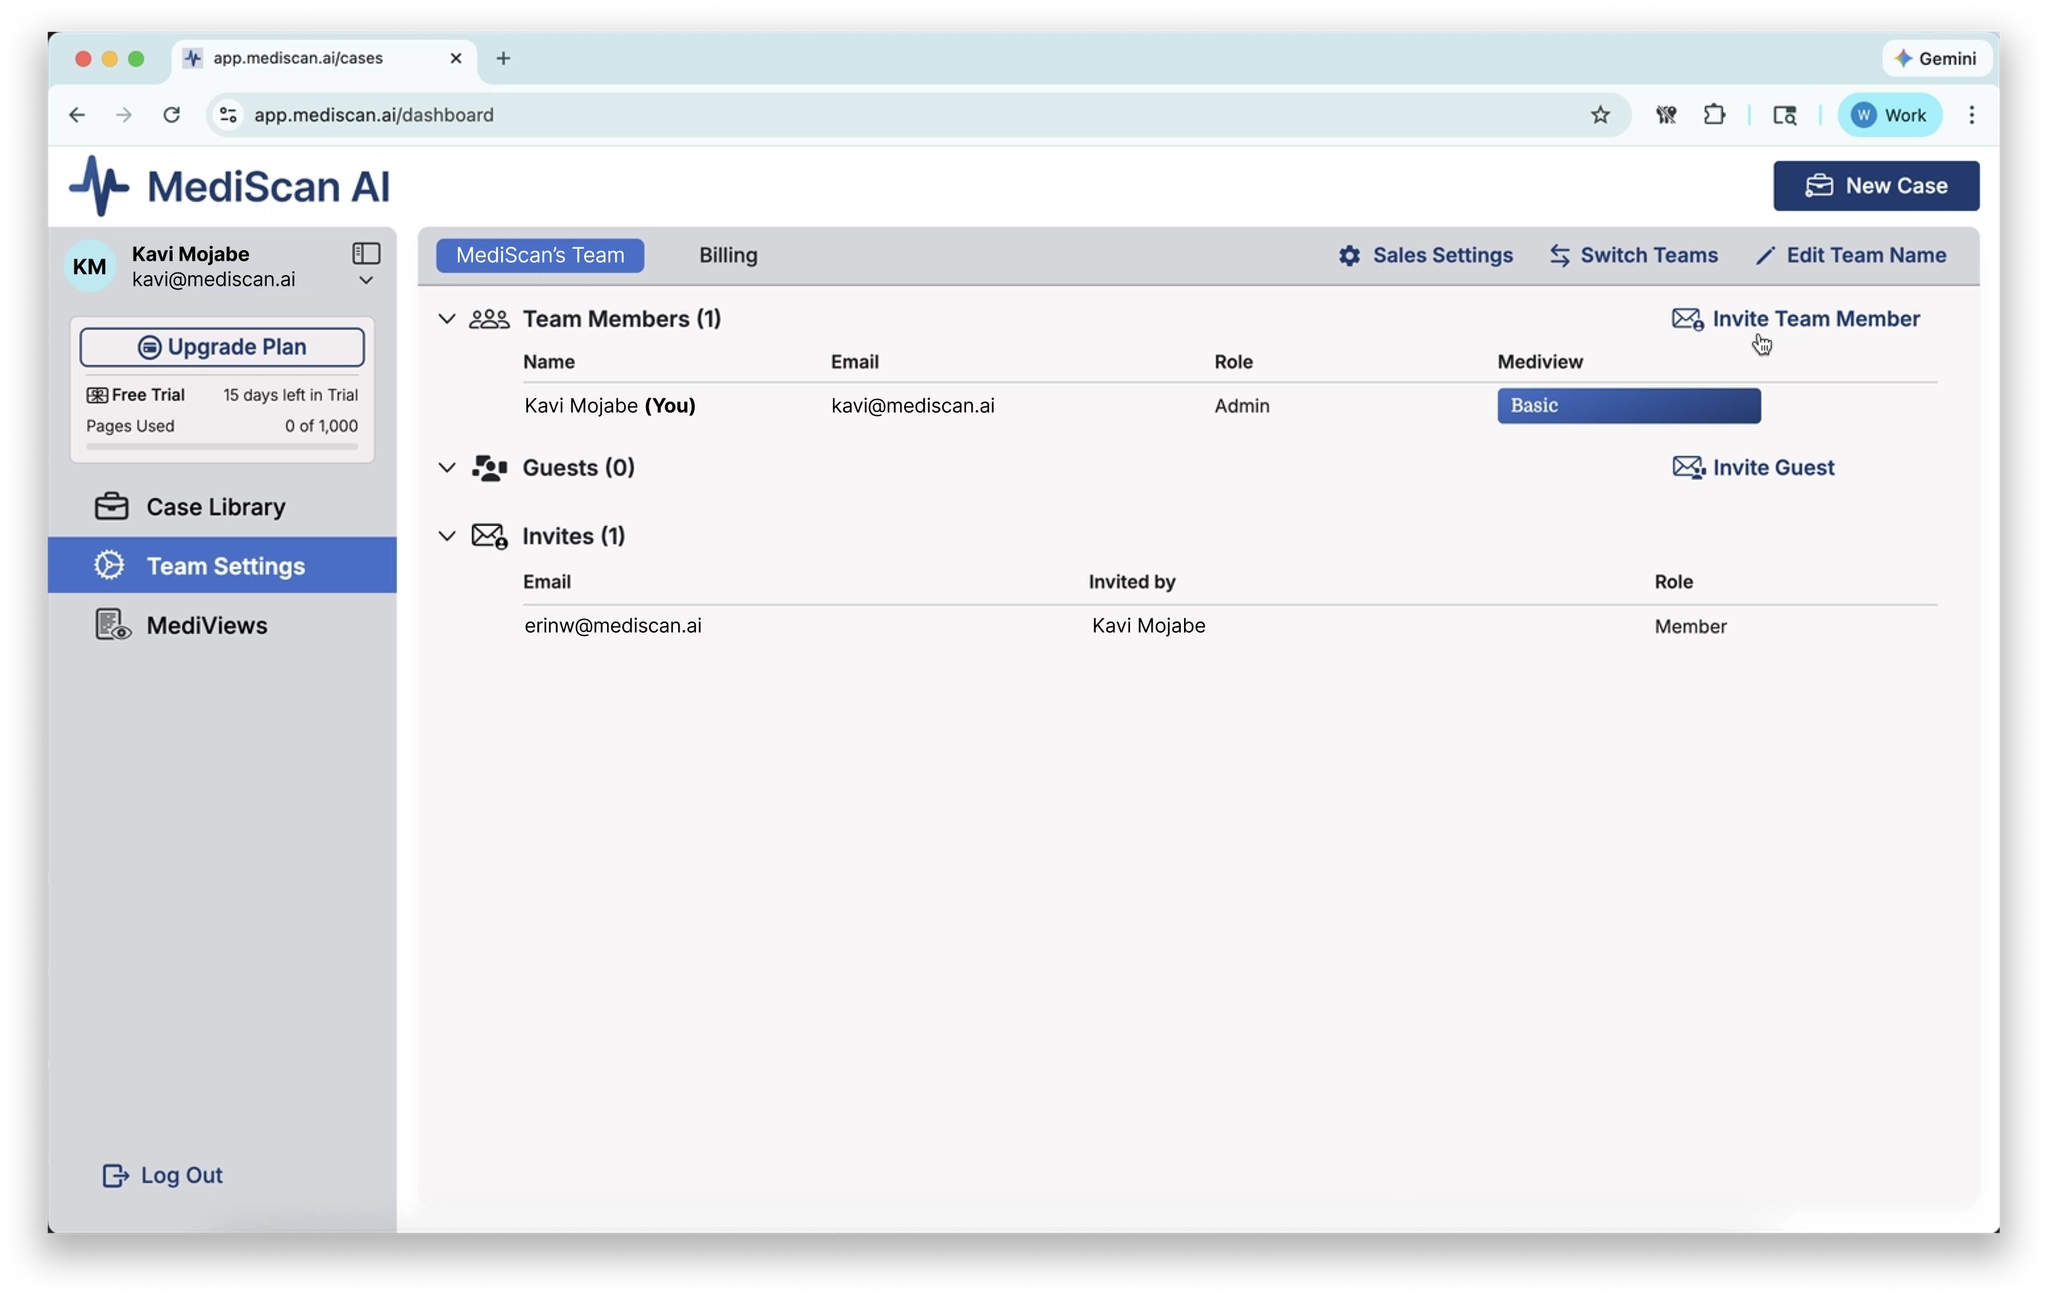
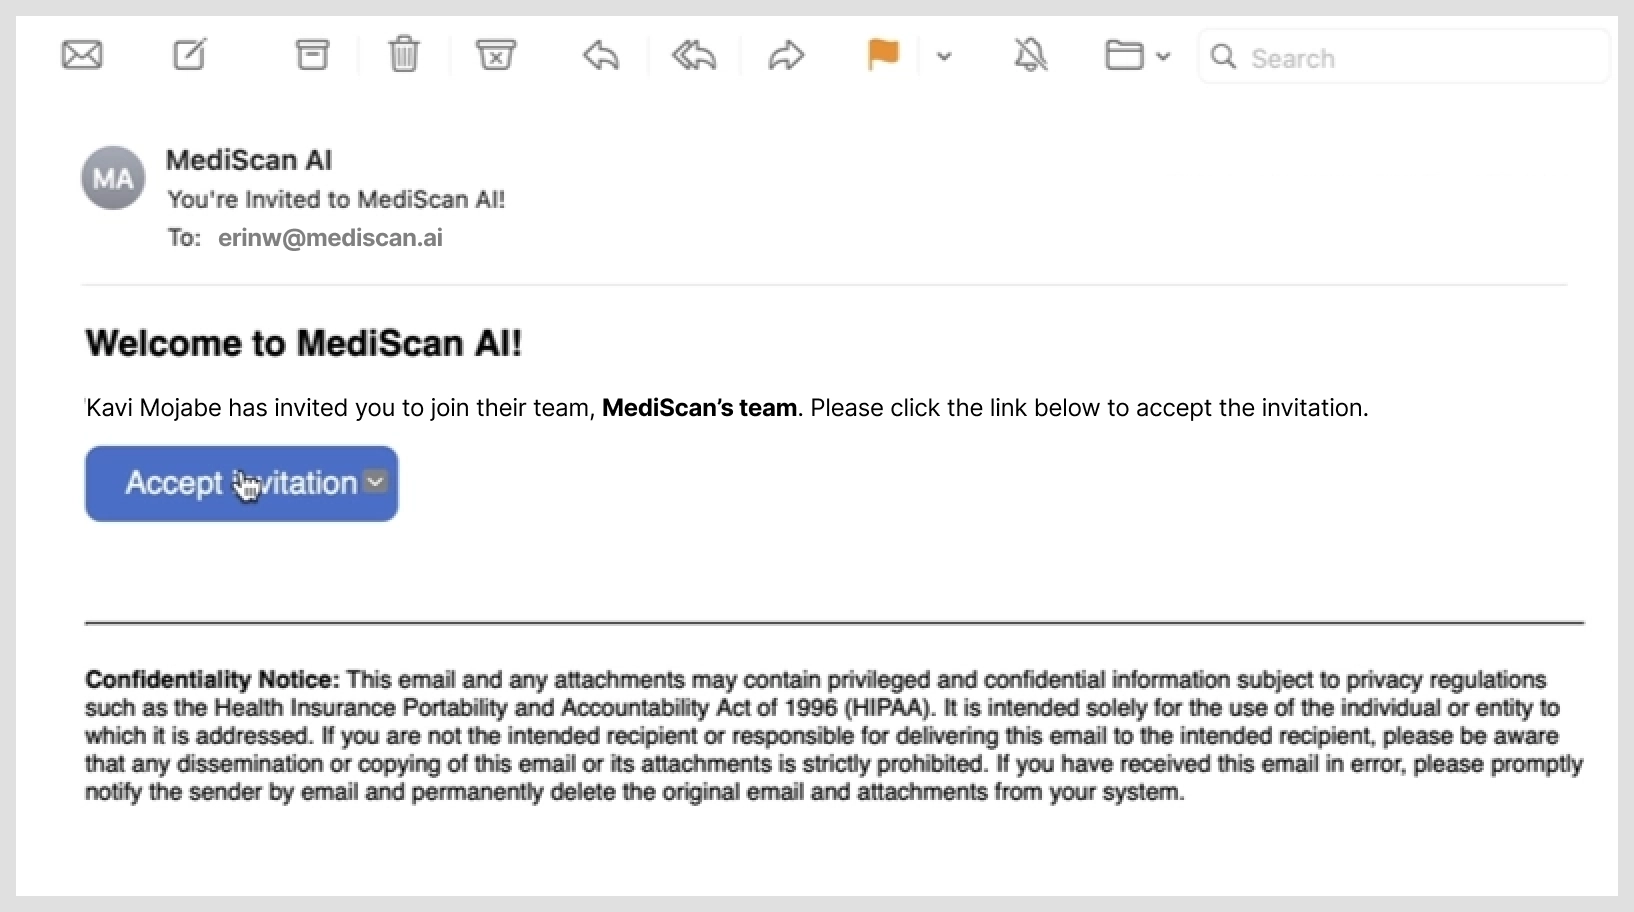
The invited person will receive an email invitation. When they click Accept Invitation, they will be taken to a signup page to create their account.
Accepting a Team Member Invitation (for the invitee)
1. Open the invitation email and click Accept Invitation.
1. On the signup page, enter your:
- First and last name
- Role
- Password

2. After reading the Terms of Service and Business Associate Agreement, check the checkboxes if you agree.
3. Click Get Started.
4. A verification code will be sent to your email. Enter it and click Verify and Continue.
Your browser will open to the case library, where you will have access to all cases on the team.
Invite a Guest
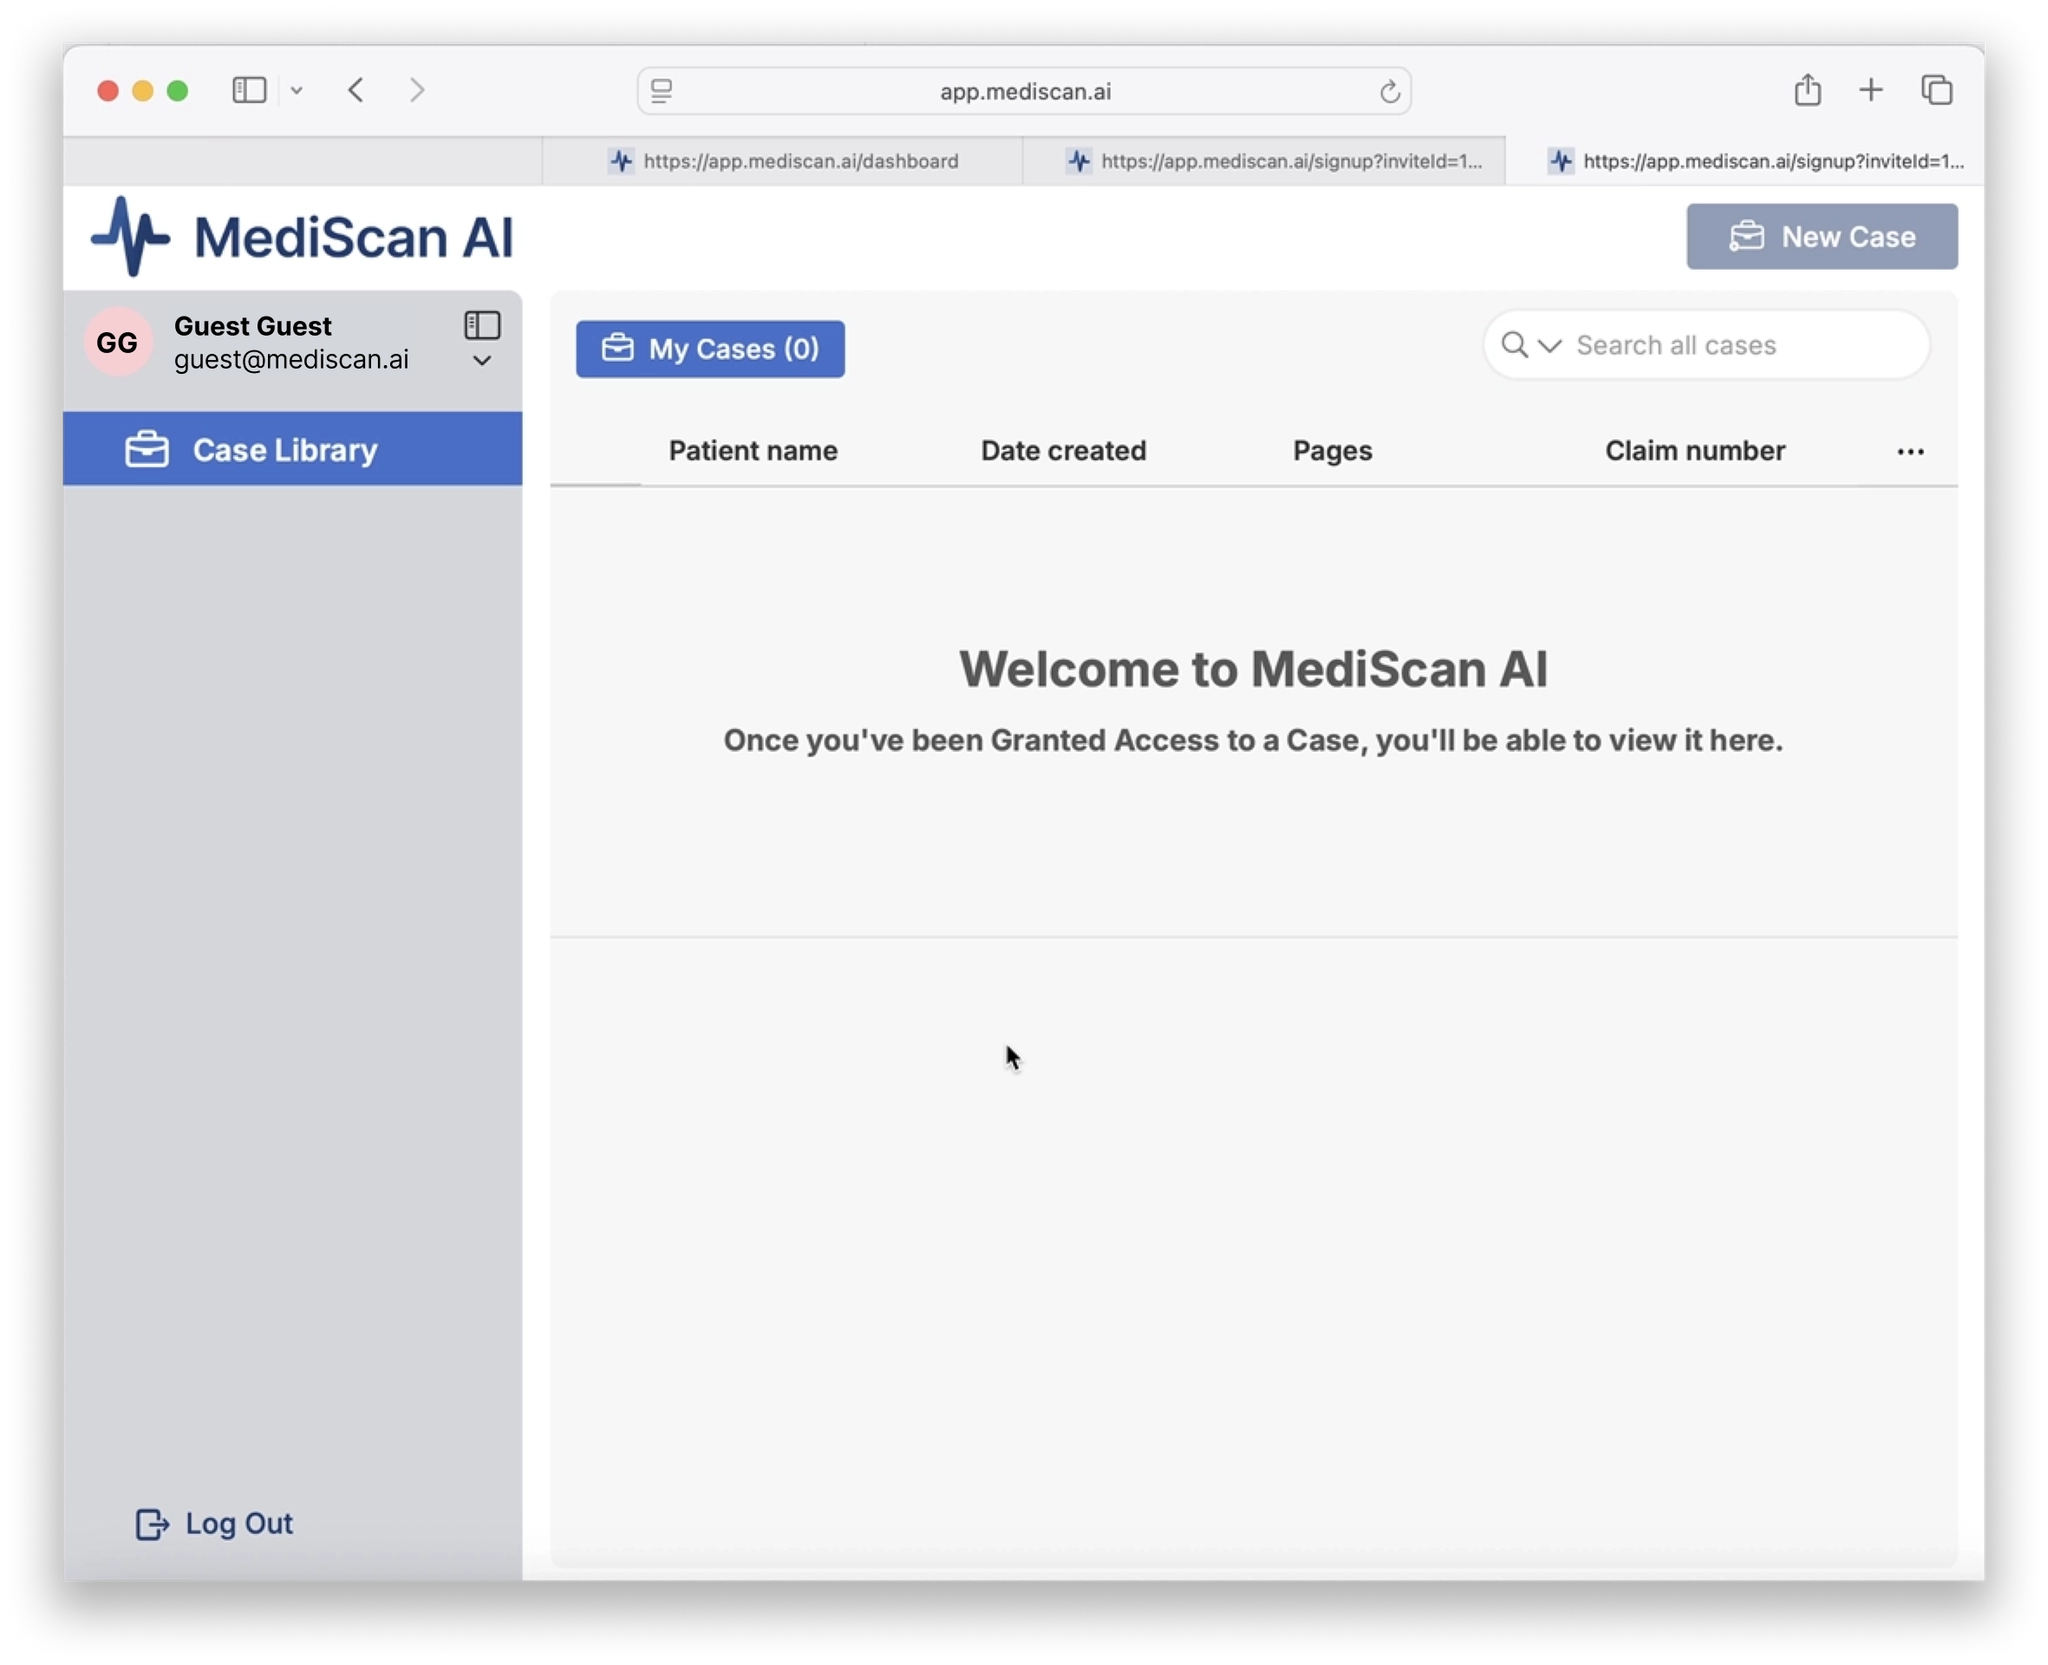
Guests only have access to the specific cases you assign to them — they cannot see any other cases in the case library.
- In the left sidebar, click Team Settings.
- Click Invite Guest.
- Enter the guest’s email address.
- Choose the MediView you want to set as their default.
- Click Invite.
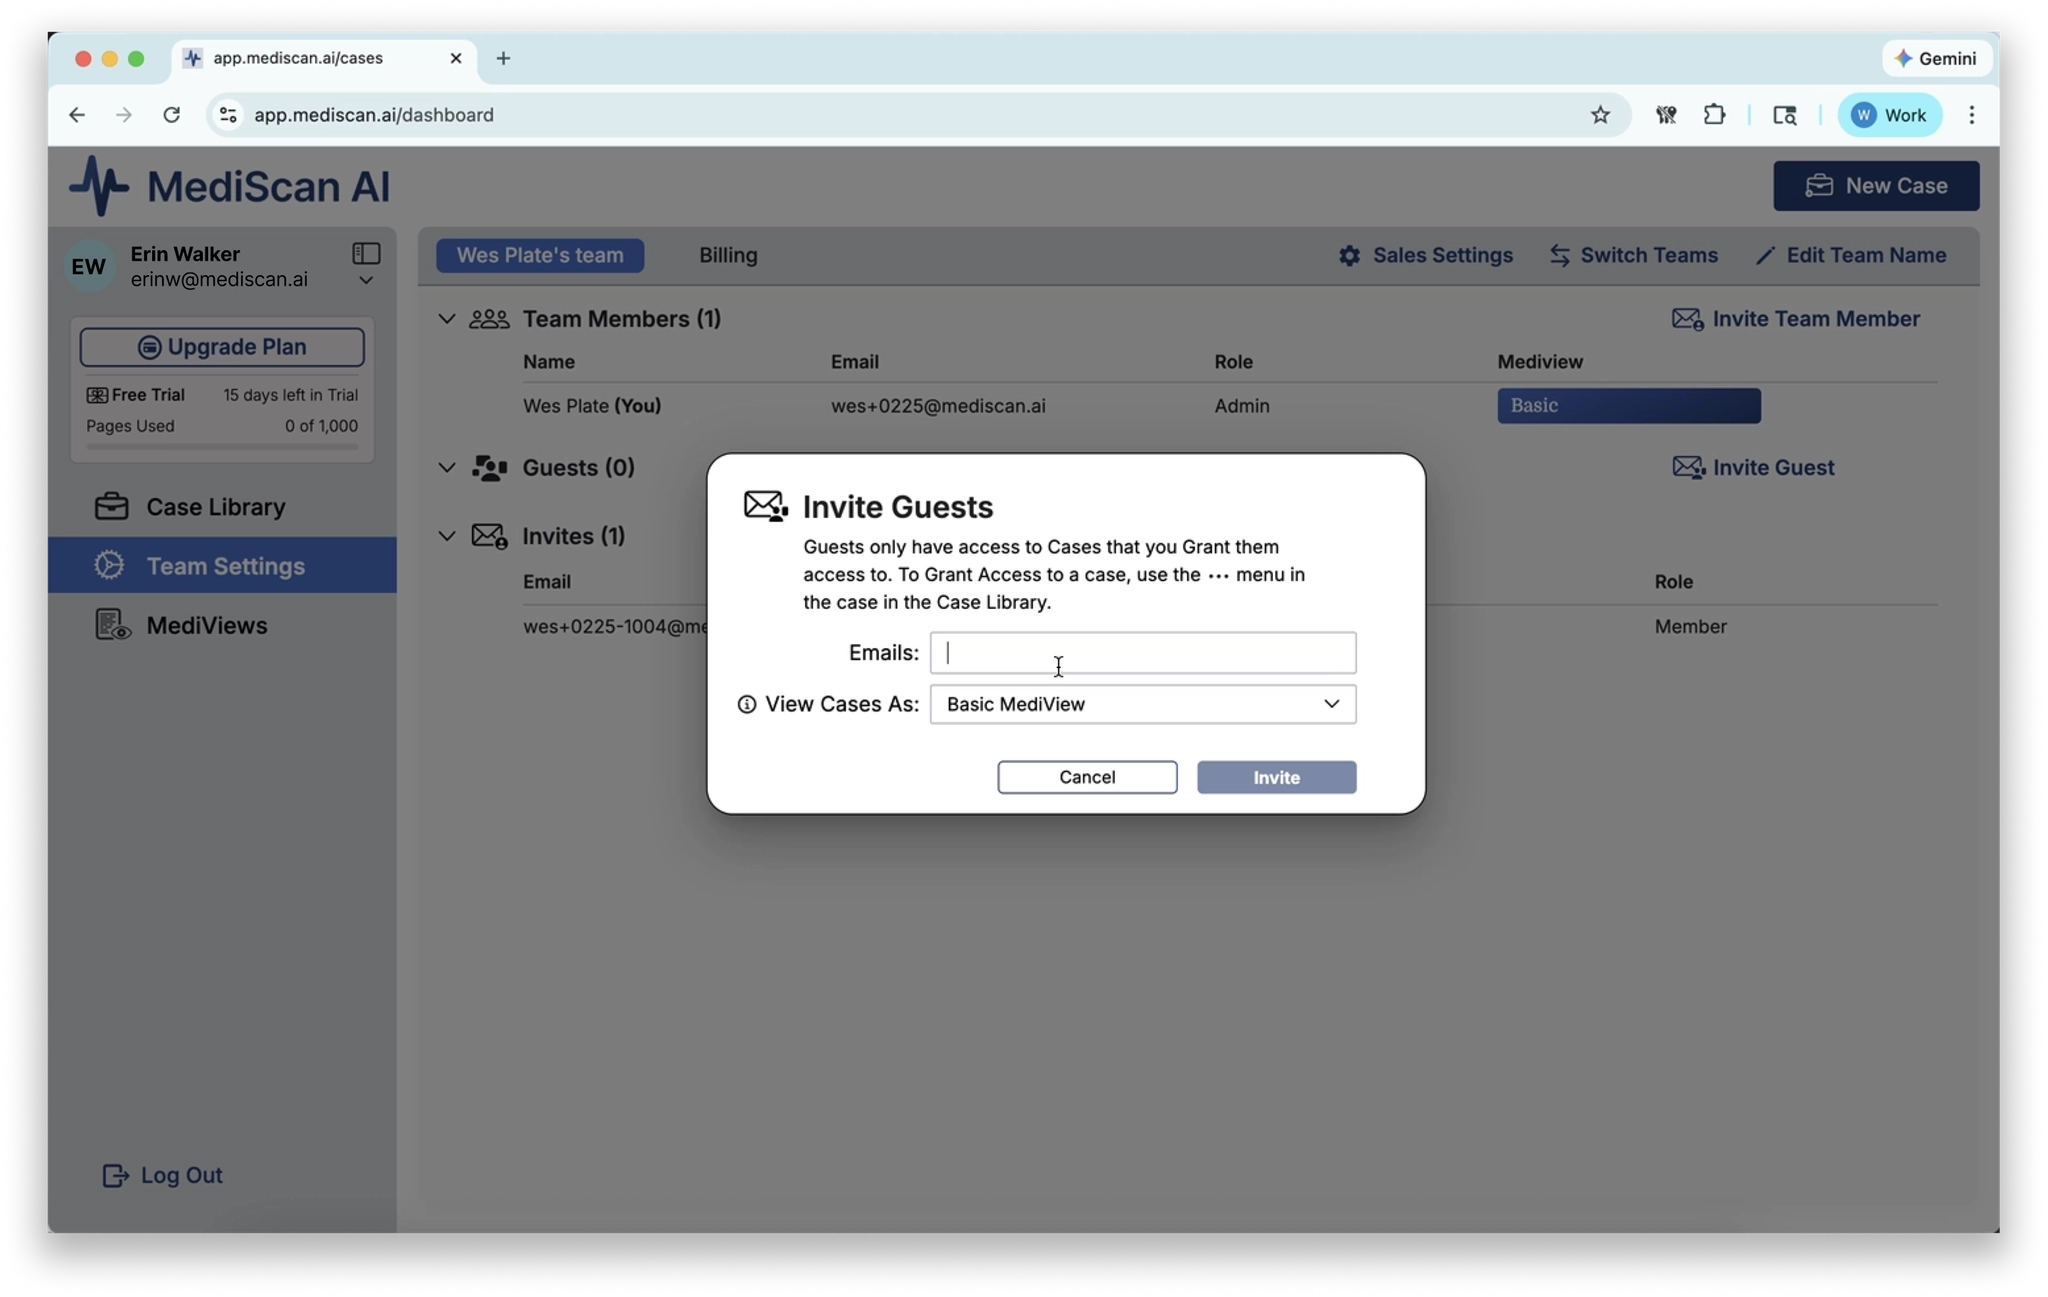
The guest will receive an invitation email asking them to click Accept Invitation.
Accepting a Guest Invitation (for the guest)
1. Open the invitation email and click Accept Invitation.
1. On the signup page, enter your:
- First and last name
- Role
- Password
2. After reading the Terms of Service and Business Associate Agreement, check the checkboxes if you agree.
3. Click Get Started.
4. A verification code will be sent to your email. Enter it and click Verify and Continue.
Your browser will open to the case library. As a guest, you will only see the cases that have been assigned to you.
Invite Team Members or Guests from a Case
After a case has been created, team members and guests can also be invited directly from the case library.
- In the case library, locate the case you want to share.
- Click the … (actions menu) on the far right side of the case row.
- Select the invite option and follow the prompts.
MediChat
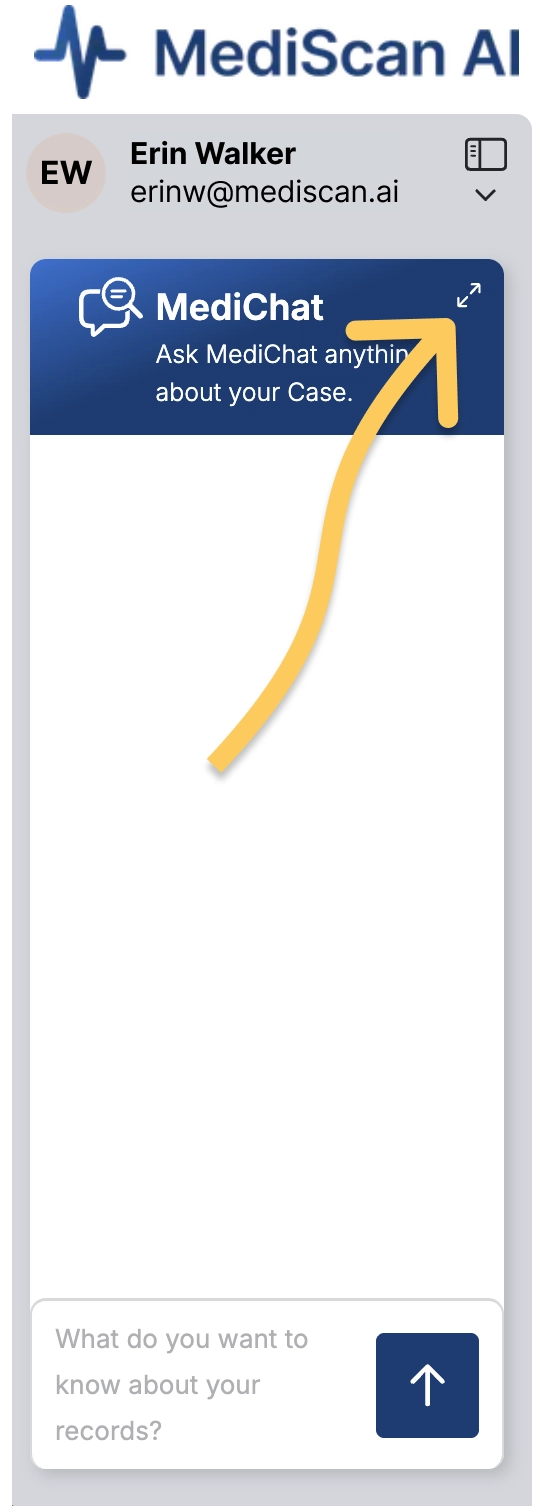
The MediChat panel appears in the left sidebar offering AI-powered assistance for your case review.
You can ask MediChat questions about the medical records, request summaries of specific conditions or treatments, or get help understanding complex medical documentation. The assistant analyzes the documents in your current case to provide contextual, accurate responses.
The MediChat interface can be expanded or collapsed as needed to maximize your MediChat results.
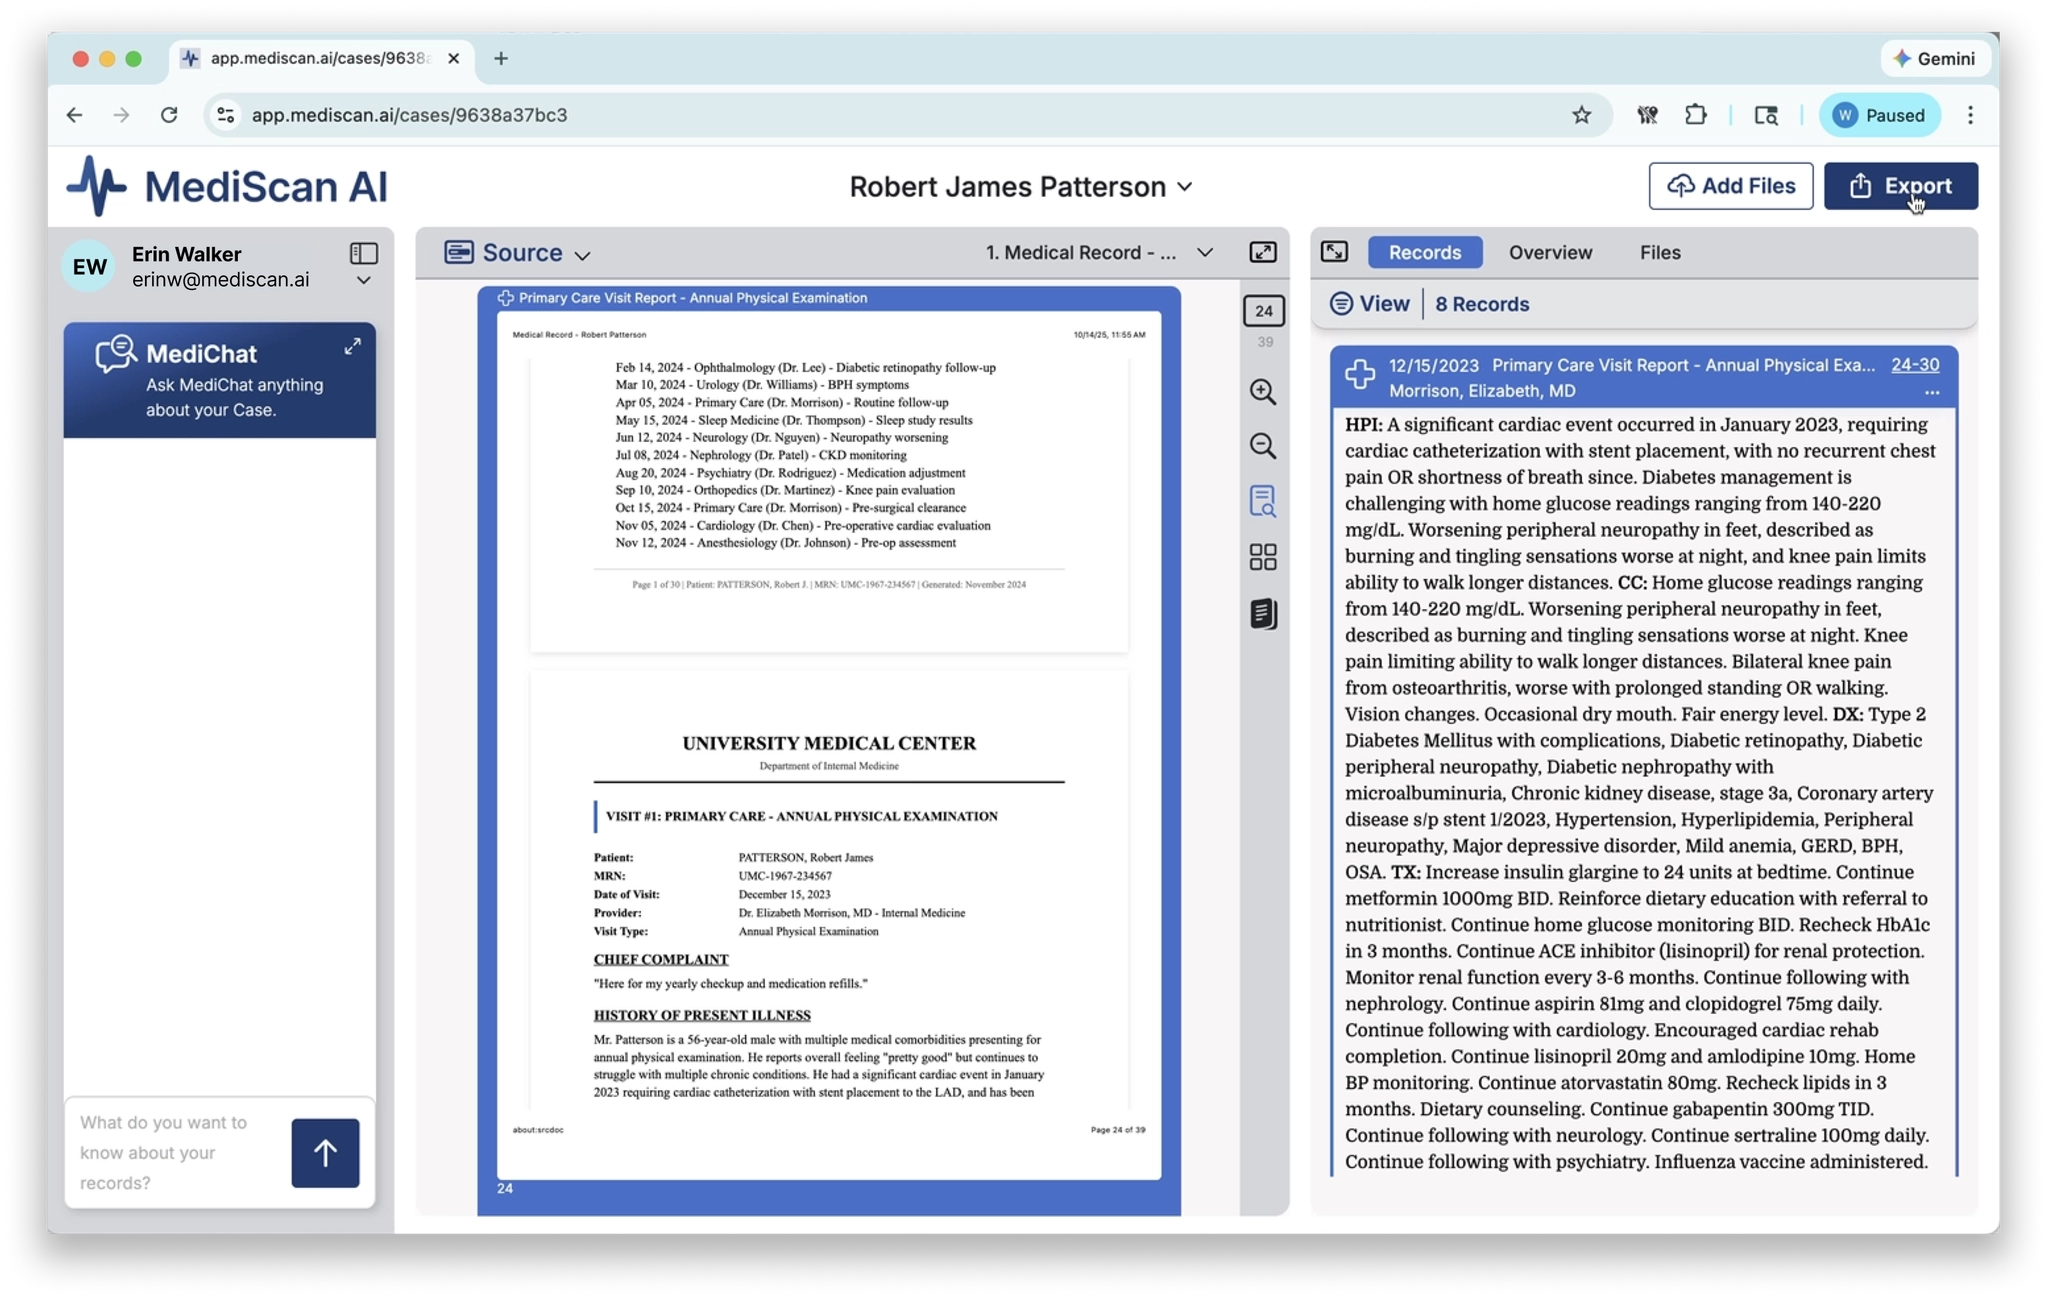
Case Page
When you double click on a row in the Case Library, you enter the Case Page.
1. Case Context Bar
The top bar displays the current case’s patient name with a dropdown arrow. This dropdown lets you quickly switch between cases without returning to the Case Library, streamlining your workflow when reviewing multiple related cases or moving through your task list.

Two action buttons on the right provide key functionality: Add Files lets you upload additional medical records or documentation to the current case, while Export allows you to generate reports or download case data in various formats.
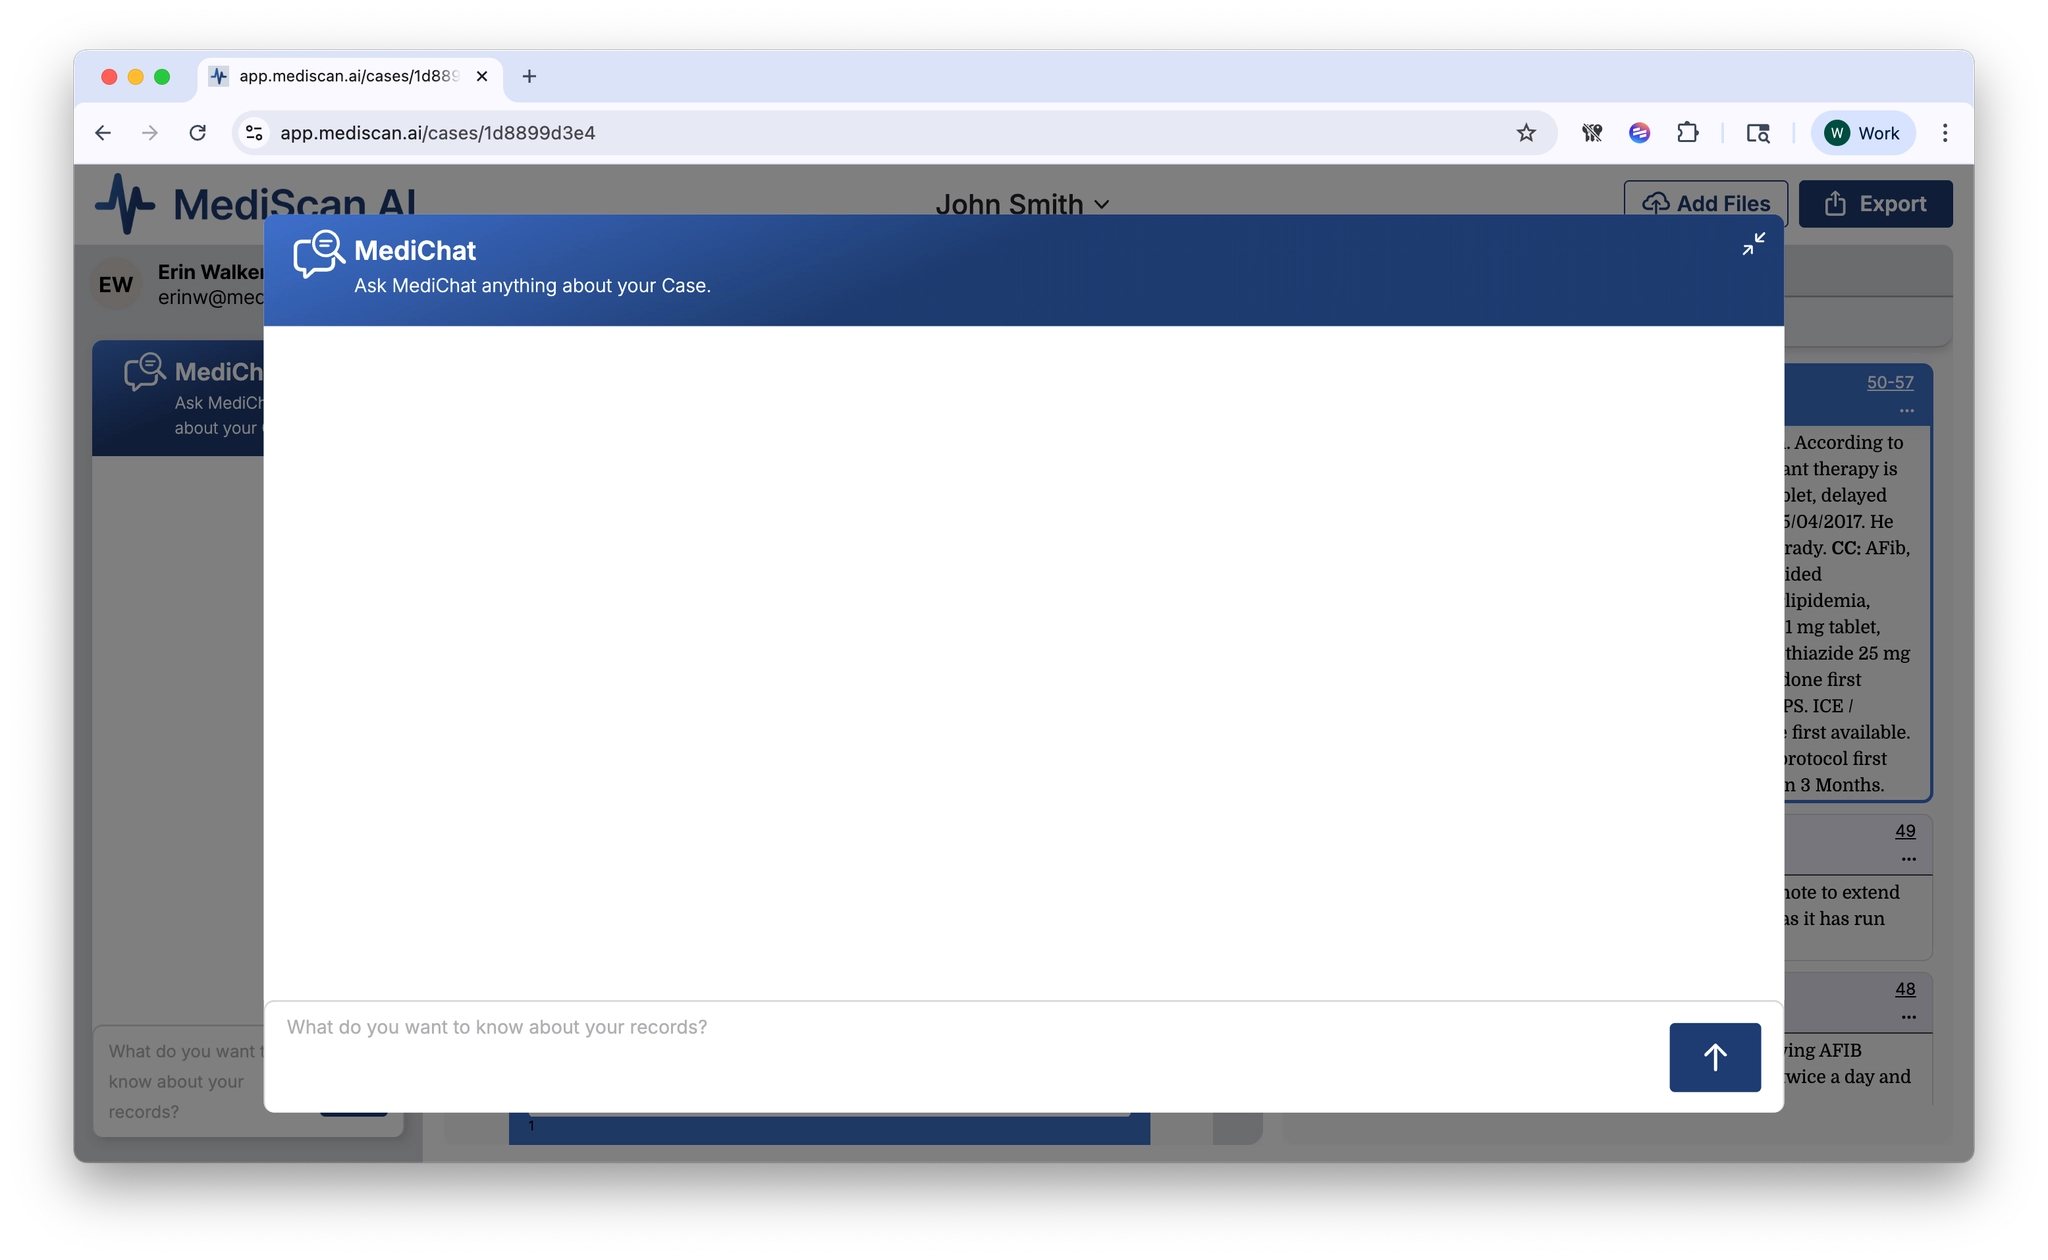
2. MediChat Assistant
The MediChat panel appears in the left sidebar offering AI-powered assistance for your case review. You can ask MediChat questions about the medical records, request summaries of specific conditions or treatments, or get help understanding complex medical documentation. The assistant analyzes the documents in your current case to provide contextual, accurate responses.
The MediChat interface can be expanded or collapsed as needed to maximize your MediChat results.
3. Source Viewer (Left Pane)
The left pane serves as your primary document viewer. At the top, a dropdown menu labeled lets you specify if the viewer is showing selected Records only all of your Source Files.
When Selected Records Only is chosen in the dropdown menu, the Source Viewer will always load the pages from the record in the right hand panel. The title of the Record is shown in the top bar.
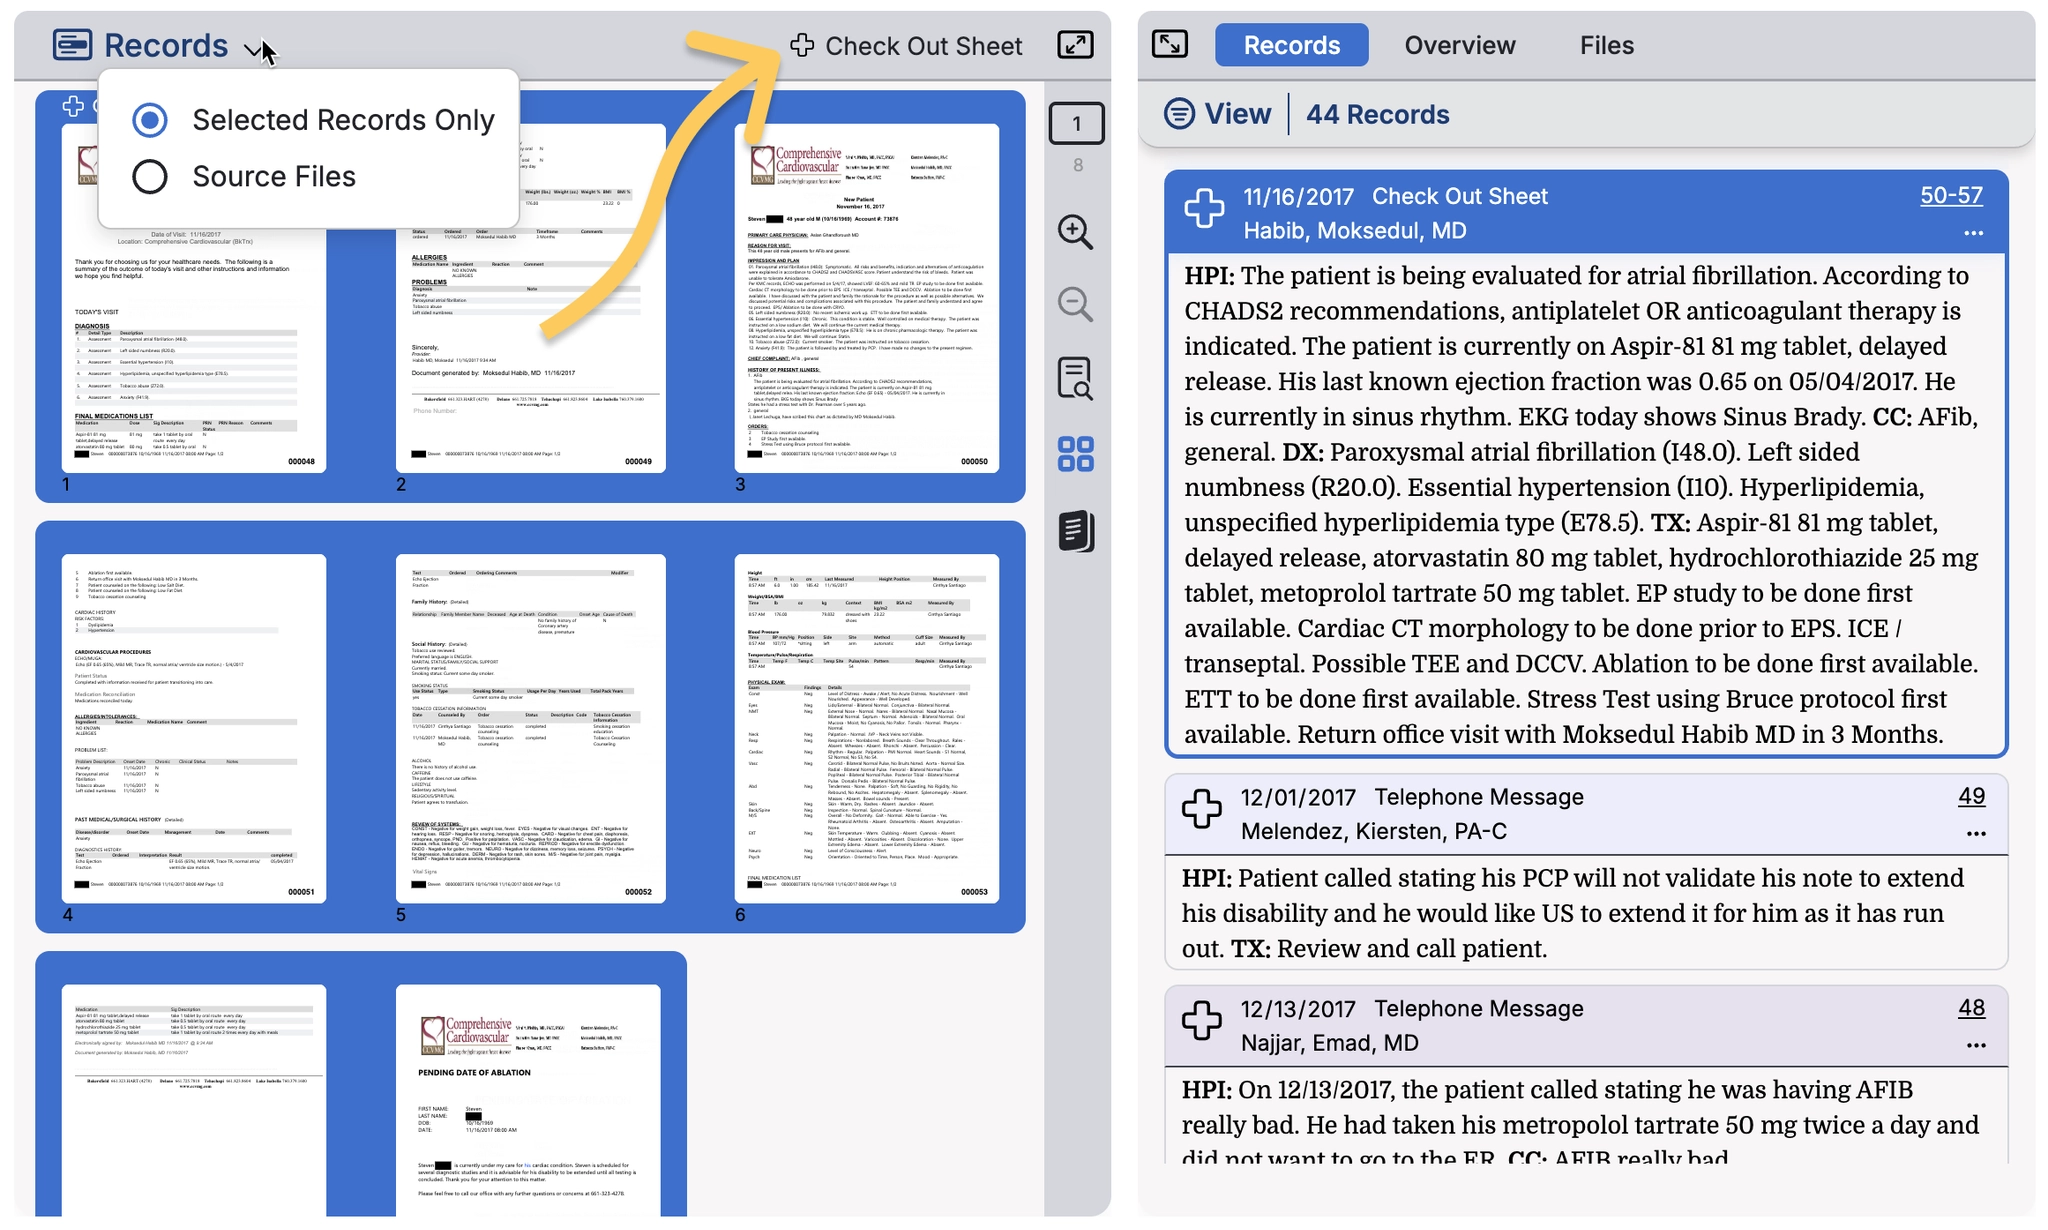
When you choose Source files, the entire source file is loaded into the Viewer and the records that are selected are scrolled to within each file. You can see the name of the file in the bar and switch to another file by clicking on the dropdown to load a different file into the viewer.
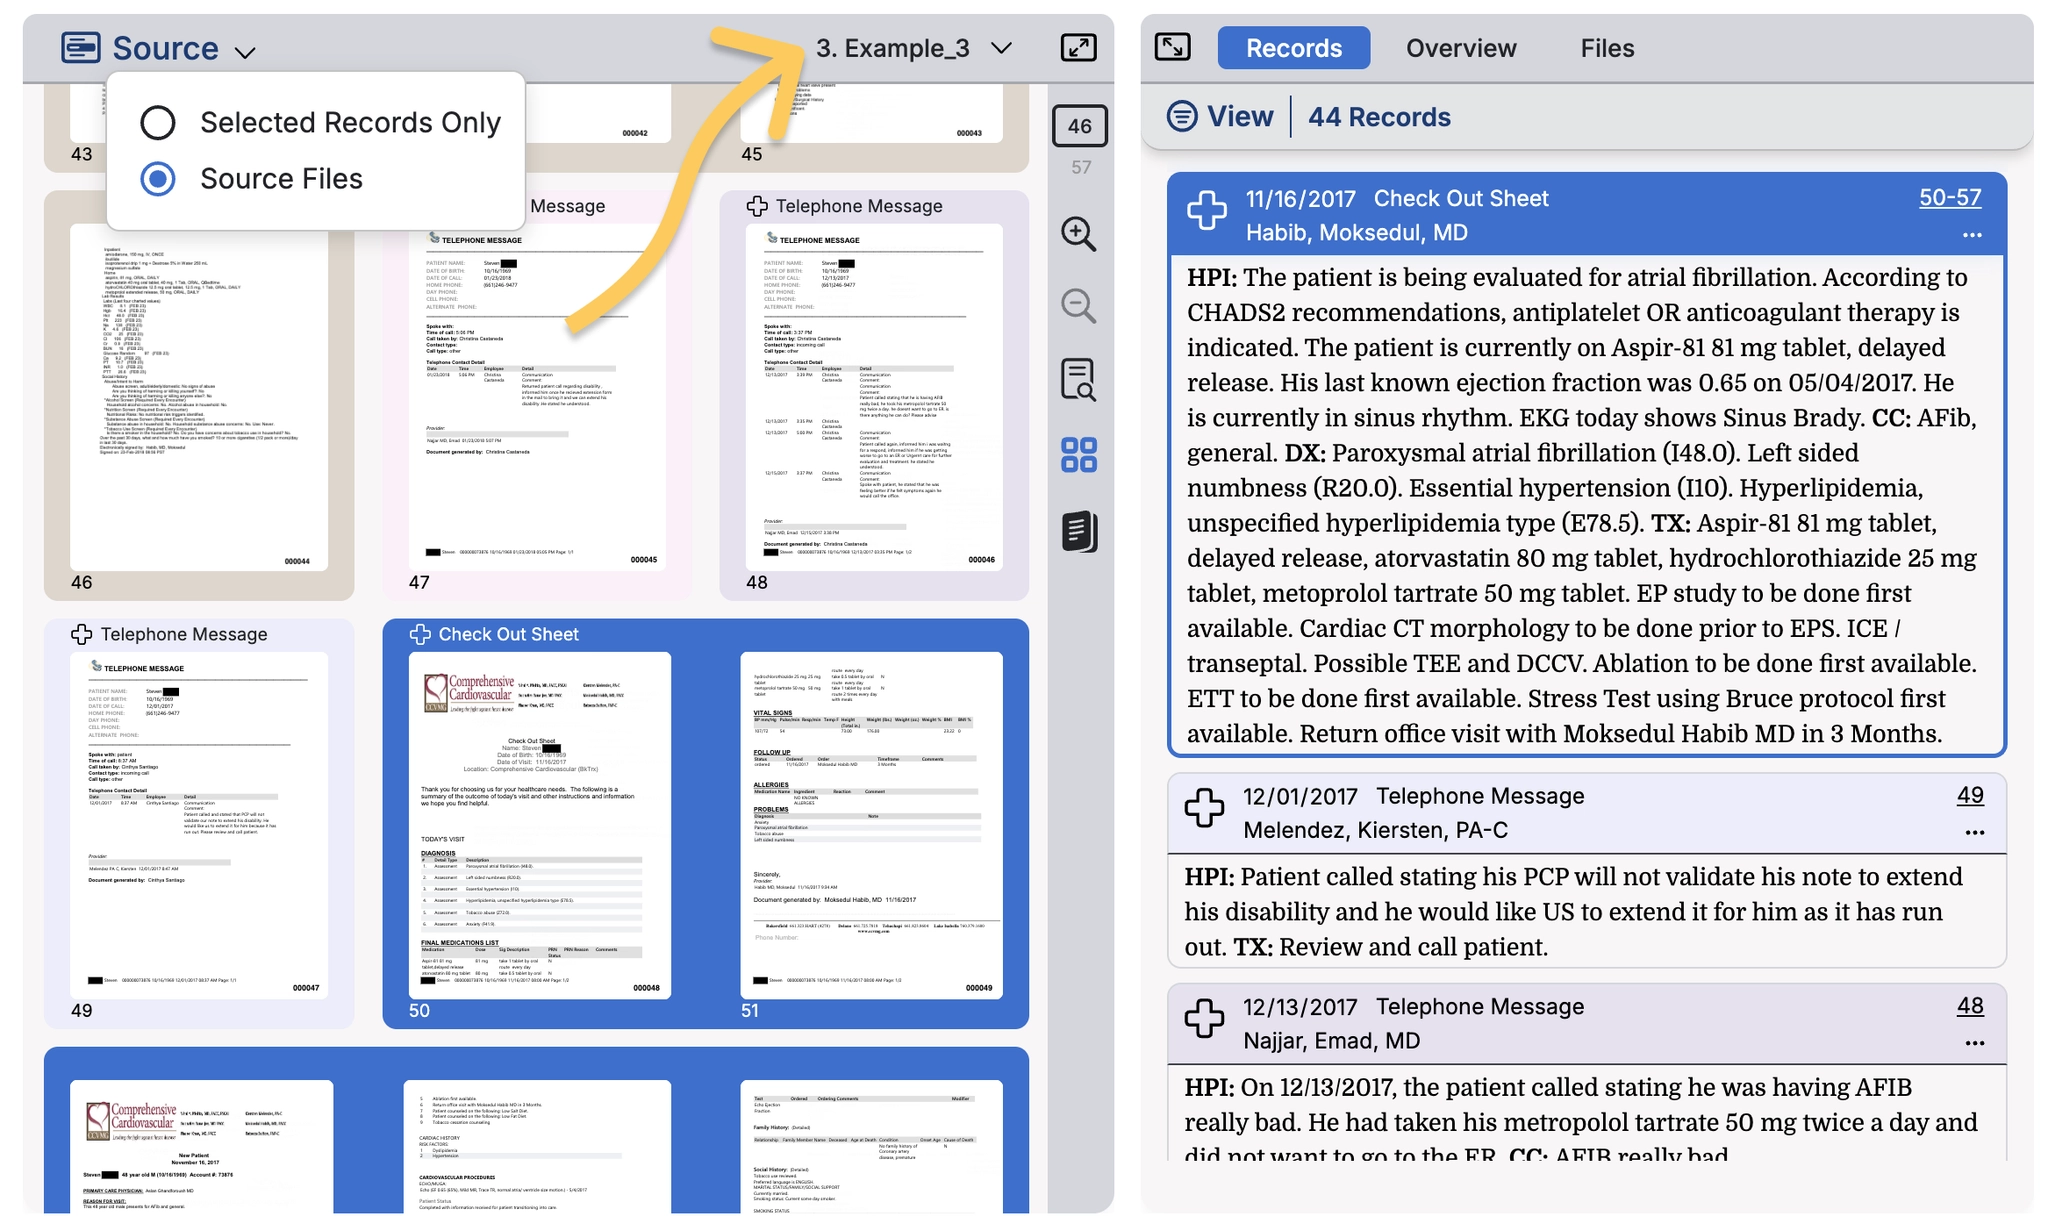
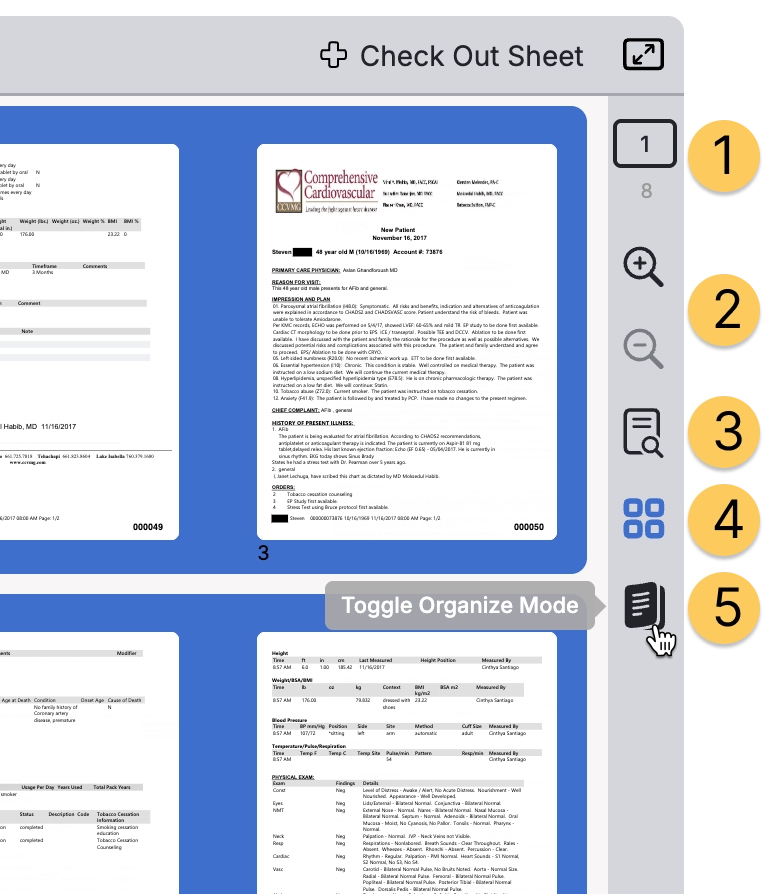
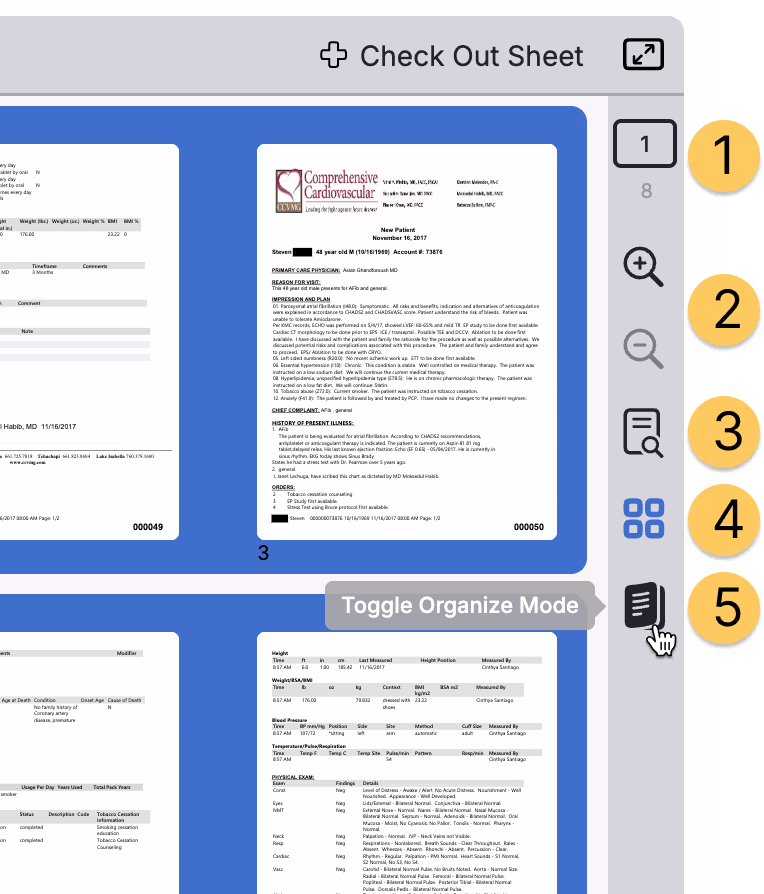
On the right side of the viewer, you'll find a comprehensive set of viewing controls. These tools allow you to
- navigate between pages
- zoom in and out
- zoom in for detailed examination of text or images
- switch to a thumbnail grid view to scan multiple pages quickly
- go into Organize mode where you can manage how your records are split and created.
Learn more about Organize mode here
4. Case Panel (Right Pane)
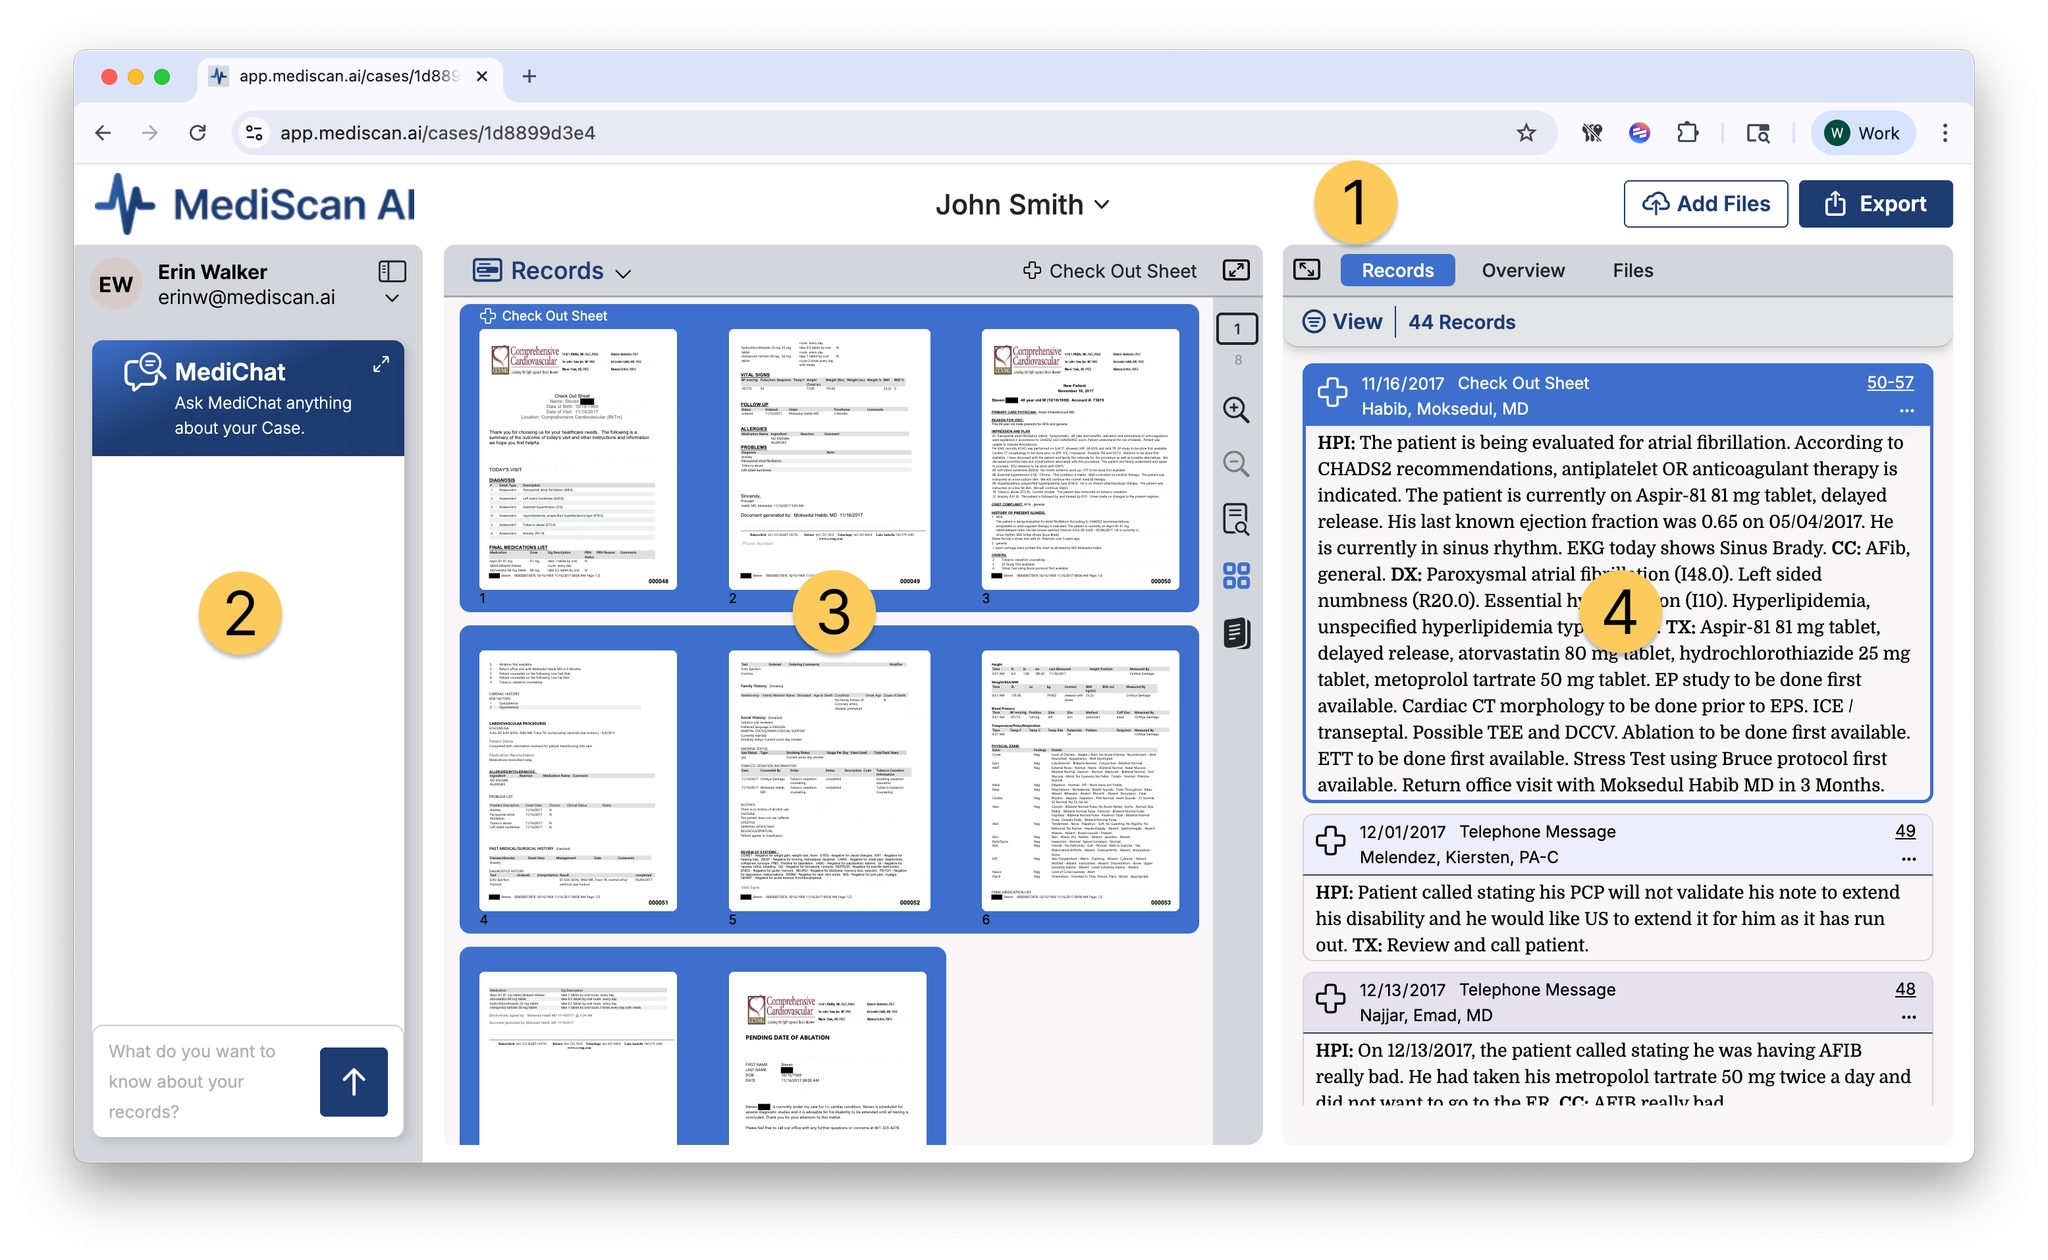
The Case Panel organizes all records and information related to the case through three tabs: Records, Overview, and Files.
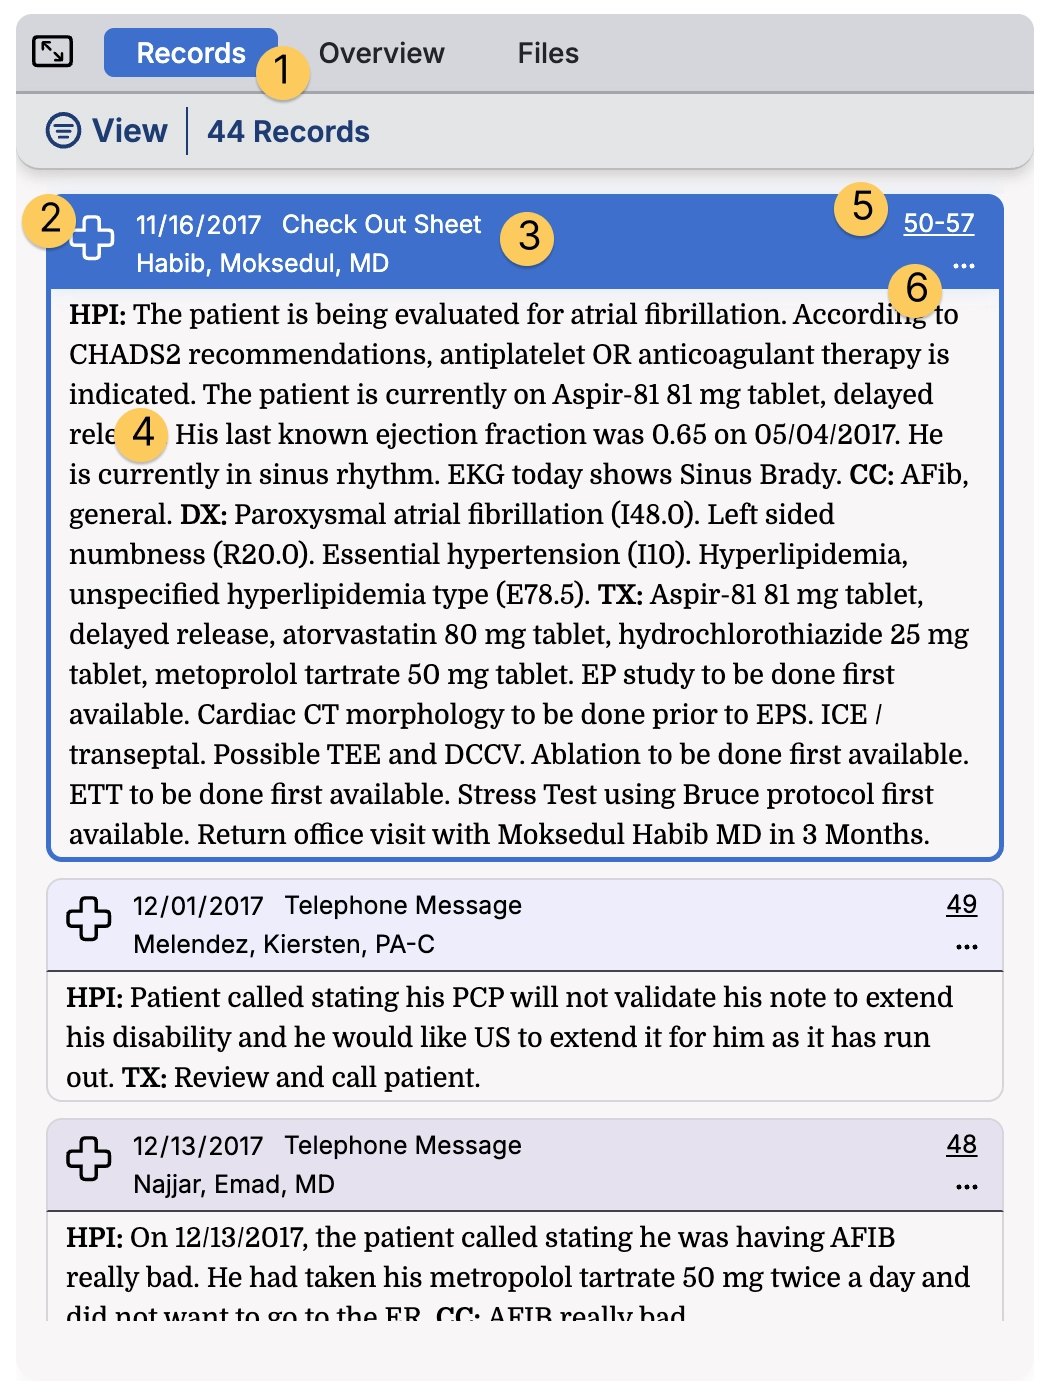
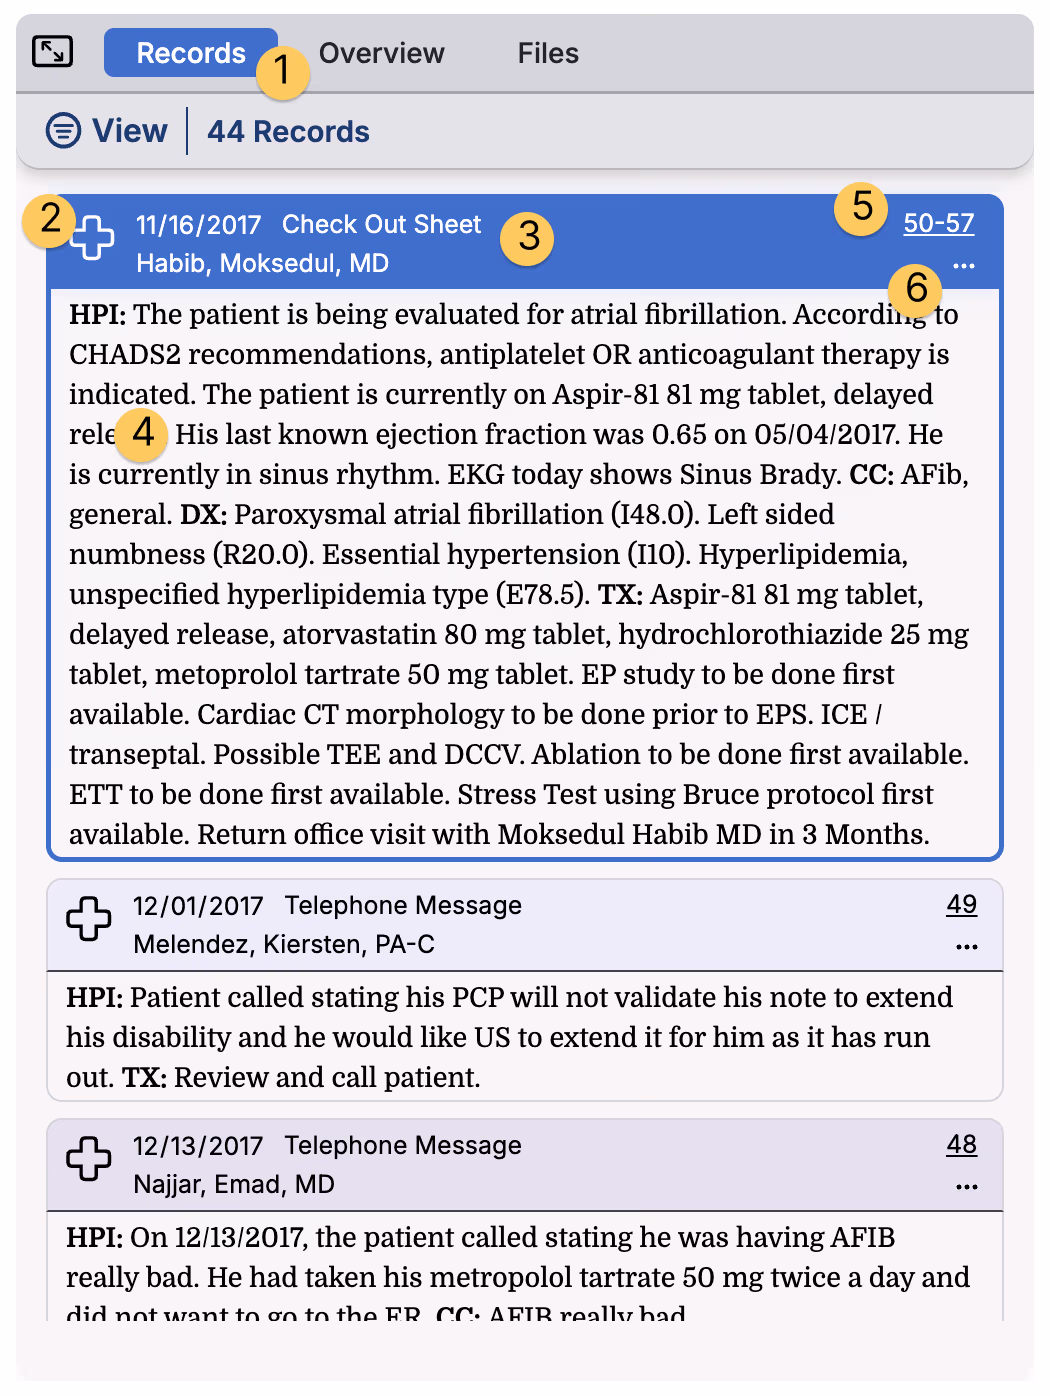
Records Tab (1)
When the Records tab is active, you see a chronological timeline of all medical records in the case.
Each record entry displays a MediScan AI generated summary based on your MediView settings.
The top bar of each Summary includes a badge that indicates the record type (2), date of the visit (3), followed by the title of the record. You can also choose to include the author, the facility and the specialty.
Record Types:
- list them all
- Sub Record types
Below this header information, the system displays a summary including data fields like History of Present Illness, Chief Complaint, Diagnosis, Treatment plan, and Work History or Work Status information (4). This intelligent extraction means you can often gather the key facts from a medical record without needing to open and read the full document. Each Record Type will display a different set of fields that are specific to that record type.
A page count indicator (5) shows the length of each record, and denotes if the record spans different files.
The ••• menu at the right of the header contains more action options including the ability to collapse, organize and edit the content (6).
-Editing:
-Organizing Pages
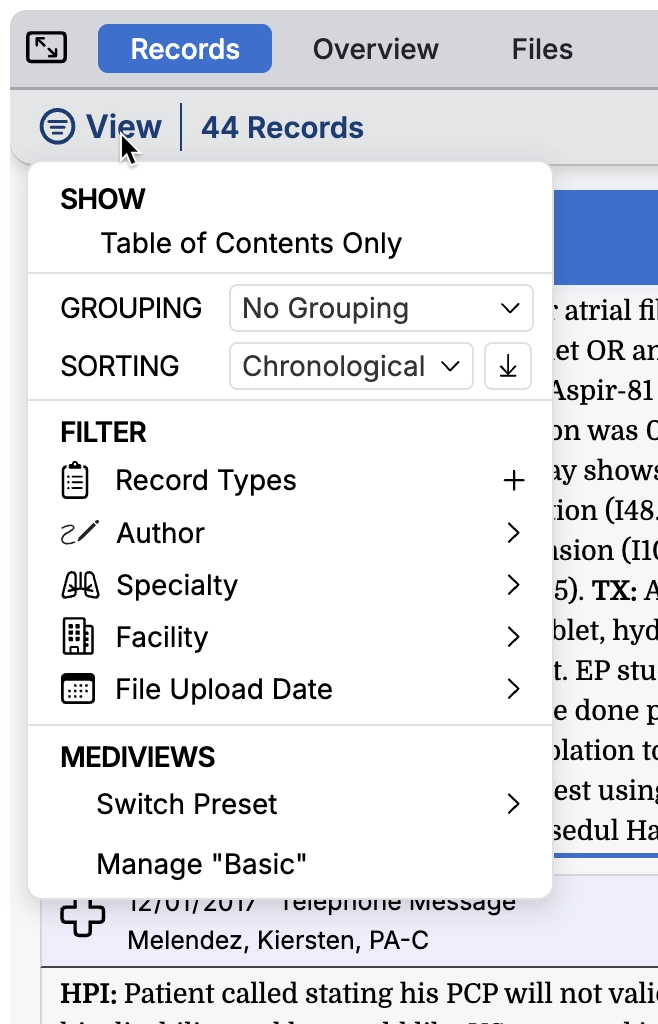
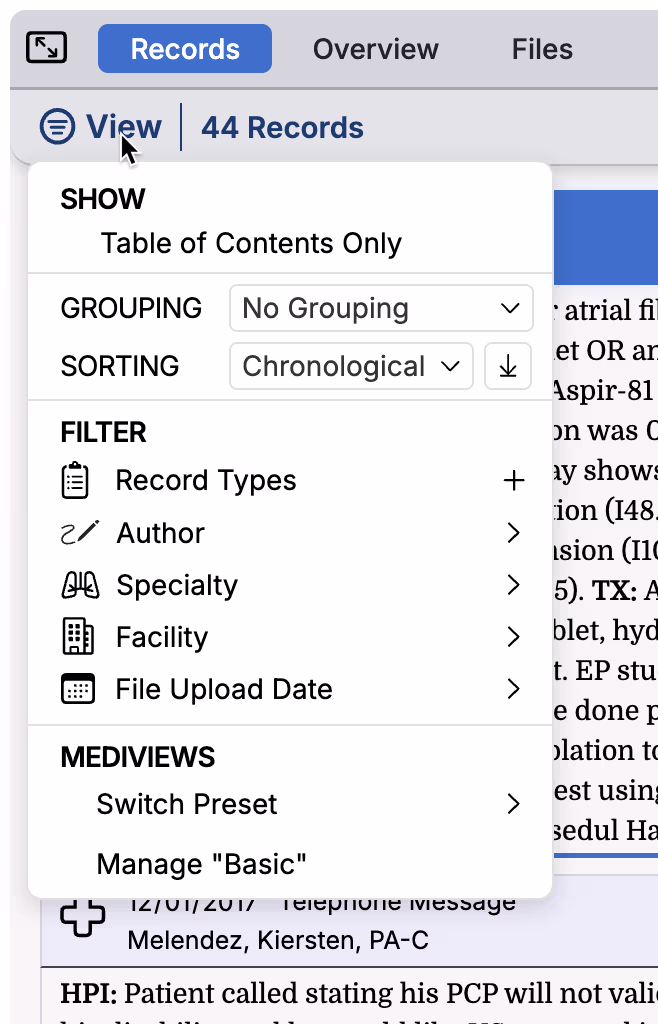
Within the Records Tab there are numerous controls under the View menu that help you sort and filter and find or focus on specific record types and more
- View menu
- Grouping
- Sorting
- Filtering
- MediViews
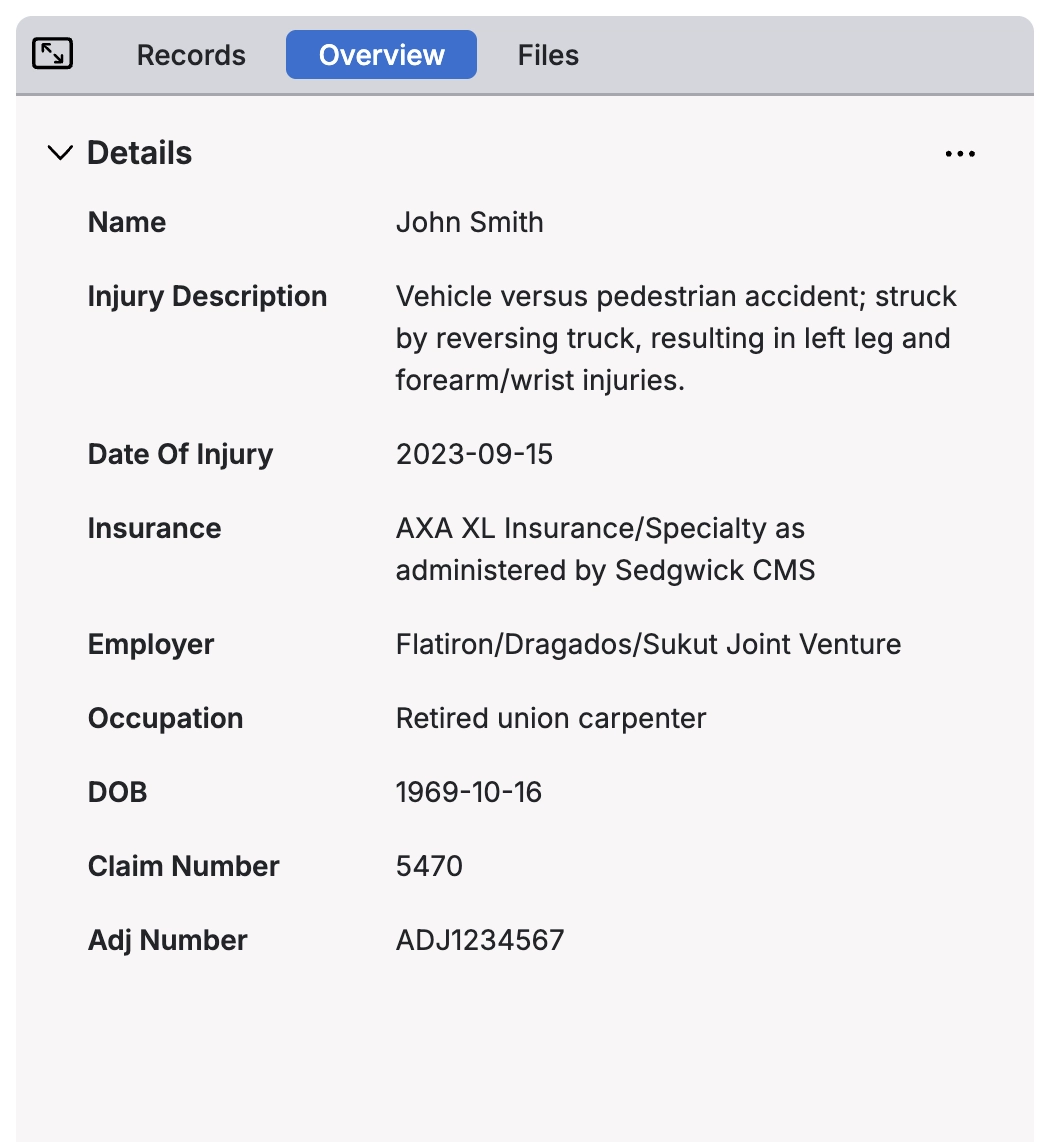
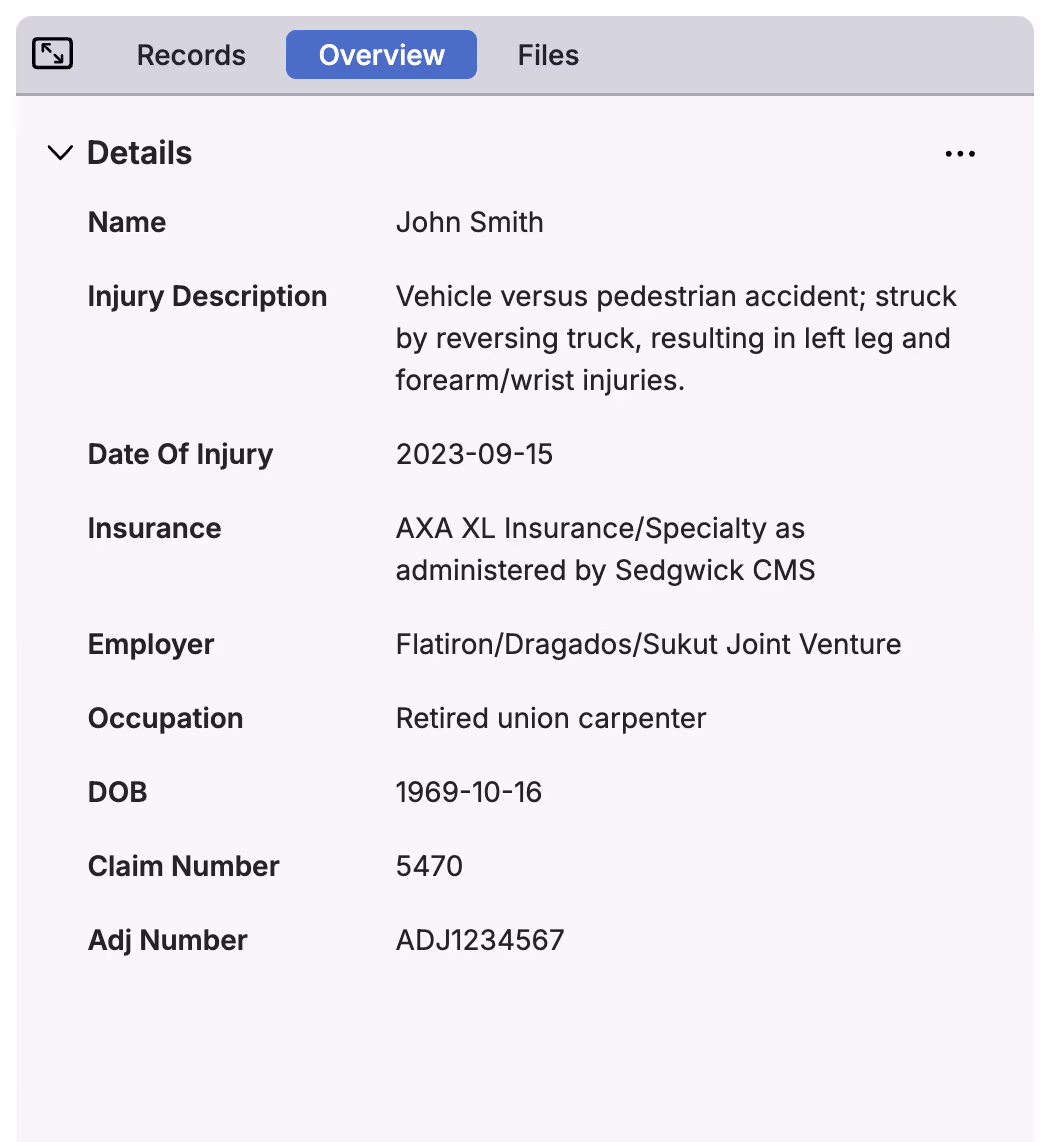
Overview Tab
The Overview tab provides a high-level summary of the entire case, integrating information from all records to give you a complete picture of the patient's medical journey, claim status, and case progress.
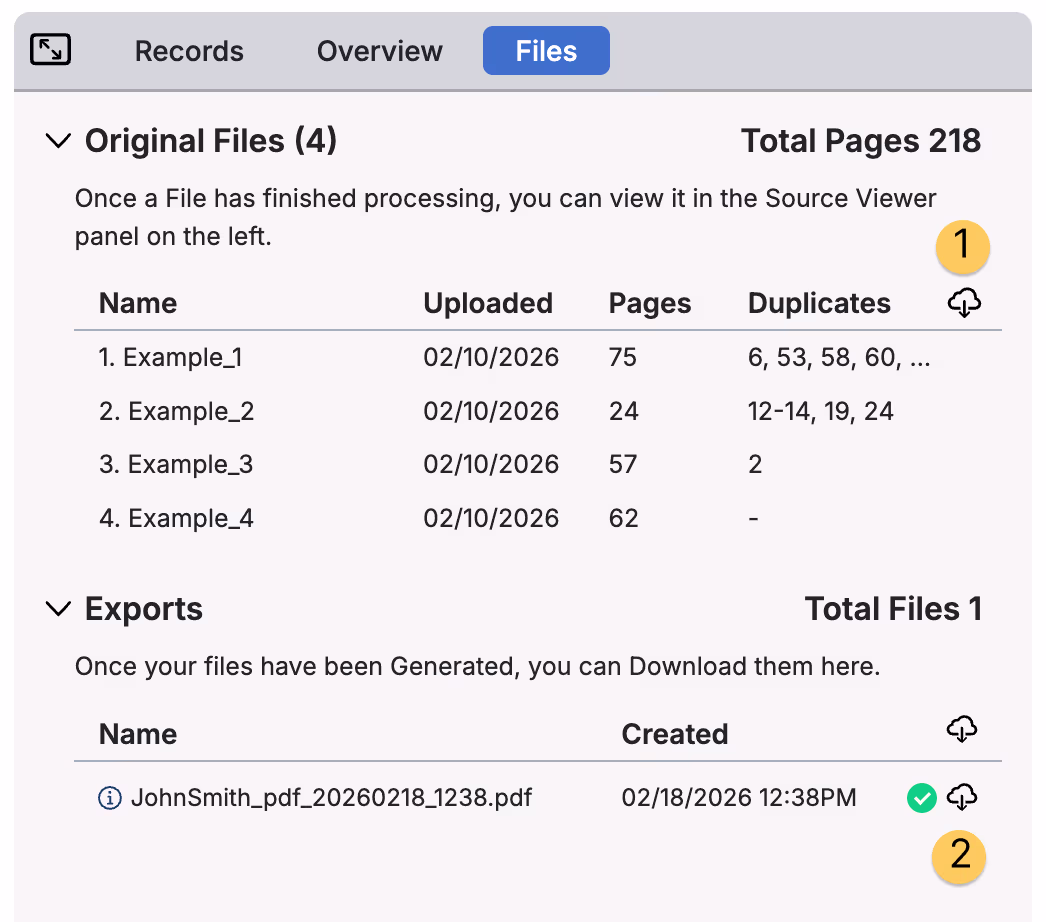
Files Tab
The Files tab offers a document management interface where you can download the original case files that were uploaded (1), see the date each file was uploaded, and see how many duplicates exist per file.
Exports are also listed in the files tab and are downloaded from here (2).

MediViews
MediViews are saved configurations that control how your cases appear in MediScan AI. You decide which record types to include, which fields to show or hide, and how records are grouped and sorted. Once set up, MediViews are shared across your team—so everyone's working from the same consistent view of the data that matters to them.
To access, click MediViews from the left sidebar. If you are in a Case page, click the MediScan AI logo to navigate to the Case Library and enable the sidebar.
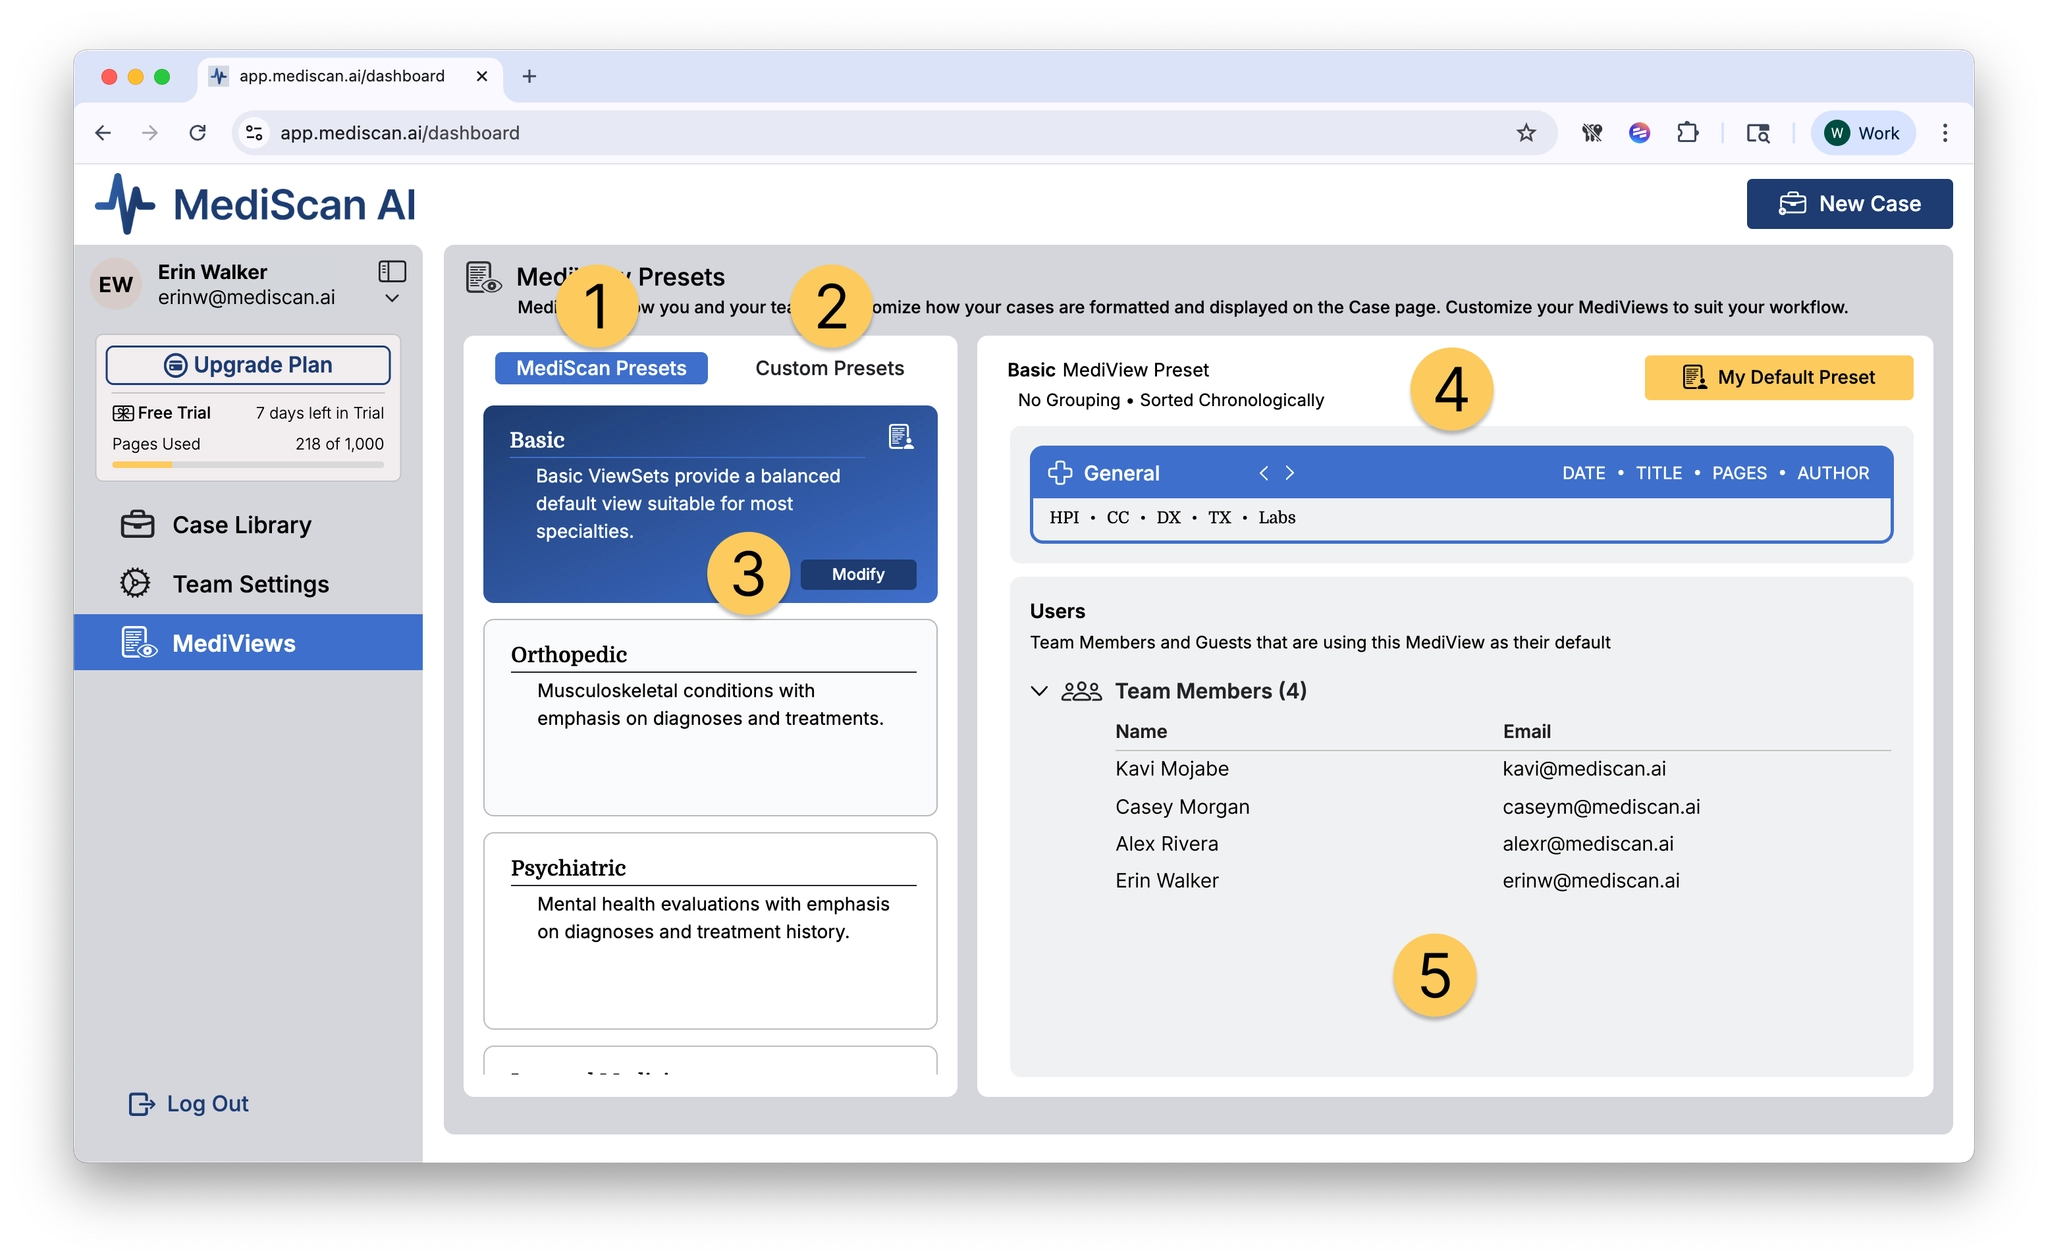
The left side of the MediViews screen lists presets in two categories: MediScan Presets that come from MediScan AI (1), and Custom Presets that you and your team have modified (2).
MediScan-created presets cannot be changed, but if you press the Modify button (3), you can create a new custom preset based on the built-in preset.
In the top of the right side of the MediViews management screen, is a settings preview for the selected preset (4).
- Grouping and Sorting
- Record Types
- use the < and > buttons to cycle through the preset’s enabled record types
- see the fields enabled for each record type
- see the header fields enabled for each record type
The bottom right of the screen lists the team members who use this preset as their default (5).
This is especially useful for Custom MediViews, so that you know which users will affected if you make changes to that preset.
Team Settings
To access, click Team Settings from the left sidebar. If you are in a Case page, click the MediScan AI logo to navigate to the Case Library and enable the sidebar.
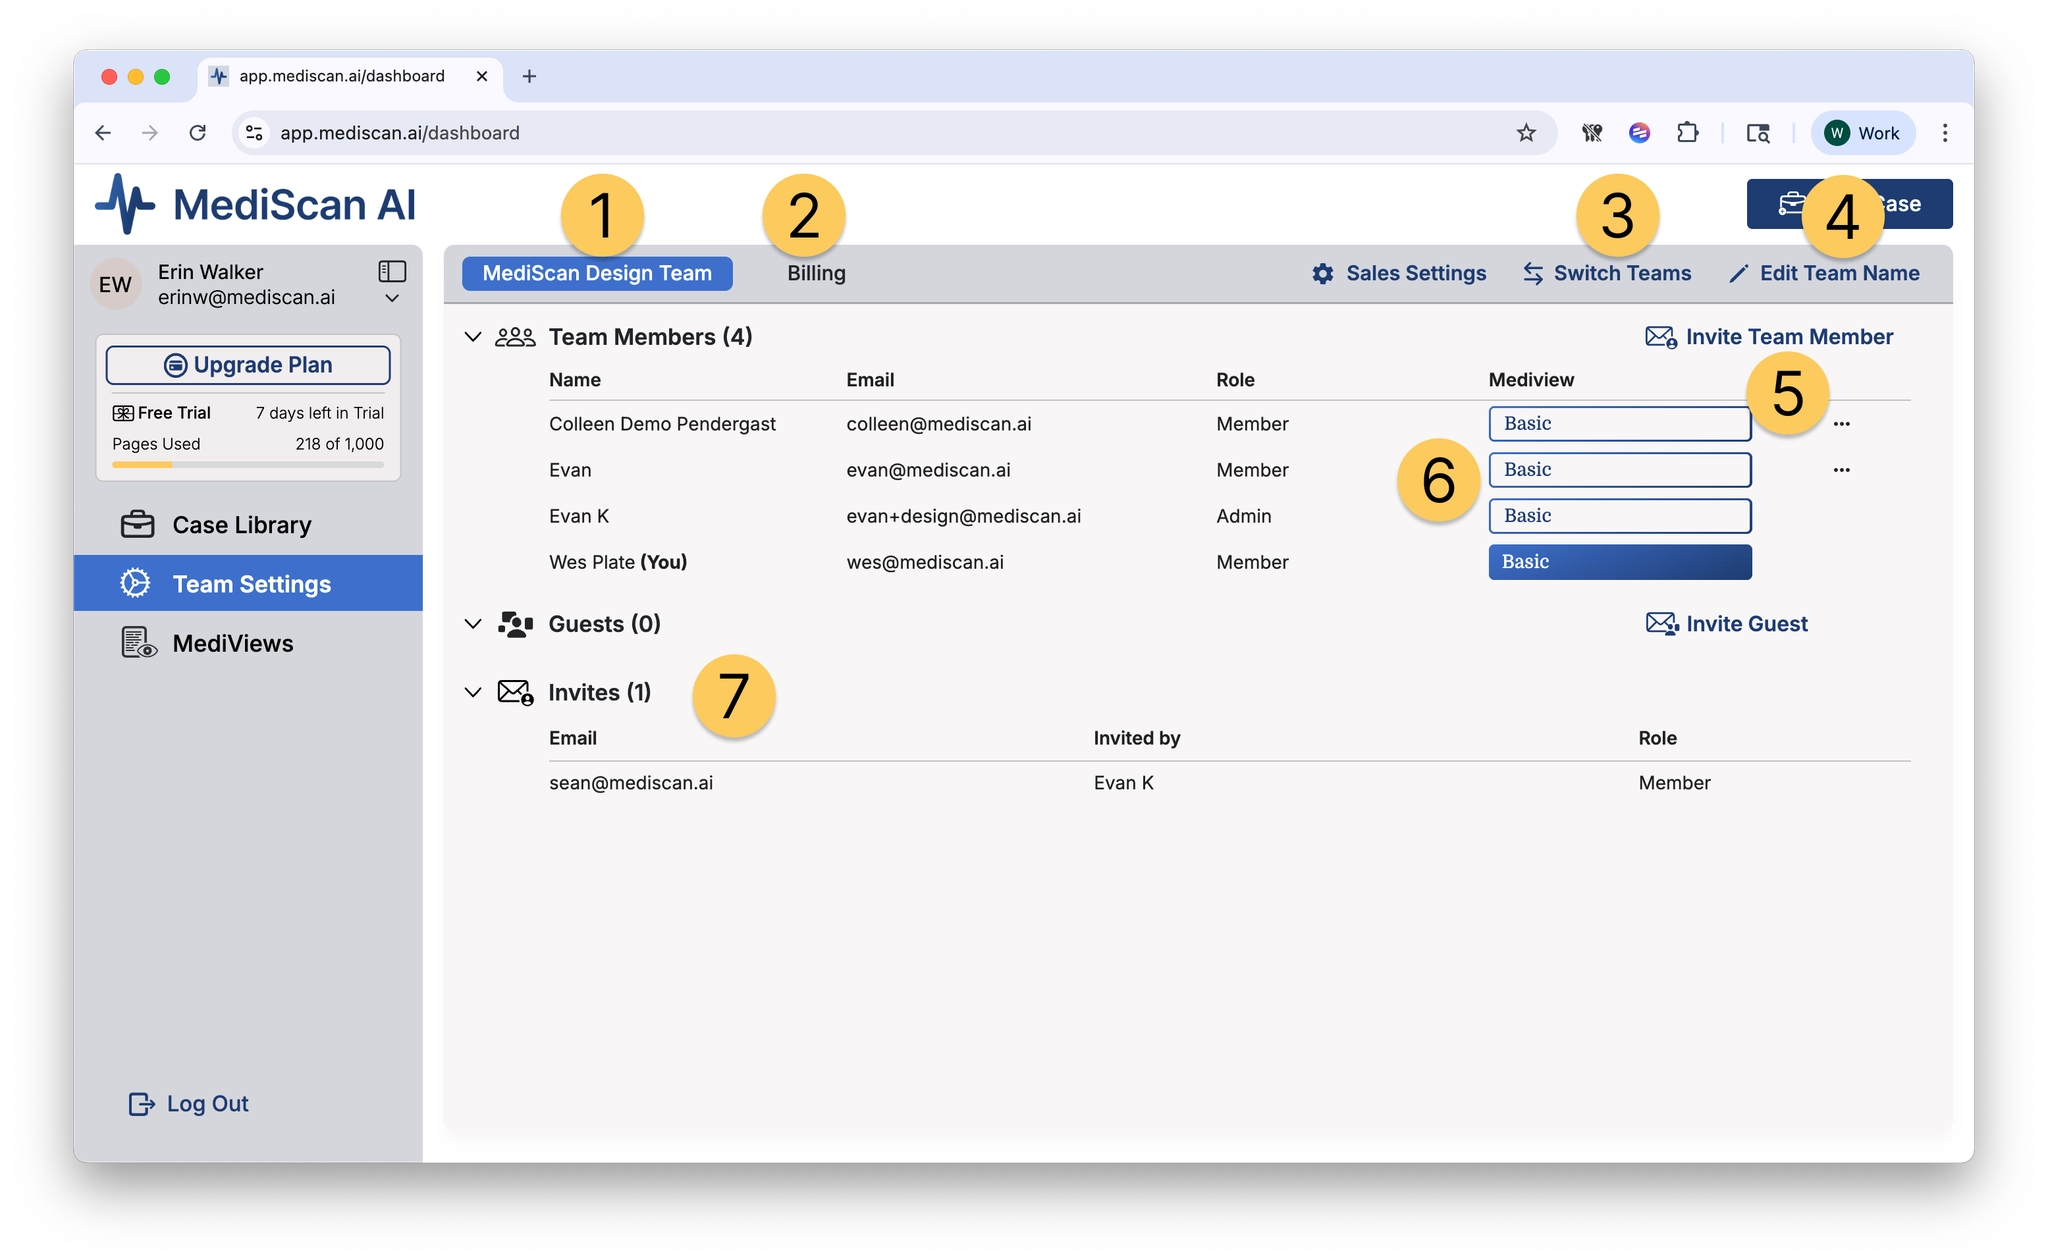
- The first tab shows the name of your team in MediScan AI
- Click the Billing tab to review and download invoices
- If you have logins for more than one team, use Switch Teams to switch between them
- Use Edit Team Name to change your team name
- The area below the header buttons lists the members of your team, and you can invite new team members with Invite Team Member
- Admin users on this page can set the default MediView preset for each team member
- Pending invites are shown below Guest users
Billing
Click Billing in the header bar to see a list of your MediScan AI invoices.
Click something under the Download CSV column to download a CSV organized by patient name and page count.
Click something under the Download PDF column to download a PDF invoice.

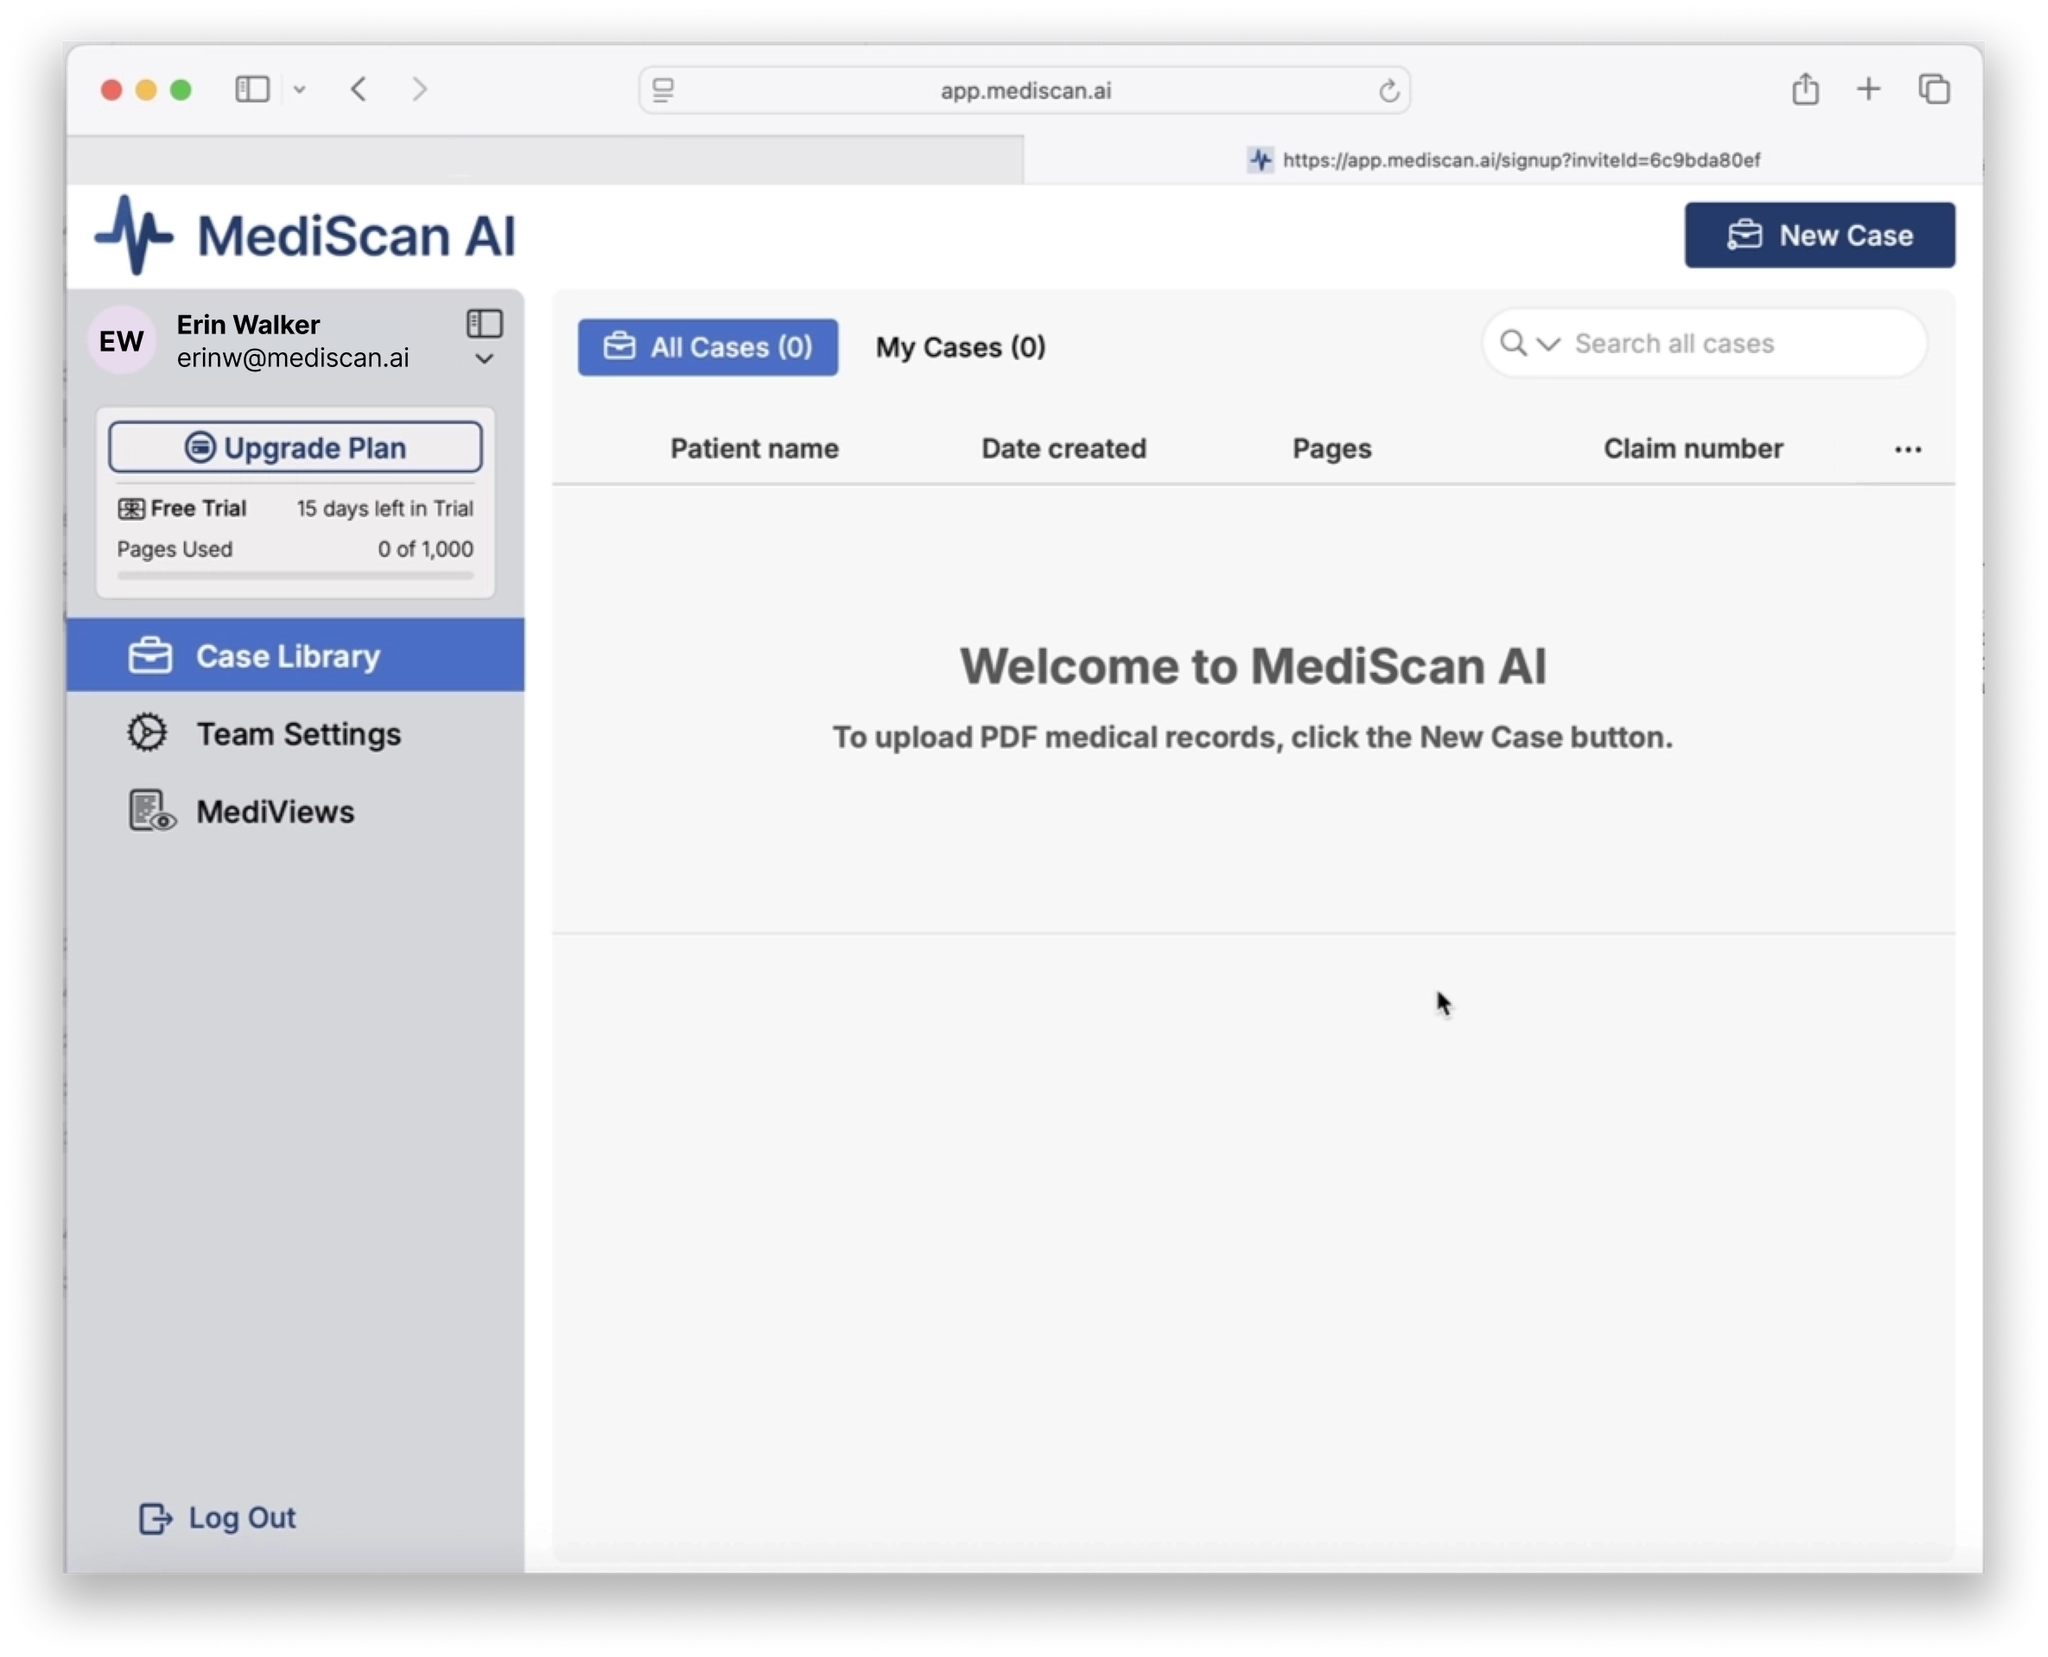
Case Library
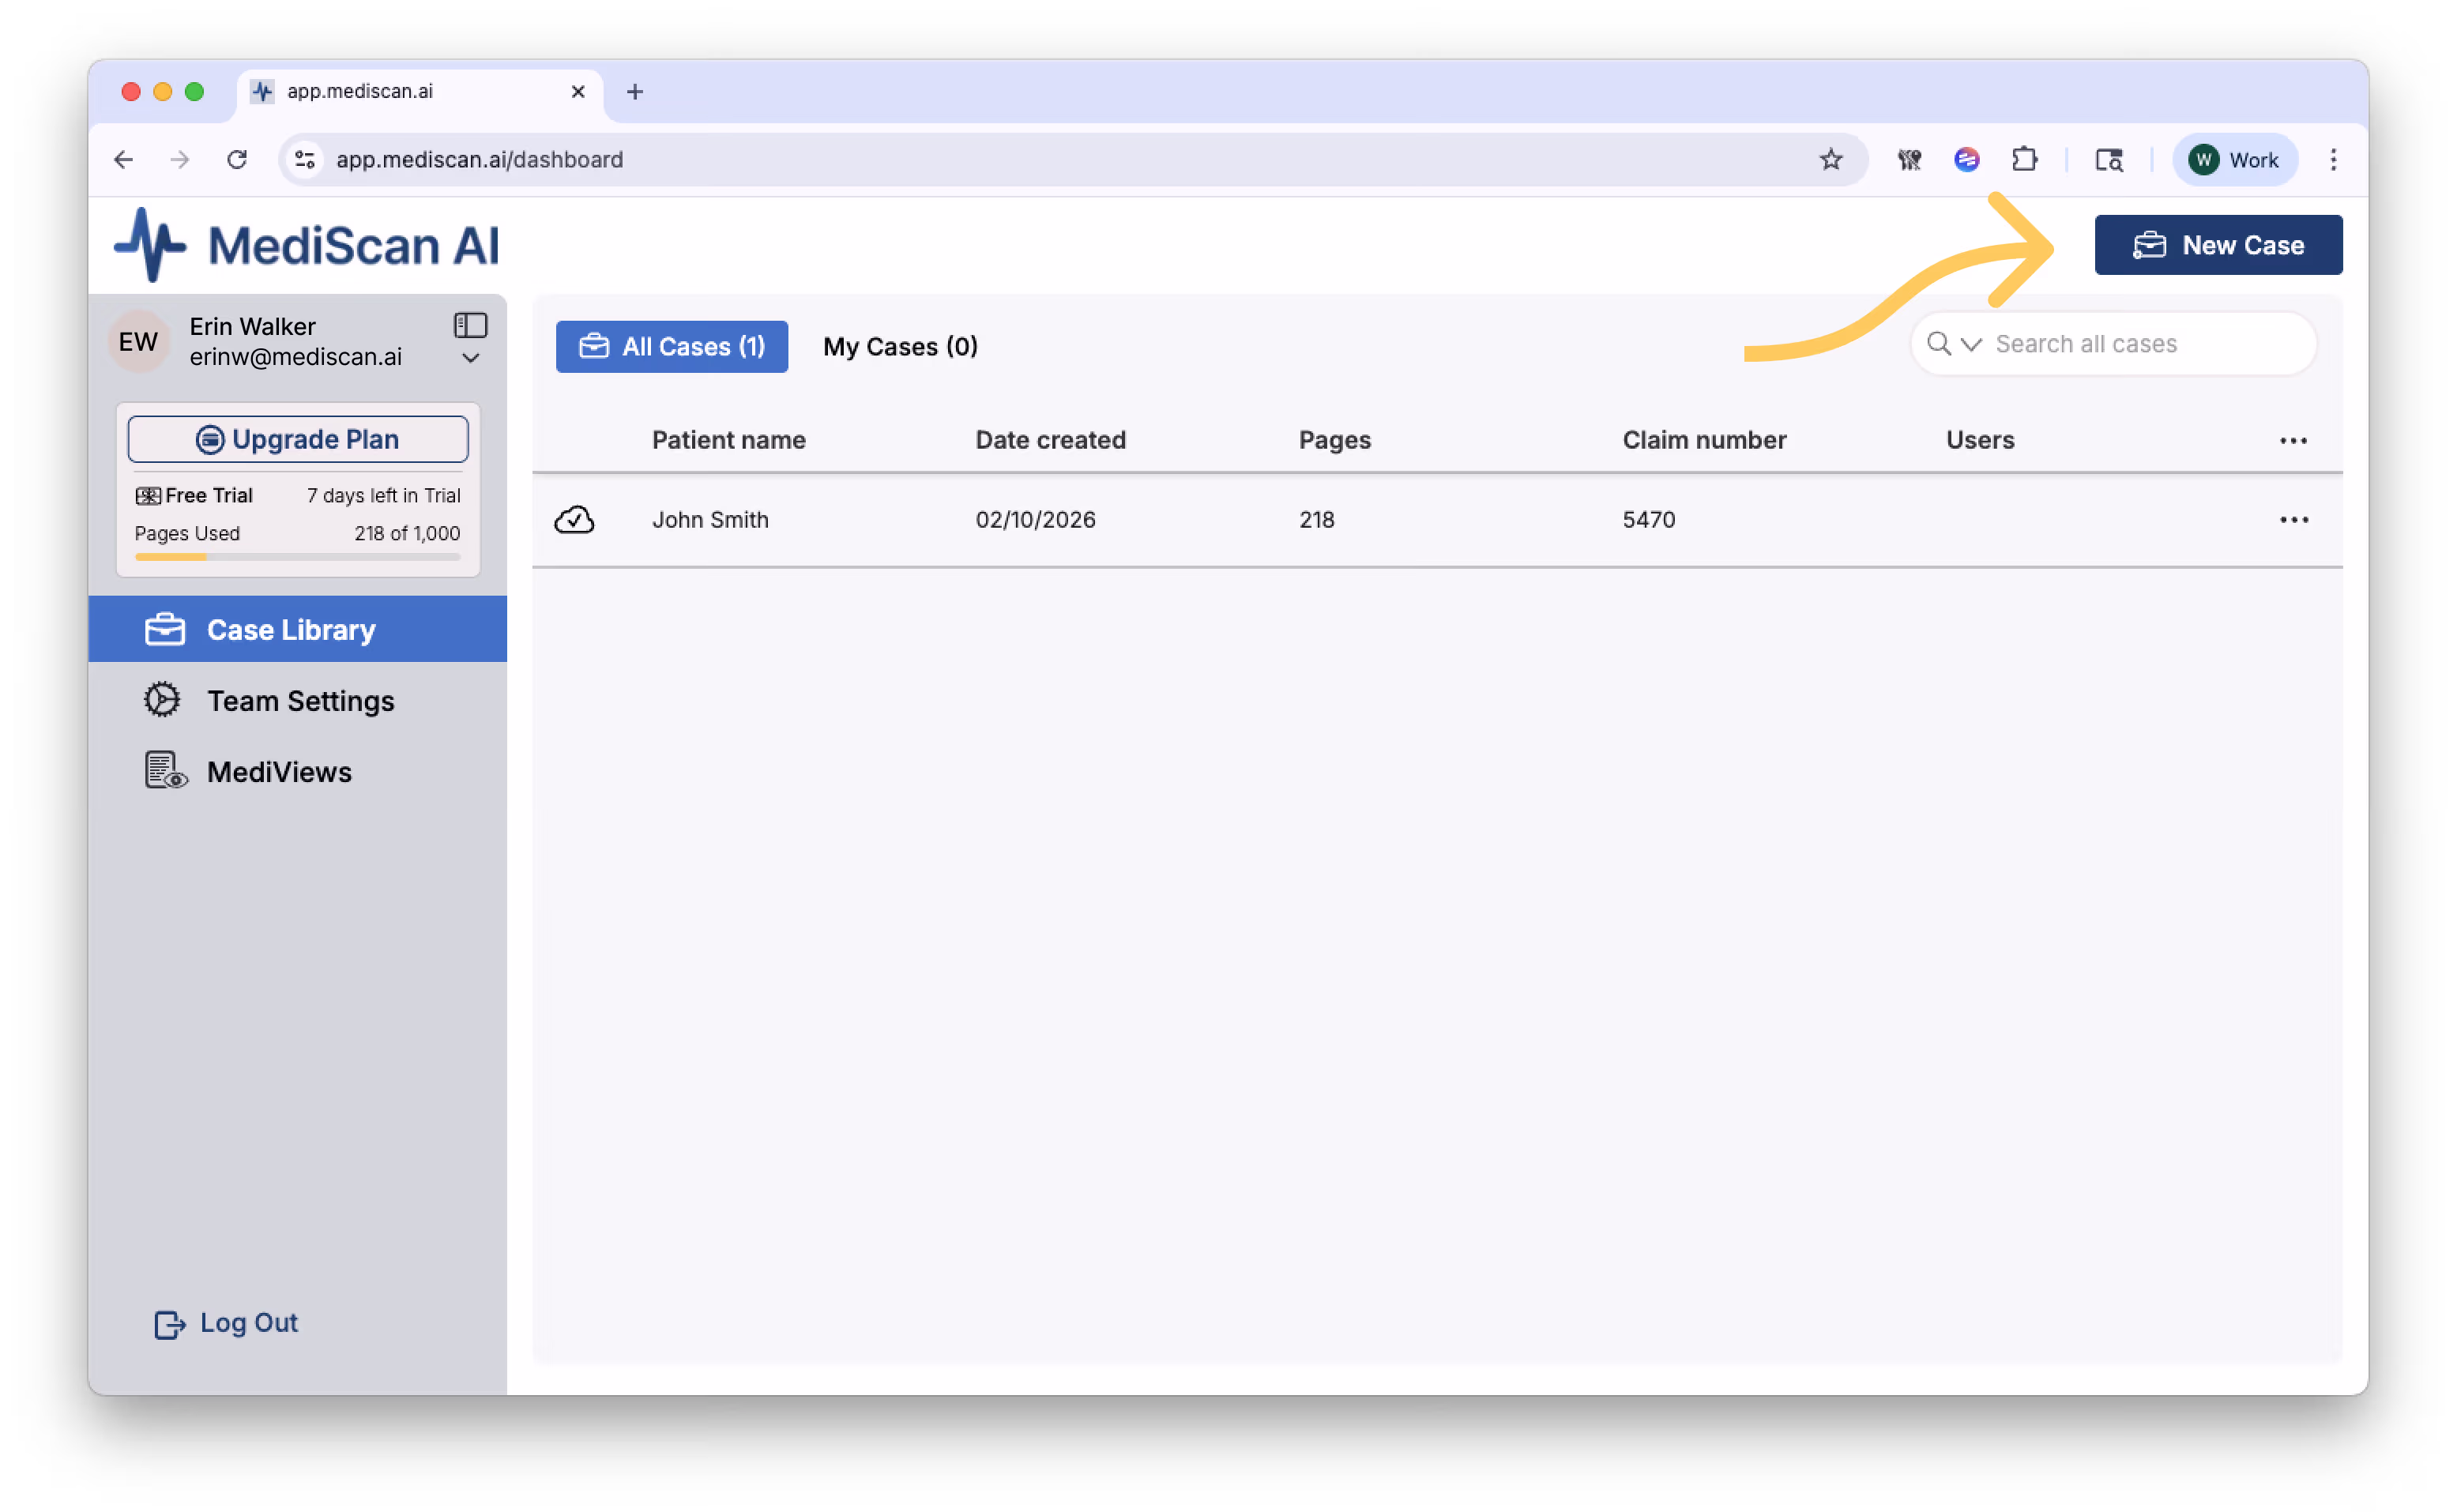
The Case Library serves as your home base in MediScan AI. This is where you manage your entire portfolio of cases and quickly access the information you need.
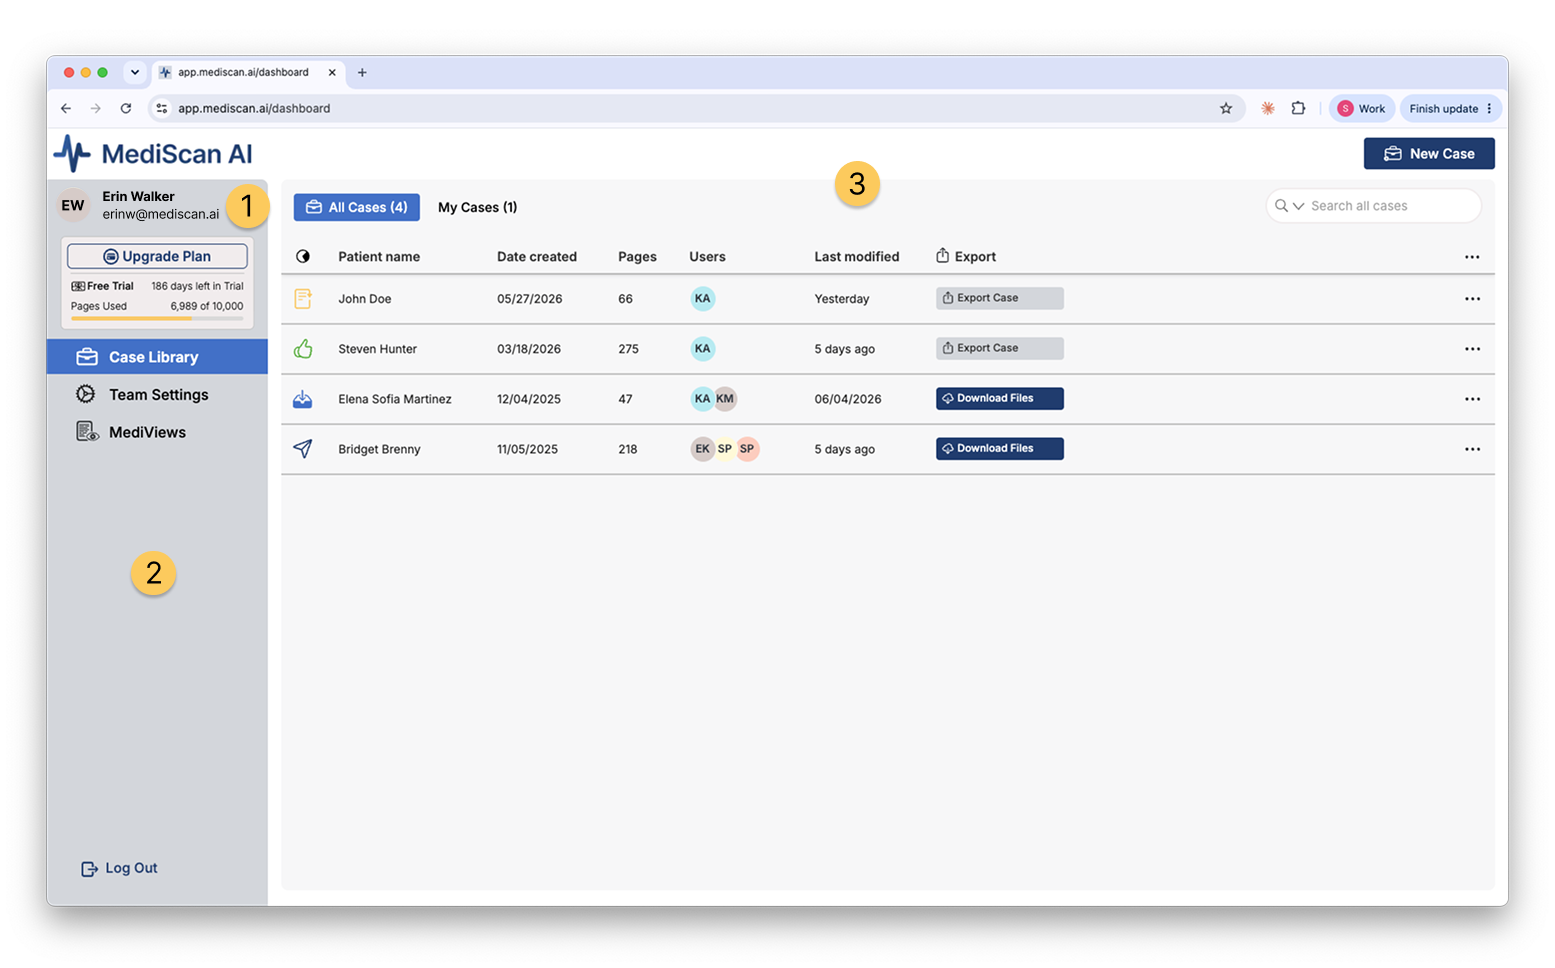
1. User Profile and Account Management
At the top of the left sidebar, you'll see your profile section displaying your avatar or initials, full name, and email address. Click the dropdown arrow to Invite Team members or Guests to your team in order to collaborate.
Directly below your profile, the "Modify Plan" button provides quick access to subscription management. Your current plan type and remaining days are clearly displayed, along with a visual indicator showing your page usage allocation. This helps you monitor your document processing capacity and upgrade when needed.
2. Navigation Sidebar
The left sidebar contains three main navigation options:
Case Library is your primary workspace for viewing and managing all cases. This view gives you a comprehensive table of every case in your organization, with filtering and search capabilities to quickly locate specific patients or claims.
Team Settings allows administrators to manage team members, configure case viewing options, understand invites.
MediViews is where you specify how you want to view your cases. It’s a fully customizable way to specify the record types your record review includes, show or hide specific record fields, plus how records are grouped and sorted. MediView presets are available to your whole team so you can work consistently with the data you need to see.
3. Managing Your Case List
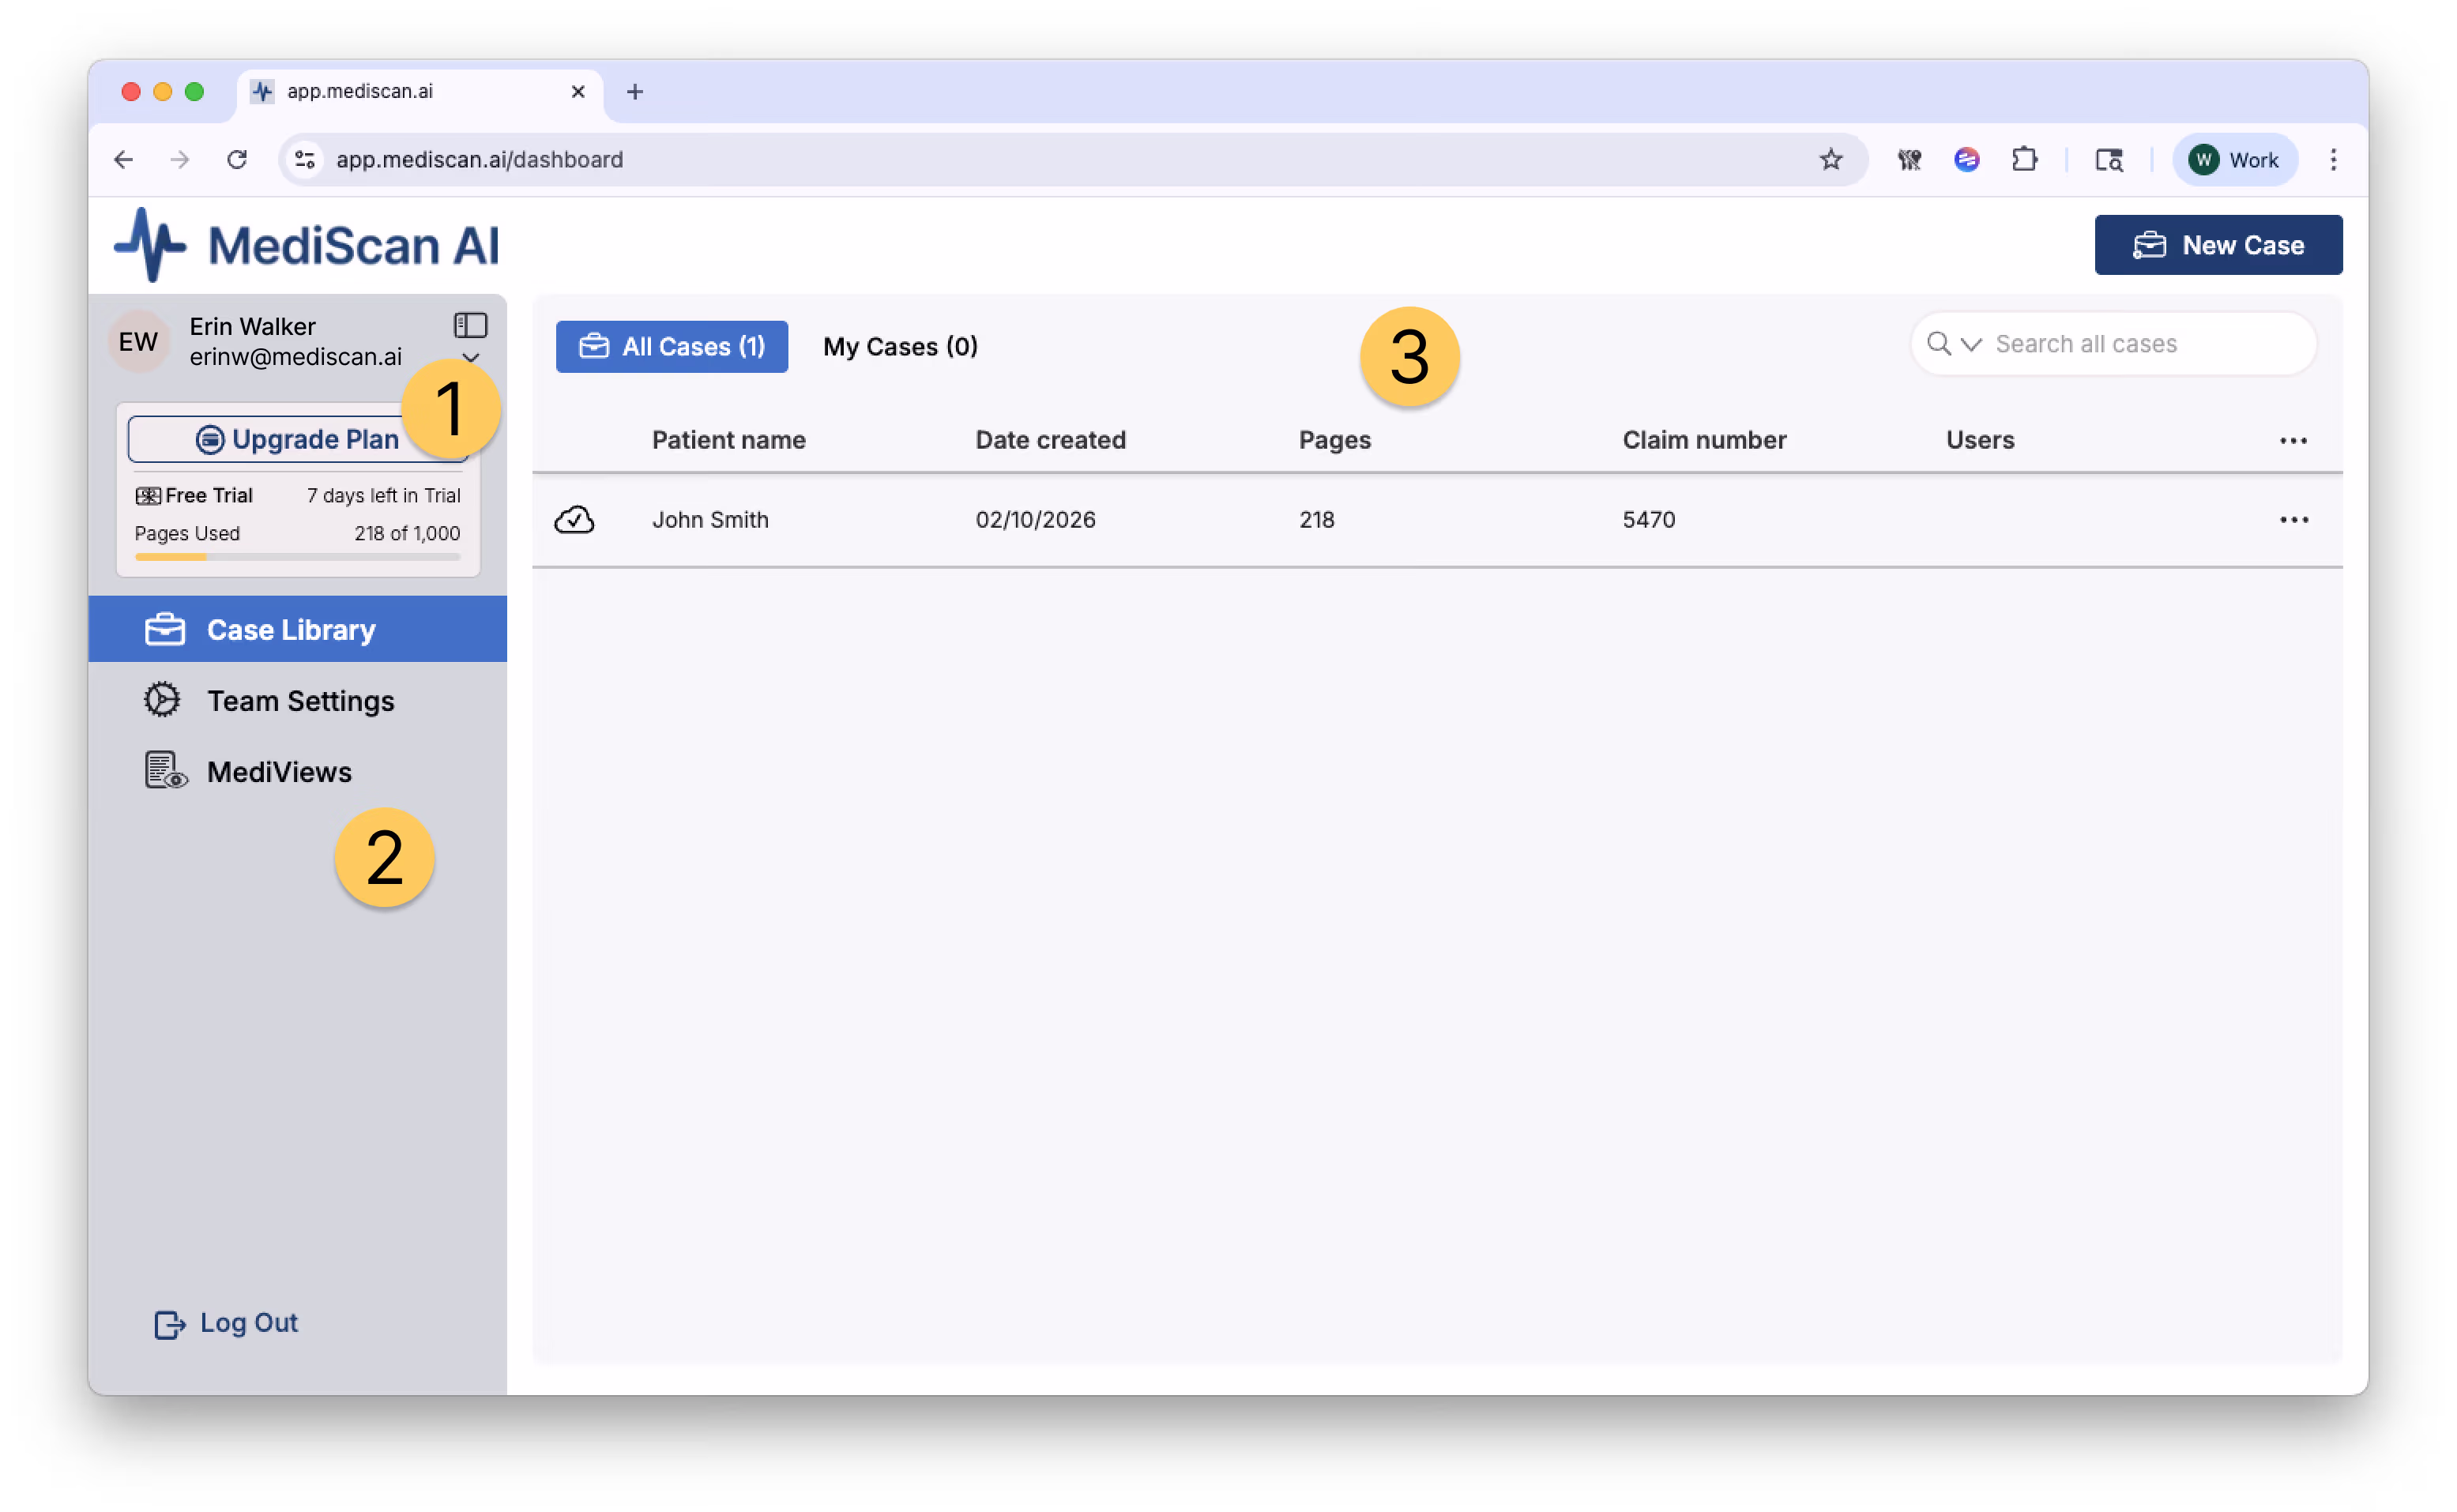
The main content area displays your cases in a searchable, sortable table. At the top, you'll find two tabs: "All Cases" shows every case in your team with a total count, while "My Cases" filters to display only the cases you’ve been added to.
The search bar in the upper right lets you quickly find cases by patient name, user, or other identifying information. Simply type your search term and the list updates in real-time.
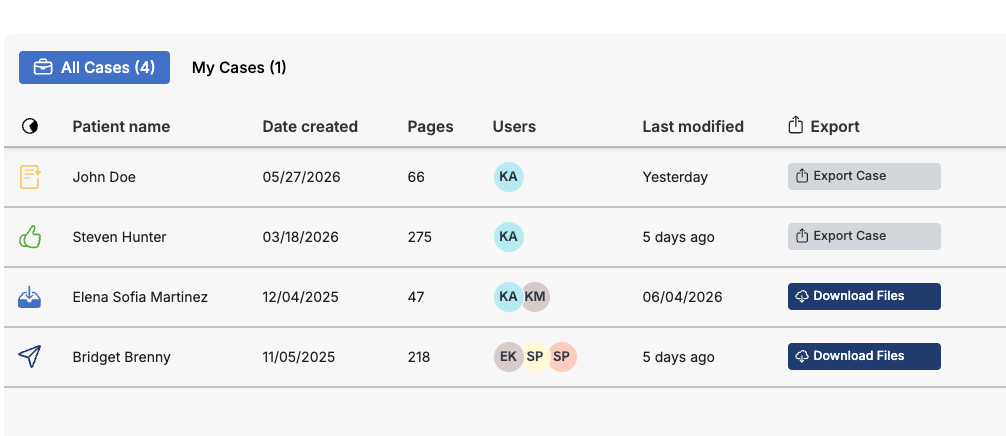
Each row in the case table represents a single patient case and displays essential information at a glance:
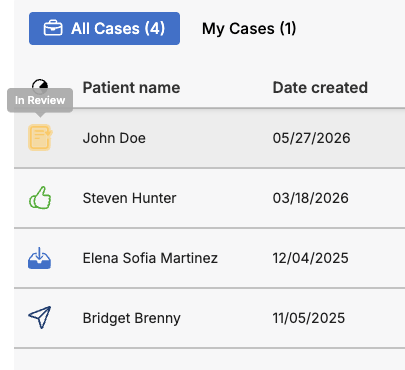
The icon at the start of each row indicates the sync status of that case, ensuring you know which cases have their documents fully uploaded and processed. Hover your cursor over the icon to see a tooltip describing the status. MediScan's current statuses are In Review (a document icon), QA Approved (a thumbs up icon), "Ready for Review" (an arrow pointing down into a paper tray icon ), or lastly "Delivered" (a paper airplane icon).
The patient name serves as the primary case identifier and can be edited by clicking on, and then holding the mouse button down.
To open any case, double click anywhere in the patient row
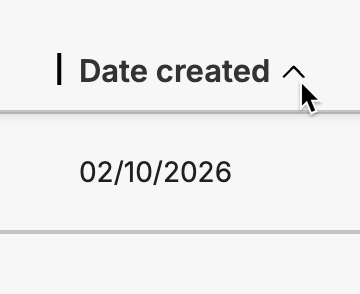
The Date Created column shows when the case was created in MediScan AI, helping you track case age and prioritize newer or older cases.
The Pages column displays the total number of document pages associated with the case, giving you a sense of the record volume before you open it.
The Users column displays which users are assigned to the case, enabling team coordination and workload visibility.
The Last Modified column displays when the case was last edited or changed.
The Export Column allows you to export the case or download files directly from the case library.
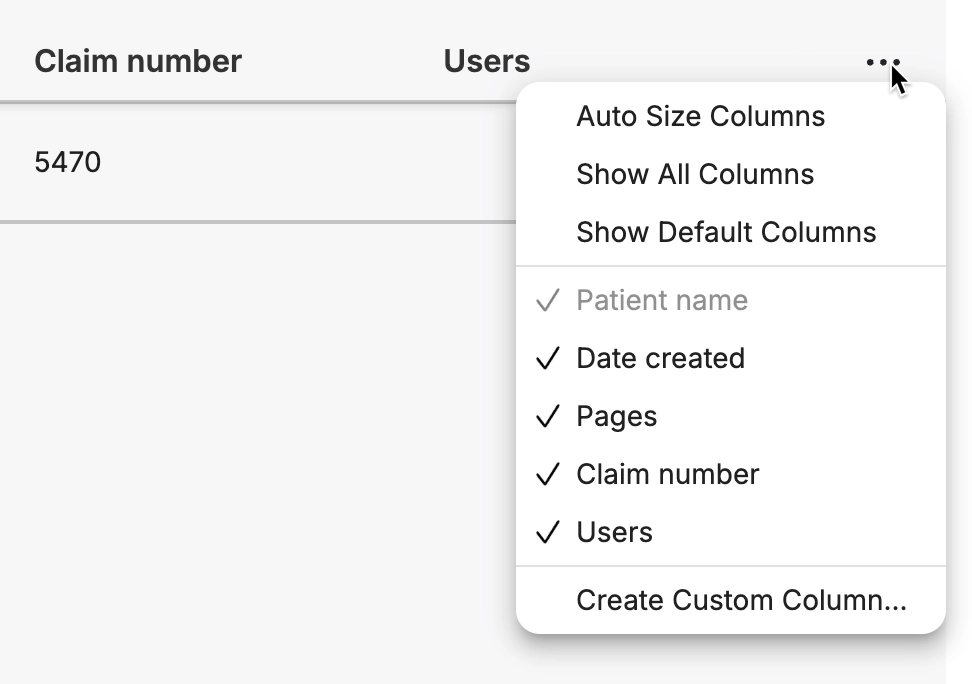
Additional columns can be added and customized and resized to your liking. To create a custom column, click the ••• menu on the right end of the column headers.
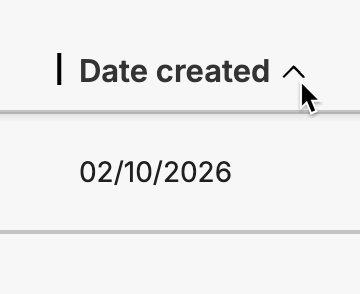
To sort by Patient name, Date Created or Page count, you can click on the carat next to the Column label.
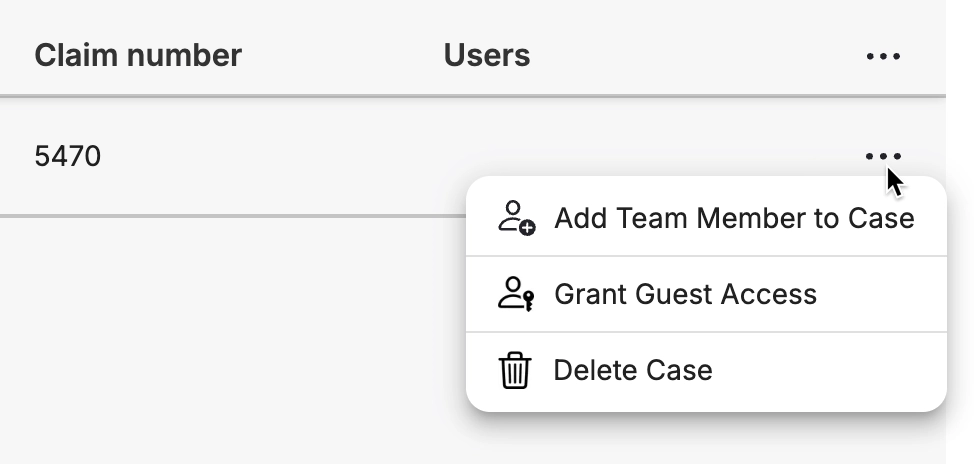
At the end of each row, the ••• menu icon reveals additional actions:
- Add Team Member
- Invite a Guest
- Mark as QA approved
- Delete Case
Welcome to MediScan AI
MediScan AI is a medical records management platform built for medical-legal professionals, healthcare providers, and insurance organizations. It solves a specific problem: medical records are voluminous, disorganized, and time-consuming to review. MediScan AI gives you the tools to cut through that—organizing documents, surfacing key information, and keeping your team aligned on findings—so you can focus on analysis and decision-making rather than document wrangling.
Whether you're managing a handful of cases or several thousand, MediScan AI keeps everything findable, reviewable, and in sync across your workspace.
Application Layout
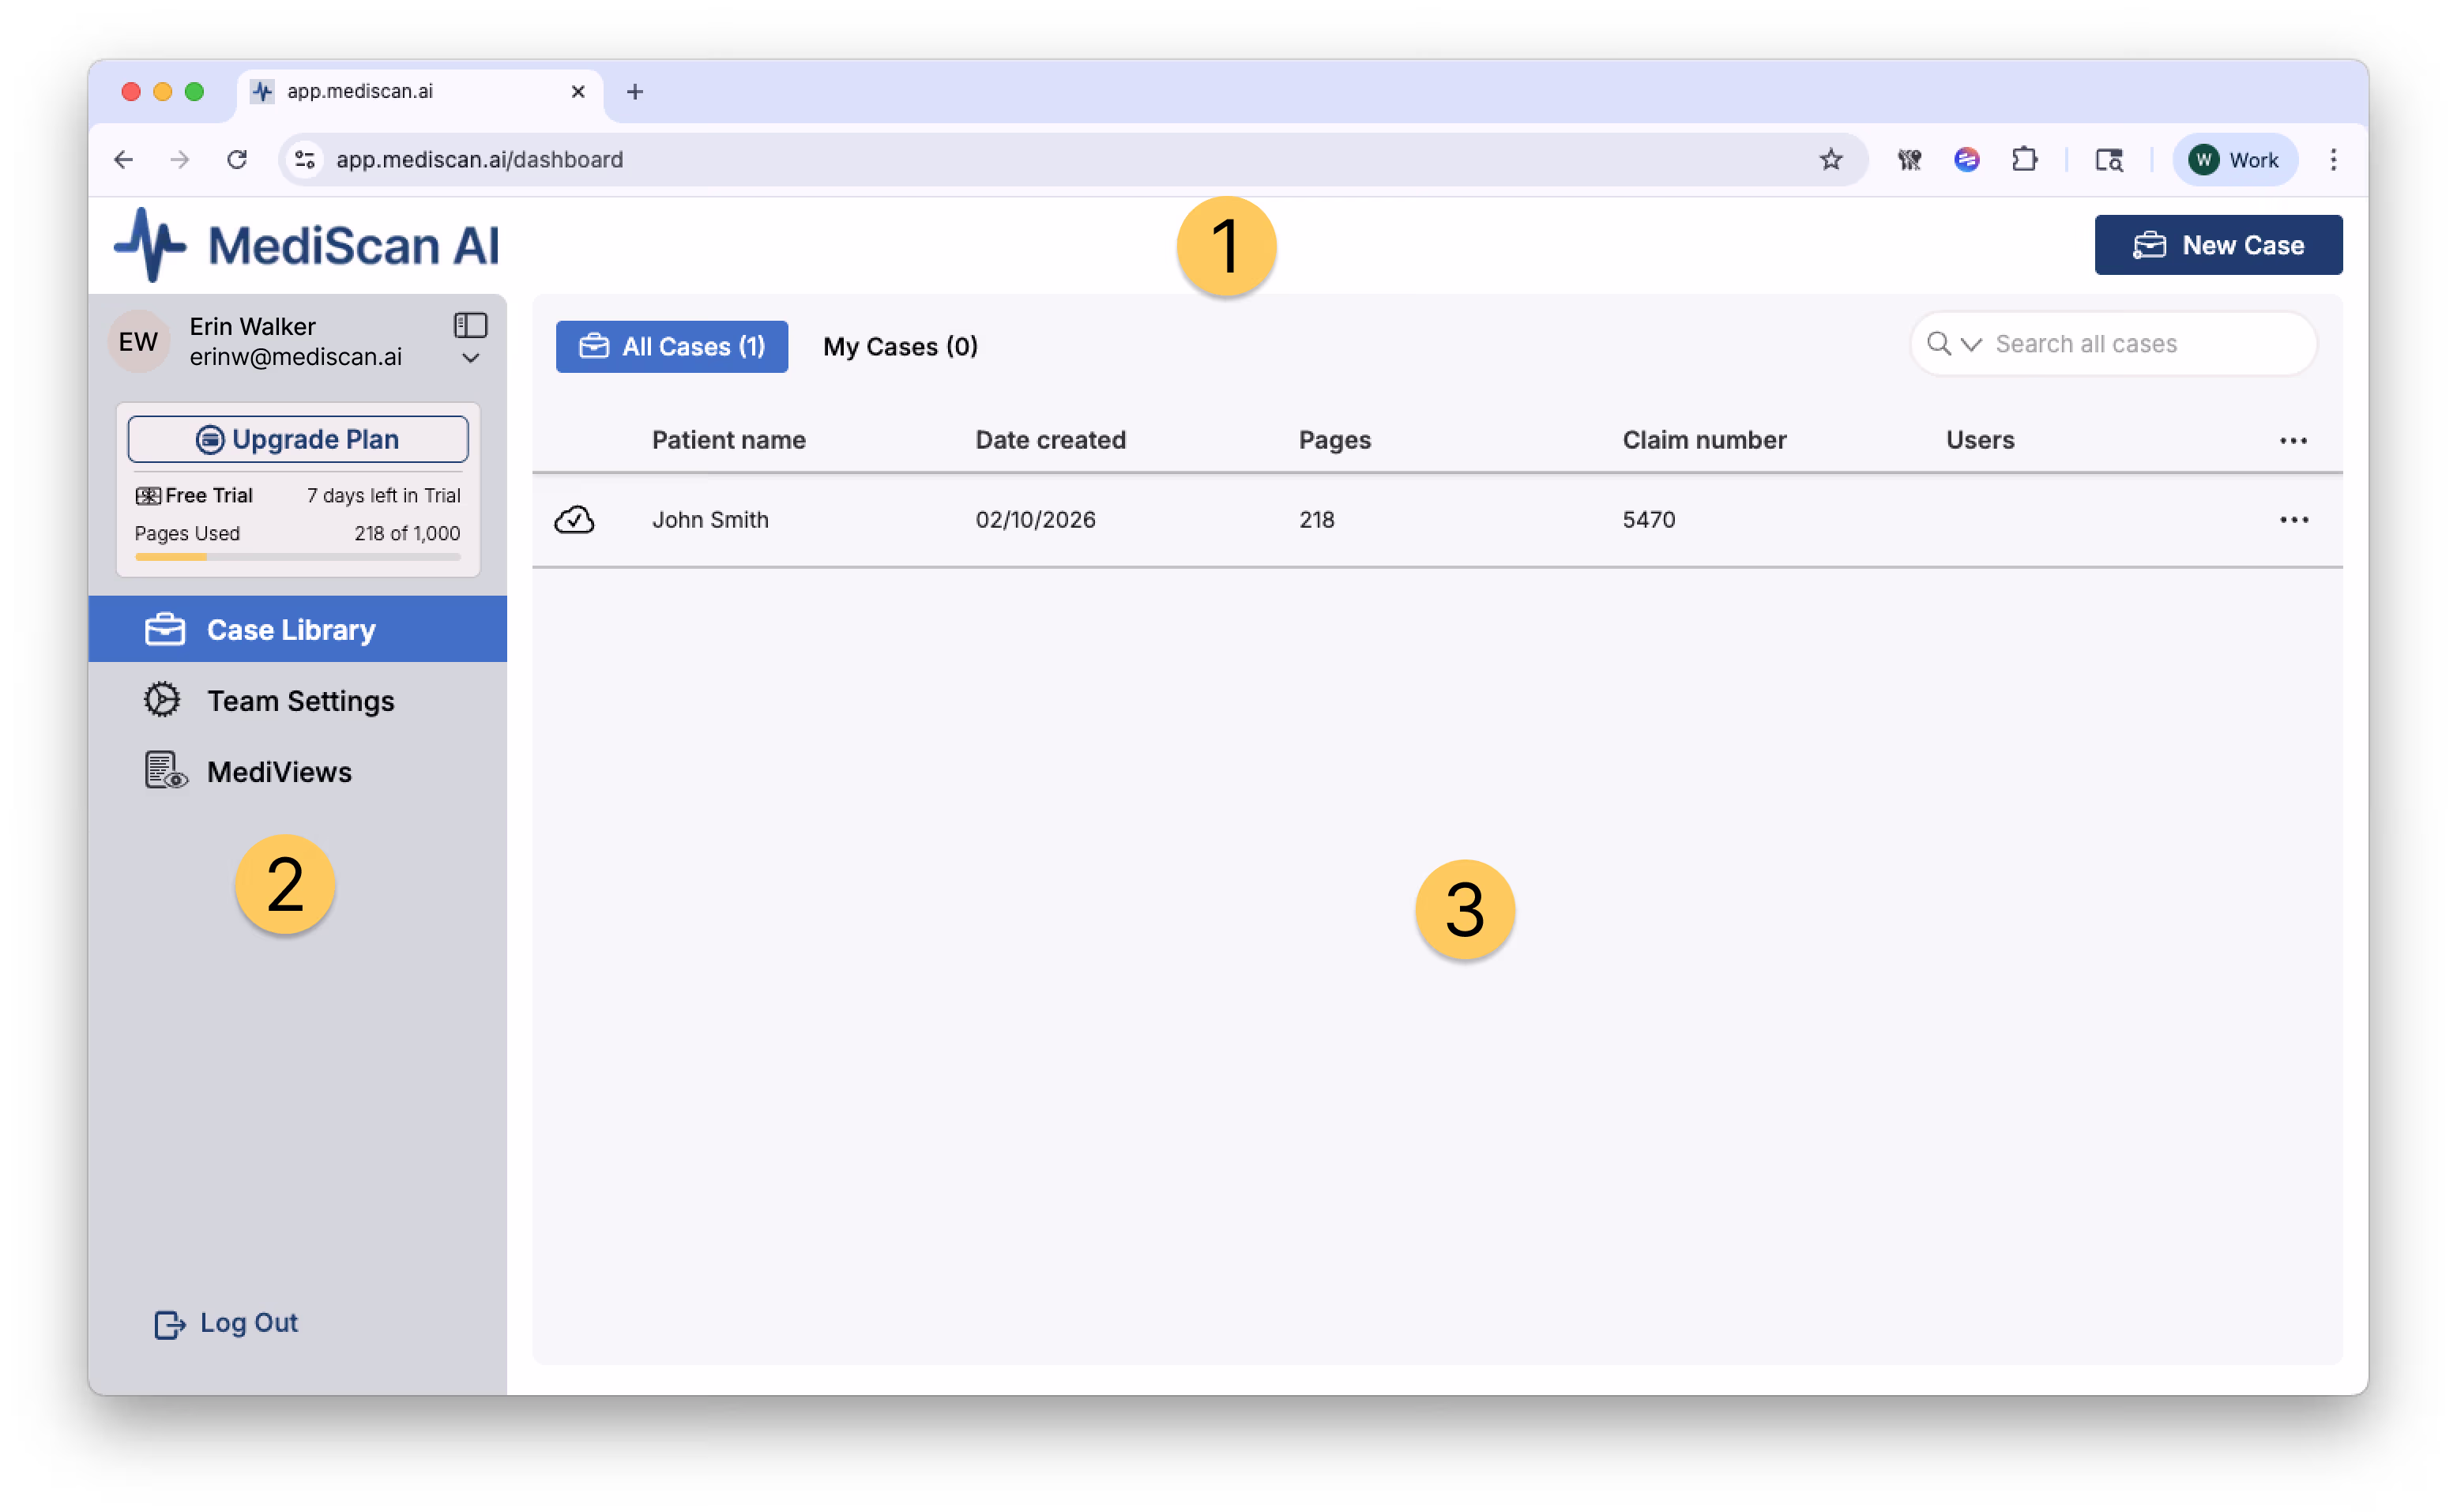
- Global Header spans the top of every screen, providing access to your primary actions. The MediScan AI logo serves as a home button to return to your Case Library, while the right side displays context-specific action buttons like "New Case" or "Export."
- Left Navigation Sidebar persists across all views and on the homepage contains your user profile, subscription information, and main navigation menu.
- Main Content Area occupies the center and right portions of the screen. This area adapts based on your current task—displaying your case library when browsing, or expanding into a multi-pane case page when reviewing a specific case.
Case Library
The Case Library serves as your home base in MediScan AI. This is where you manage your entire portfolio of cases and quickly access the information you need.
1. User Profile and Account Management
At the top of the left sidebar, you'll see your profile section displaying your avatar or initials, full name, and email address. Click the dropdown arrow to Invite Team members or Guests to your team in order to collaborate.
Directly below your profile, the "Modify Plan" button provides quick access to subscription management. Your current plan type and remaining days are clearly displayed, along with a visual indicator showing your page usage allocation. This helps you monitor your document processing capacity and upgrade when needed.
2. Navigation Sidebar
The left sidebar contains three main navigation options:
Case Library is your primary workspace for viewing and managing all cases. This view gives you a comprehensive table of every case in your organization, with filtering and search capabilities to quickly locate specific patients or claims.
Team Settings allows administrators to manage team members, configure case viewing options, understand invites.
MediViews is where you specify how you want to view your cases. It’s a fully customizable way to specify the record types your record review includes, show or hide specific record fields, plus how records are grouped and sorted. MediView presets are available to your whole team so you can work consistently with the data you need to see.
3. Managing Your Case List
The main content area displays your cases in a searchable, sortable table. At the top, you'll find two tabs: "All Cases" shows every case in your team with a total count, while "My Cases" filters to display only the cases you’ve been added to.

The search bar in the upper right lets you quickly find cases by patient name, user, or other identifying information. Simply type your search term and the list updates in real-time.
Each row in the case table represents a single patient case and displays essential information at a glance:
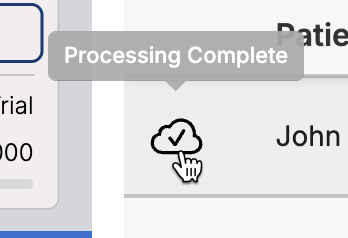
The icon at the start of each row indicates the sync status of that case, ensuring you know which cases have their documents fully uploaded and processed. Hover your cursor over the icon to see a tooltip with describing the status.
The patient name serves as the primary case identifier and can be edited by clicking on in and then holding the mouse button down.
To open any case, double click anywhere in the patient row
The Date Created column shows when the case was created in MediScan AI, helping you track case age and prioritize newer or older cases.
The Pages column displays the total number of document pages associated with the case, giving you a sense of the record volume before you open it.
Each case includes a Claim Number for insurance tracking and billing purposes.
The Users column displays which users are assigned to the case, enabling team coordination and workload visibility.
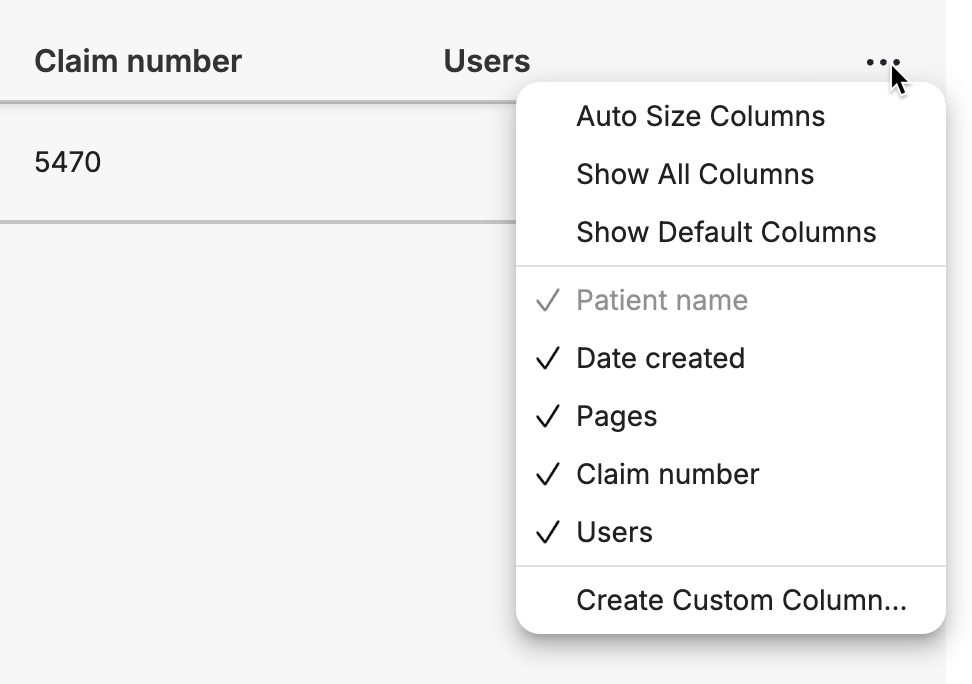
Additional columns can be added and customized and resized to your liking. To create a custom column, click the ••• menu on the right end of the column headers.
To sort by Patient name, Date Created or Page count, you can click on the carat next to the Column label.
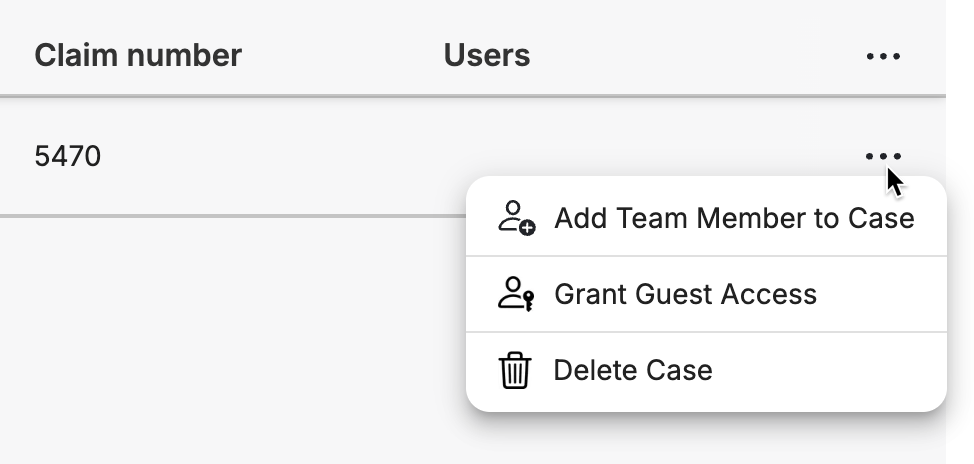
At the end of each row, the ••• menu icon reveals additional actions:
Add Team Member
Invite a Guest
Mark as QA approved
Delete Case
Team Settings
Team Settings in the left sidebar to manage your organization's users, permissions, and shared settings. Return to your case work by clicking "Case Library."
MediViews
MediViews are saved configurations that control how your cases appear in MediScan AI. You decide which record types to include, which fields to show or hide, and how records are grouped and sorted. Once set up, MediViews are shared across your team—so everyone's working from the same consistent view of the data that matters to them.
Create a New Case
The "New Case" button in the global header is your starting point for adding cases to the system. This button is prominently displayed and accessible from the Home Screen only.
Case Page
When you double click on a row in the Case Library, you enter the Case Page.

1. Case Context Bar
The top bar displays the current case’s patient name with a dropdown arrow. This dropdown lets you quickly switch between cases without returning to the Case Library, streamlining your workflow when reviewing multiple related cases or moving through your task list.
Two action buttons on the right provide key functionality: Add Files lets you upload additional medical records or documentation to the current case, while Export allows you to generate reports or download case data in various formats.

2. MediChat Assistant
The MediChat panel appears in the left sidebar offering AI-powered assistance for your case review. You can ask MediChat questions about the medical records, request summaries of specific conditions or treatments, or get help understanding complex medical documentation. The assistant analyzes the documents in your current case to provide contextual, accurate responses.
The MediChat interface can be expanded or collapsed as needed to maximize your MediChat results.
3. Source Viewer (Left Pane)
The left pane serves as your primary document viewer. At the top, a dropdown menu labeled lets you specify if the viewer is showing selected Records only all of your Source Files.
When Selected Records Only is chosen in the dropdown menu, the Source Viewer will always load the pages from the record in the right hand panel. The title of the Record is shown in the top bar.

When you choose Source files, the entire source file is loaded into the Viewer and the records that are selected are scrolled to within each file. You can see the name of the file in the bar and switch to another file by clicking on the dropdown to load a different file into the viewer.

On the right side of the viewer, you'll find a comprehensive set of viewing controls. These tools allow you to
- navigate between pages
- zoom in and out
- zoom in for detailed examination of text or images
- switch to a thumbnail grid view to scan multiple pages quickly
- go into Organize mode where you can manage how your records are split and created.
Learn more about Organize mode here
4. Case Panel (Right Pane)
The Case Panel organizes all records and information related to the case through three tabs: Records, Overview, and Files.
Records Tab (1)
When the Records tab is active, you see a chronological timeline of all medical records in the case.
Each record entry displays a MediScan AI generated summary based on your MediView settings.
The top bar of each Summary includes a badge that indicates the record type (2), date of the visit (3), followed by the title of the record. You can also choose to include the author, the facility and the specialty.
Below this header information, the system displays a summary including data fields like History of Present Illness, Chief Complaint, Diagnosis, Treatment plan, and Work History or Work Status information (4). This intelligent extraction means you can often gather the key facts from a medical record without needing to open and read the full document. Each Record Type will display a different set of fields that are specific to that record type.
A page count indicator (5) shows the length of each record, and denotes if the record spans different files.
The ••• menu at the right of the header contains more action options including the ability to collapse, organize and edit the content (6).
Within the Records Tab there are numerous controls under the View menu that help you sort and filter and find or focus on specific record types and more
- View menu
- Grouping
- Sorting
- Filtering
- MediViews
Overview Tab
The Overview tab provides a high-level summary of the entire case, integrating the information from all records to give you a complete picture of the patient's medical journey, claim status, and case progress.
Files Tab
The Files tab offers a document management interface where you can download the original case files that were uploaded (1), see the date each file was uploaded, and see how many duplicates exist per file.
Exports are also listed in the files tab and are downloaded from here (2).
Navigation Patterns
Moving efficiently through MediScan AI becomes intuitive once you understand a few key navigation patterns.
Returning to the Case Library: Click the MediScan AI logo in the top left corner from any screen to return to your case library. Alternatively, use the patient dropdown menu and choose to Browse all Cases.
Switching Between Cases: When you're in a case detail view, use the patient name dropdown in the top bar to jump directly to another case without returning to the library. This is especially useful when working through a list of related cases or following up on multiple patients in sequence. To get to another case, go back home and open another case.
Moving Between Records: Within a case, use the Records
Moving Between Files
Common Actions
Searching for a Case
Use the search bar in the top right corner of the Case Library to find specific cases. You can search by patient name, claim number, or other identifying information. The search updates dynamically as you type, instantly filtering your case list. You can change the filter options in the search bar to ONLY search users or patients if you want to focus your search.
Opening a Case
DBL Click on any patient row in the Case Library table to open that case's detail view. The case will open with the most recently viewed or most relevant document displayed.
Adding Files to a Case
While viewing a case, click the "Add Files" button in the top right corner. This opens a file upload dialog where you can select documents from your computer to add to the case. Uploaded documents are automatically processed and added your list of uploaded Files. When new Files are uploaded, MediScan AI will run a new summarization process to look for duplicates across files, find records that span files etc.
Exporting Reports
Click the "Export" button in the case header to generate reports or download case information. You'll be able to select the format and content to include in your export.
What are the Options here…..
Using MediChat
Type a question into the MediChat input field in the left sidebar. MediChat can help you locate specific information in the medical records, explain medical terminology, summarize treatments, or answer questions about the case timeline. Your questions and MediChat's responses remain associated with the case for future reference.
Viewing Record Details
In the Records panel, click on any record entry to display that document in the main viewer. Click the expand icon on a record to see the full extracted medical summary without opening the document.
Filtering Cases
Use the "All Cases" and "My Cases" tabs to switch between viewing your entire organization's case library and just the cases assigned to you. This helps you focus on your specific workload while maintaining visibility into team activity when needed.
Managing Your Subscription
Click "Modify Plan" in the left sidebar to adjust your subscription level, add more page capacity, or manage billing information. Your current usage is displayed visually to help you understand when you might need additional capacity.
This Application Overview provides the foundation for understanding MediScan AI's interface and core functionality. For detailed information about specific features and step-by-step workflows, refer to the Features and Workflows sections of this user guide.